Sticky Honey Garlic Chicken Thighs: A 30-Minute Recipe
This Honey Garlic Chicken Thighs recipe delivers that perfect sticky, sweet, and savory glaze clinging to incredibly juicy chicken. We achieve deep flavor with simple pantry staples and a foolproof pan-searing technique that guarantees a beautiful crust. It’s one of my go-to easy weeknight dinner recipes for a reason.
Why This Method Works
This isn’t just another chicken recipe; it’s an engineered approach for maximum flavor in minimum time.
- Chicken Thighs are Key: We use boneless, skinless chicken thighs because they are more forgiving than breasts. Their higher fat content ensures they stay moist and tender, even with the high heat needed for a good sear.
- Two-Stage Sauce Process: The garlic is added after the initial sear. This prevents it from burning and turning bitter, a common failure point. The sauce is then built in the same pan, scraping up the browned bits (fond) for a massive flavor boost.
- The Power of Cornstarch: A simple cornstarch slurry is the secret to a glaze that actually clings to the chicken, rather than a watery sauce that pools at the bottom of the plate. It thickens the sauce in seconds.
The Science of the Perfect Glaze
Every ingredient in the sauce serves a specific function. Understanding them is key to mastering the dish.
- Honey: Provides sweetness and, crucially, the sugars needed for caramelization. This helps the sauce thicken and develop its signature sticky texture and deep brown color.
- Soy Sauce: This is the source of our savory, umami backbone. It provides the salt content and a complex, fermented depth that balances the honey’s sweetness.
- Garlic & Ginger: These are our primary aromatics. Minced fresh garlic provides a pungent, sharp flavor, while ginger adds a warm, zesty spice that cuts through the richness.
- Apple Cider Vinegar: A small amount of acid is essential. It brightens the entire dish, preventing the sweet and savory notes from tasting flat or overly heavy.
Pro Tips for Flawless Execution
Follow these guidelines to elevate your chicken from good to great.
- Pat Your Chicken Dry: Moisture is the enemy of a good sear. Use paper towels to pat the thighs completely dry before seasoning. This ensures the chicken sizzles and browns, rather than steams.
- Don’t Crowd the Pan: Use a skillet large enough to hold the chicken in a single layer without overlapping. If your pan is too small, cook in two batches. Crowding lowers the pan’s temperature, leading to gray, rubbery chicken.
- Control Your Heat: Start with medium-high heat for the sear. Once you add the garlic and sauce ingredients, immediately lower the heat to medium-low to prevent the honey and garlic from scorching.
- Let it Rest: While not as critical as with a steak, letting the chicken rest for 2-3 minutes before serving allows the juices to redistribute, ensuring every bite is succulent. For more inspiration, you can browse all my favorite recipes here.
Serving & Pairing Guide
This versatile dish pairs well with a variety of sides to make it a complete meal.
- Carbohydrates:
- Steamed Jasmine Rice: The classic choice. Its fluffy texture is perfect for soaking up extra glaze.
- Quinoa: A great, higher-protein alternative.
- Garlic Noodles: Double down on the flavor for a truly indulgent meal.
- Vegetables:
- Steamed Broccoli or Green Beans: A simple, healthy side that provides a fresh crunch.
- Roasted Asparagus: The earthy flavor of asparagus is a fantastic complement to the sweet sauce.
- A Crisp Salad: To balance the richness of the chicken, a simple green salad with a light vinaigrette works wonders. For a more adventurous pairing, a fresh side like this Thai mango chicken salad offers a bright, tangy contrast.
Step-by-Step Instructions
Prep Time: 10 mins
Cook Time: 20 mins
Total Time: 30 mins
- Prep the Chicken: Pat the boneless, skinless chicken thighs completely dry with paper towels. Season both sides generously with salt and black pepper.
- Mix the Sauce: In a small bowl, whisk together the soy sauce, honey, minced garlic, grated ginger, and apple cider vinegar. In a separate, even smaller bowl, mix the cornstarch and cold water to create a slurry. Set both aside.
- Sear the Chicken: Heat the olive oil in a large skillet or cast-iron pan over medium-high heat. Once shimmering, carefully place the chicken thighs in the pan, presentation-side down. Sear for 5-7 minutes without moving them, until a deep golden-brown crust forms.
- Flip and Cook: Flip the chicken thighs. Continue to cook for another 5-7 minutes, or until cooked through and the internal temperature reaches 165°F (74°C). Remove the chicken from the skillet and set aside on a plate.
- Build the Glaze: Reduce the heat to low. Add the honey-soy sauce mixture to the hot skillet, scraping up any browned bits from the bottom of the pan with a wooden spoon.
- Thicken the Sauce: Bring the sauce to a gentle simmer. Whisk in the cornstarch slurry. Continue to simmer for 1-2 minutes, stirring constantly, until the sauce has thickened into a beautiful glaze that coats the back of a spoon.
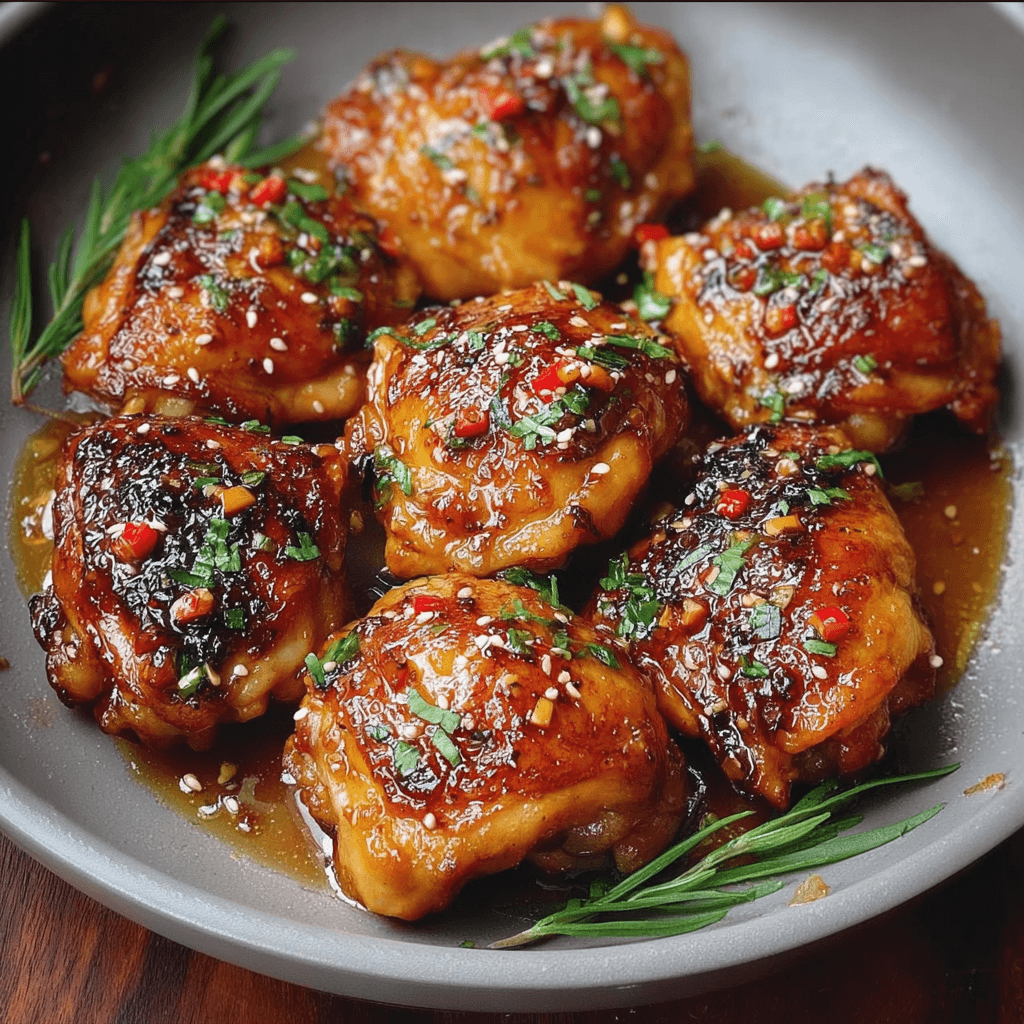
- Combine and Serve: Return the cooked chicken thighs to the pan. Spoon the glaze over each piece, tossing to coat them thoroughly. Garnish with sesame seeds and sliced green onions. Serve immediately. And for a perfect dessert pairing, consider something decadent like these Nutella cheesecake bars.
COMMON MISTAKES TO AVOID
Mistake: Burnt Garlic. Adding minced garlic to a ripping hot pan with the chicken will scorch it, creating a bitter taste that ruins the dish.
Fix: Add the garlic with the liquid sauce ingredients after the chicken is cooked and the heat is lowered. This allows its flavor to infuse the sauce without burning.
Mistake: Watery, Thin Sauce. Simply pouring the sauce ingredients in the pan without a thickener will result in a runny liquid, not a sticky glaze.
Fix: Always use a cornstarch slurry. Mix cornstarch with cold water before adding it to the simmering sauce to ensure it dissolves lump-free and thickens properly.
Mistake: Steamed, Not Seared, Chicken. Overcrowding the pan drops the temperature, causing the chicken to release moisture and steam in its own juices instead of developing a brown crust.
Fix: Use a large enough skillet to give each thigh space. If necessary, sear the chicken in two separate batches. The flavor from the crust is non-negotiable.
FAQ
Q: Can I use chicken breasts for this recipe?
A: Yes, but with adjustments. Chicken breasts cook faster and dry out more easily. Slice them into thinner cutlets and reduce the searing time to 3-4 minutes per side. Ensure they reach an internal temperature of 165°F (74°C).
Q: How do I store and reheat leftovers?
A: Store leftovers in an airtight container in the refrigerator for up to 3 days. Reheat gently in a skillet over low heat with a splash of water to loosen the sauce, or in the microwave in 30-second intervals.
Q: Is there a substitute for soy sauce to make this gluten-free?
A: Absolutely. To make this recipe gluten-free, simply substitute the soy sauce with an equal amount of Tamari or coconut aminos.
NUTRITIONAL SNAPSHOT
| Nutrient | Amount per Serving |
|---|---|
| Calories | 410 kcal |
| Protein | 35g |
| Fat | 20g |
| Net Carbs | 21g |
| Fiber | 1g |
| Sugar | 18g |
Estimates are based on one serving, assuming 4 servings per recipe. If you’re looking for other dessert ideas, some home cooks also enjoy simple classics like these chocolate chip muffins.
Sticky Honey Garlic Chicken Thighs: A 30-Minute Recipe
Ingredients
- 1.5 lbs boneless, skinless chicken thighs (about 6-8 thighs)
- 1 tbsp olive oil
- Salt and black pepper to taste
- 1 tbsp sesame seeds
- 2 green onions, sliced
- 1/3 cup honey
- 1/4 cup low-sodium soy sauce (or Tamari for gluten-free)
- 4 cloves garlic, minced
- 1 tsp fresh ginger, grated
- 1 tbsp apple cider vinegar
- 1 tsp cornstarch
- 2 tsp cold water