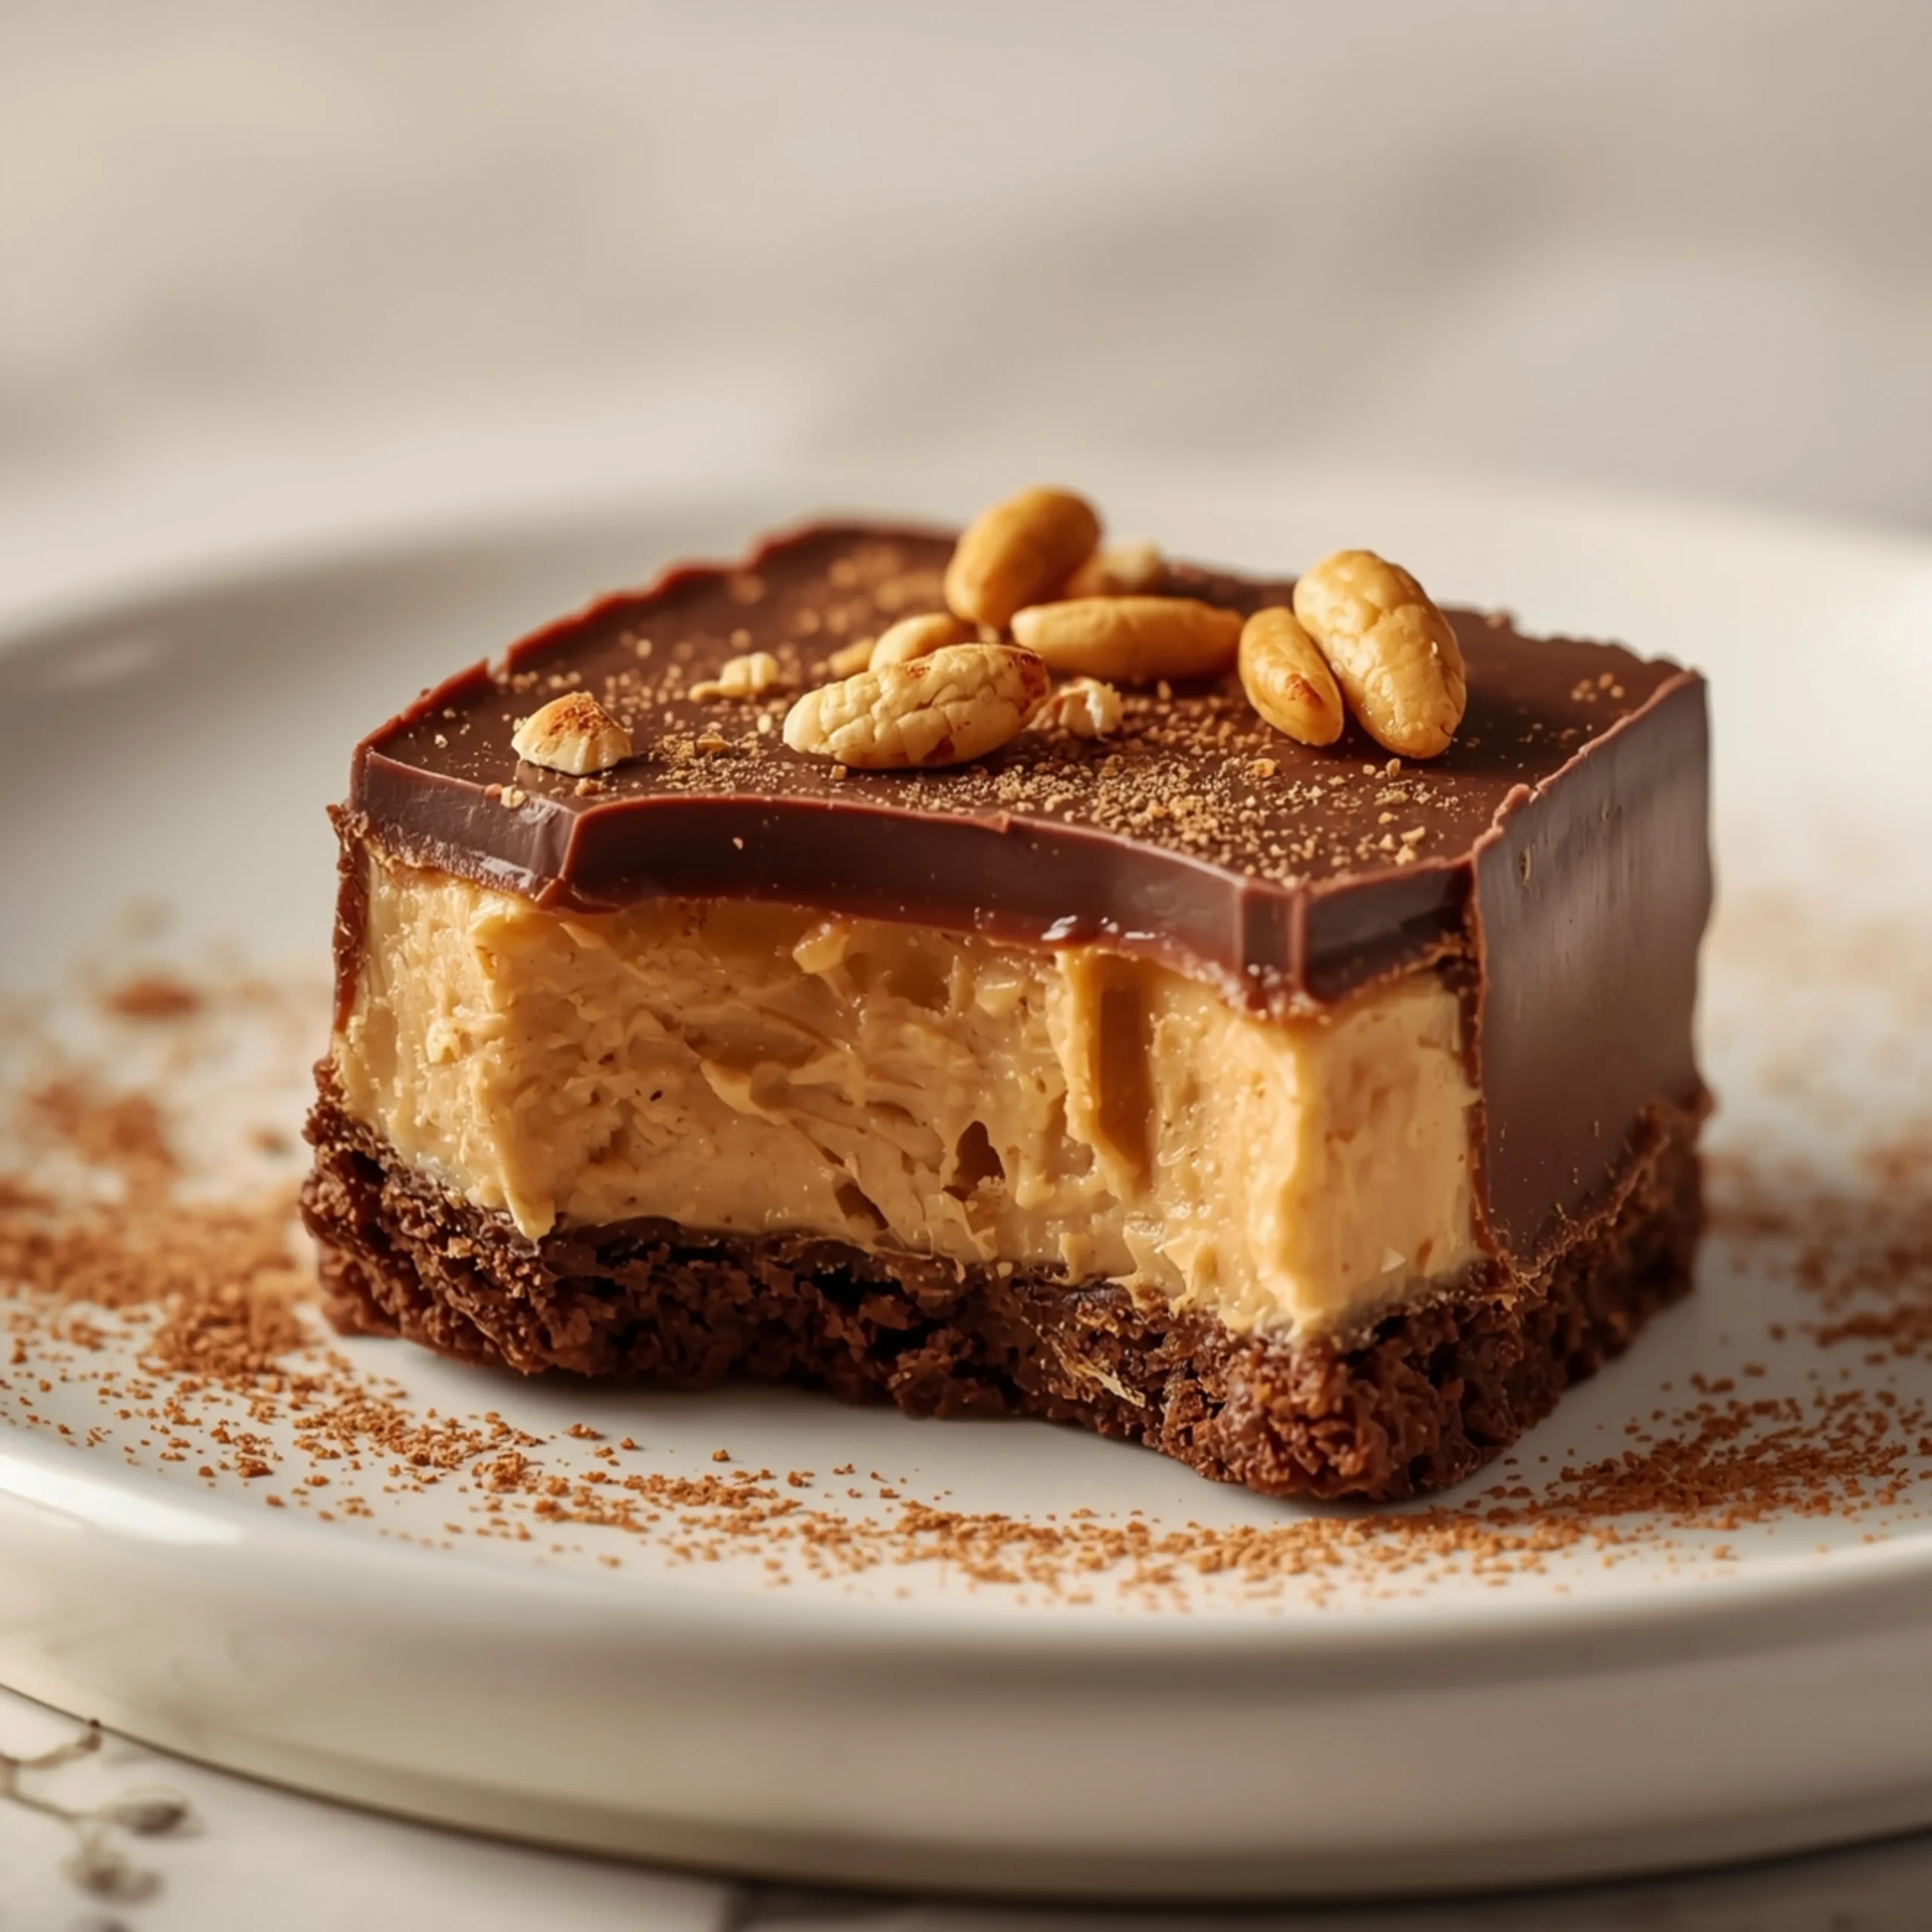
Easy No-Bake Chocolate Peanut Butter Bars
These layered chocolate peanut butter bars deliver that addictive sweet-and-salty flavor with a rich, fudgy texture. This no-bake recipe is engineered for speed and perfect results, making it one of the most efficient treats in our entire Desserts collection. Get ready for a foolproof candy bar you can make in under 30 minutes.
The Anatomy of the Perfect Bar: 3 Key Layers
Understanding the function of each layer is key to a flawless result. This bar is a simple assembly of three distinct components, each engineered for a specific texture and flavor.
- The Salty-Sweet Base: We use crushed butter crackers (like Ritz) or saltines mixed with melted butter and sugar. This creates a crisp, salty foundation that cuts through the richness of the filling. Unlike a standard graham cracker crust, this base provides a crucial savory contrast.
- The Creamy Peanut Butter Filling: This is the heart of the bar. By combining creamy peanut butter with powdered sugar and butter, we create a dense, fudgy, and stable filling that won’t ooze when cut. The powdered sugar dissolves completely, ensuring a smooth, non-gritty texture.
- The Rich Chocolate Topping: A simple melted mixture of high-quality chocolate chips and butter. The butter adds shine and softens the chocolate just enough so it creates a satisfying “snap” without shattering when you slice into the bars.
Ingredient Deep Dive: Choosing Your Chocolate & Peanut Butter
The success of this recipe hinges on two main ingredients. Your choice here directly impacts the final texture and flavor.
For Peanut Butter, Consistency is Key:
- Recommended: Use a standard commercial creamy peanut butter like Jif, Skippy, or a store-brand equivalent. These are stabilized with emulsifiers, preventing oil separation and ensuring a firm, predictable filling.
- Avoid: Natural-style peanut butters (where the oil separates). The excess oil will make the filling greasy, soft, and difficult to set properly.
For Chocolate, Quality Matters:
- Semi-Sweet Chocolate Chips: This is the gold standard. It provides a classic, balanced chocolate flavor that complements the sweet peanut butter filling without being overpowering.
- Dark Chocolate (60-72% Cacao): Excellent for a more intense, less sweet dessert. It creates a sophisticated flavor profile.
- Milk Chocolate: Creates a much sweeter, creamier bar reminiscent of a Reese’s cup. A great option for kids or those with a serious sweet tooth.
Step-by-Step Instructions
Prep Time: 20 minutes
Chill Time: 2 hours
Yields: 16 bars
- Prepare the Pan: Line an 8×8 inch baking pan with parchment paper, leaving a 2-inch overhang on two sides. This “sling” will make it easy to lift the bars out for clean slicing.
- Make the Base: In a food processor, pulse the butter crackers into fine crumbs. If you don’t have one, place crackers in a zip-top bag and crush them with a rolling pin. In a medium bowl, combine the cracker crumbs, powdered sugar, and melted butter. Mix until it resembles wet sand.
- Press the Base: Firmly and evenly press the crumb mixture into the bottom of your prepared pan. Use the bottom of a measuring cup to get it flat and compact. Place in the freezer to set for 10-15 minutes while you prepare the filling.
- Create the Filling: In a large bowl using an electric mixer (or a stand mixer with the paddle attachment), beat the peanut butter and softened butter until smooth and creamy. Gradually add the powdered sugar and mix on low speed until just combined, then increase to medium and beat until fully incorporated and smooth.
- Layer the Filling: Spread the peanut butter filling evenly over the chilled cracker base. Use an offset spatula to create a smooth, level surface. Return the pan to the freezer for another 15-20 minutes.
- Melt the Chocolate Topping: In a microwave-safe bowl, combine the chocolate chips and butter. Microwave in 30-second intervals, stirring well between each, until the chocolate is about 90% melted. Remove and stir until completely smooth and glossy.
- Add the Final Layer: Pour the melted chocolate over the chilled peanut butter layer. Gently tilt the pan to spread the chocolate into an even layer covering the entire surface.
- Chill to Set: Refrigerate the bars for at least 2 hours, or until the chocolate is completely firm.
Pro-Tips for Clean Slices & Flawless Layers
Achieving those sharp, professional-looking layers is easy with the right technique.
- Parchment Sling is Non-Negotiable: The parchment overhang is your best tool. Once the bars are fully set, use it to lift the entire block cleanly out of the pan and onto a cutting board.
- Chill Each Layer: Don’t rush the chilling process. A firm base prevents mixing, and a cold filling helps the chocolate topping set faster without melting the layer beneath it. While the layers chill, it’s a great time to plan other dinner ideas.
- Use a Hot, Clean Knife: Fill a tall glass with hot water. Dip a large, sharp knife into the water, wipe it dry with a paper towel, and make one long, decisive cut. Repeat for every single slice—dip, wipe, cut. This melts the chocolate just enough for a perfect slice without cracking.
- Score the Chocolate: For extra insurance against cracking, let the chocolate topping set at room temperature for about 10 minutes before refrigerating. At this stage, it’s firm but not hard. Use your hot knife to score the chocolate where you plan to make your final cuts.
Customization & Variations: Engineer Your Own Bar
Once you master the base recipe, you can modify it for endless variations.
- Base Swaps:
- Pretzels: Substitute for the crackers for an even saltier, crunchier base.
- Graham Crackers: For a classic, s’mores-style flavor.
- Biscoff Cookies: Creates a spiced, caramel-flavored foundation.
- Filling Add-ins:
- Texture: Mix in 1/2 cup of Rice Krispies cereal for a satisfying crunch.
- Nut Butters: Swap peanut butter for almond butter or sun butter (for a nut-free version).
- Topping Finishes:
- Flaky Sea Salt: Sprinkle on top of the wet chocolate for a gourmet touch and a pop of flavor.
- Chopped Peanuts: Add for extra peanut flavor and texture.
- Candy: Top with Reese’s Pieces or chopped peanut butter cups.
For those who enjoy a mix of sweet and savory, a comforting meal like this Tomato Gnocchi Soup recipe provides a perfect contrast before digging into these decadent bars for dessert.
COMMON MISTAKES TO AVOID
-
Mistake: Using natural peanut butter.
Fix: Stick to conventional, stabilized peanut butter (like Jif or Skippy). The emulsifiers are essential for a firm, non-greasy filling. -
Mistake: The chocolate topping cracks when cutting.
Fix: Don’t cut the bars straight from the freezer. Let them sit at room temperature for 10-15 minutes to take the chill off. Always use a hot, dry knife for clean cuts. -
Mistake: The base is crumbly and doesn’t hold together.
Fix: Ensure you’ve packed the base down very firmly with a flat-bottomed glass or measuring cup. Chilling the base before adding the filling is also a critical step for stability.
FAQ
Q: Can I make these bars gluten-free?
A: Yes, easily. Simply substitute the butter crackers with your favorite gluten-free pretzels or gluten-free graham-style crackers. Ensure all other ingredients are certified GF.
Q: How do I store chocolate peanut butter bars?
A: Store them in an airtight container in the refrigerator for up to one week. You can also freeze them for up to 3 months. For freezing, slice them first and place parchment paper between the layers to prevent sticking.
Q: Can I use a different size pan?
A: Yes. A 9×9 inch pan will work, but the layers will be thinner. A 9×5 inch loaf pan will create very thick bars. You’ll need to adjust chilling times slightly.
NUTRITIONAL SNAPSHOT
| Nutrient | Amount per Serving |
|---|---|
| Calories | 350 |
| Protein | 6g |
| Fat | 22g |
| Net Carbs | 31g |
| Fiber | 2g |
| Sugar | 25g |
Disclaimer: These are estimates and can vary based on specific ingredients used.
After mastering this simple no-bake dessert, you might be inspired to try other impressive but straightforward meals. For a fantastic weeknight main, consider this sweet and savory roasted orange chicken recipe. Or, for a delicious brunch project, check out this guide to a perfect smoked salmon bagel with cream cheese.
Easy No-Bake Chocolate Peanut Butter Bars
These layered chocolate peanut butter bars deliver that addictive sweet-and-salty flavor with a rich, fudgy texture. This no-bake recipe is engineered for speed and perfect results, making it one of the most efficient treats in our entire Desserts collection. Get ready for a foolproof candy bar you can make in under 30 minutes.
Ingredients
- 1 ½ cups crushed butter crackers (like Ritz, about 35-40 crackers)
- ¼ cup powdered sugar
- 6 tbsp unsalted butter, melted
- 1 cup creamy peanut butter (conventional, not natural style)
- ½ cup unsalted butter, softened to room temperature
- 2 cups powdered sugar
- 1 ½ cups semi-sweet chocolate chips
- 4 tbsp unsalted butter
Instructions
- Prepare the Pan: Line an 8x8 inch baking pan with parchment paper, leaving a 2-inch overhang on two sides. This "sling" will make it easy to lift the bars out for clean slicing.
- Make the Base: In a food processor, pulse the butter crackers into fine crumbs. If you don't have one, place crackers in a zip-top bag and crush them with a rolling pin. In a medium bowl, combine the cracker crumbs, powdered sugar, and melted butter. Mix until it resembles wet sand.
- Press the Base: Firmly and evenly press the crumb mixture into the bottom of your prepared pan. Use the bottom of a measuring cup to get it flat and compact. Place in the freezer to set for 10-15 minutes while you prepare the filling.
- Create the Filling: In a large bowl using an electric mixer (or a stand mixer with the paddle attachment), beat the peanut butter and softened butter until smooth and creamy. Gradually add the powdered sugar and mix on low speed until just combined, then increase to medium and beat until fully incorporated and smooth.
- Layer the Filling: Spread the peanut butter filling evenly over the chilled cracker base. Use an offset spatula to create a smooth, level surface. Return the pan to the freezer for another 15-20 minutes.
- Melt the Chocolate Topping: In a microwave-safe bowl, combine the chocolate chips and butter. Microwave in 30-second intervals, stirring well between each, until the chocolate is about 90% melted. Remove and stir until completely smooth and glossy.
- Add the Final Layer: Pour the melted chocolate over the chilled peanut butter layer. Gently tilt the pan to spread the chocolate into an even layer covering the entire surface.
- Chill to Set: Refrigerate the bars for at least 2 hours, or until the chocolate is completely firm.