How to Make Authentic New York Style Cheesecake
This is the definitive guide to a dense, rich, and velvety New York Style Cheesecake. With a tangy finish and a crisp, buttery graham cracker crust, this recipe is engineered for a perfect, crack-free top every time. While I love exploring all kinds of desserts, this classic cheesecake remains an all-time favorite.
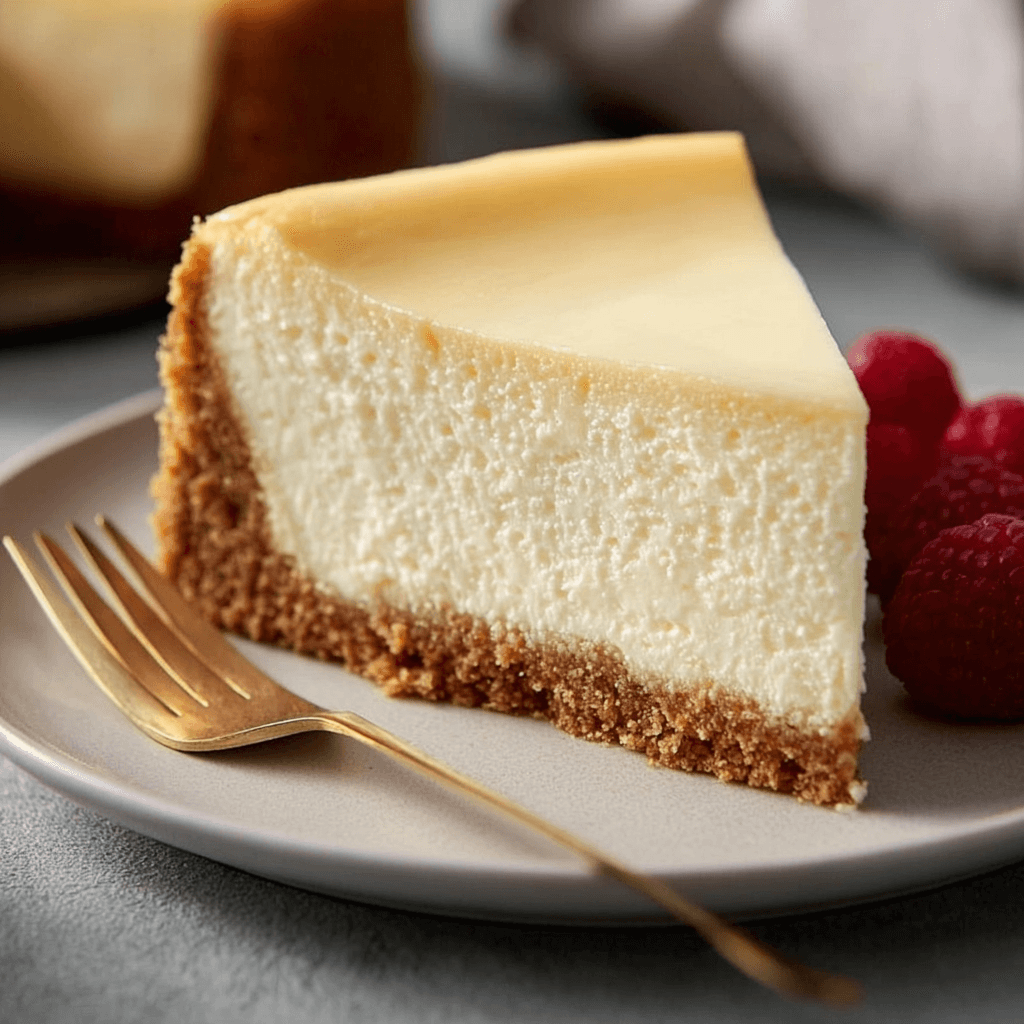
The Anatomy of a Perfect NY Cheesecake
True New York cheesecake is defined by three key characteristics. Understanding them is the first step to success.
- The Crust: A simple, sturdy base of graham cracker crumbs, sugar, and melted butter. It’s pre-baked for maximum crispness to contrast the creamy filling.
- The Filling: Dense, smooth, and rich. The key is using full-fat cream cheese and mixing it just enough to combine, not whip. This prevents a light, airy texture.
- The Tang: A subtle tang from sour cream or heavy cream in the filling sets it apart. Some recipes even use a thin, tangy sour cream layer on top, baked for the final few minutes.
The Engineer’s Toolkit: Essential Equipment
The right tools prevent common failures. You don’t need much, but these items are non-negotiable for a flawless result.
- 9-inch Springform Pan: Essential for easy, clean removal without damaging the cake.
- Stand Mixer (or Hand Mixer): Crucial for achieving a lump-free filling without incorporating too much air.
- Large Roasting Pan: Required for the water bath (bain-marie), which is our secret weapon against cracks.
- Heavy-Duty Aluminum Foil: You will need several large sheets to wrap the outside of your springform pan, creating a waterproof seal.
STEP-BY-STEP INSTRUCTIONS
Phase 1: The Graham Cracker Crust
- Preheat & Prep: Adjust your oven rack to the middle position and preheat to 350°F (175°C).
- Combine Crust Ingredients: In a medium bowl, mix the graham cracker crumbs, granulated sugar, and melted butter until the mixture resembles wet sand.
- Form the Crust: Press the crumb mixture firmly and evenly into the bottom and about one inch up the sides of your 9-inch springform pan. Use the flat bottom of a measuring cup to pack it tightly.
- Pre-Bake: Bake for 10 minutes until lightly golden and fragrant. Set aside on a wire rack to cool completely while you prepare the filling.
Phase 2: The Cream Cheese Filling
- Reduce Oven Temp: Lower the oven temperature to 325°F (160°C).
- Beat Cream Cheese: In the bowl of a stand mixer fitted with the paddle attachment, beat the room temperature cream cheese on medium-low speed until completely smooth and creamy, about 2-3 minutes. Scrape down the sides and bottom of the bowl.
- Add Sugars & Cornstarch: Add the granulated sugar, confectioners’ sugar, and cornstarch. Mix on low speed until just combined. Do not overmix.
- Incorporate Eggs: Add the eggs and egg yolk one at a time, mixing on low speed after each addition until the yellow just disappears. Scrape the bowl again.
- Finish the Filling: Stir in the sour cream, lemon juice, and vanilla extract on the lowest speed until just blended. The final batter should be thick, smooth, and uniform.
Phase 3: The Water Bath & Baking
- Waterproof the Pan: Place a large sheet of heavy-duty foil under your springform pan. Carefully wrap the foil up the sides of the pan. Repeat with a second and third sheet to ensure no water can seep in.
- Assemble for Baking: Place the foil-wrapped pan into your large roasting pan. Pour the cheesecake filling over the cooled crust and smooth the top with an offset spatula.
- Create Water Bath: Carefully pour hot water into the roasting pan until it reaches about halfway up the sides of the springform pan.
- Bake: Bake at 325°F (160°C) for 60-70 minutes. The cheesecake is done when the edges are set and the center 2-3 inches still have a slight jiggle (like Jell-O). Do not overbake.
- Slow Cool (The Critical Step): Turn off the oven, crack the door open with a wooden spoon, and let the cheesecake cool slowly in the oven for 1 hour. This prevents cracks.
- Cool to Room Temp: Remove the cheesecake from the water bath and the oven. Let it cool on a wire rack at room temperature for at least 2 hours.
- Chill: Cover the cheesecake with plastic wrap (be careful not to let it touch the surface) and refrigerate for at least 6 hours, but preferably overnight. This step is essential for the flavor and texture to set.
Pro Tips for Cheesecake Perfection
- Room Temp is Non-Negotiable: Your cream cheese, sour cream, and eggs must be at room temperature. This is the #1 defense against a lumpy filling.
- Don’t Overmix: Overmixing, especially after adding the eggs, whips air into the batter. This causes the cheesecake to puff up in the oven and then collapse and crack as it cools.
- Scrape the Bowl: Scrape the bottom and sides of your mixing bowl frequently. This ensures every bit of cream cheese is incorporated and your filling is perfectly smooth.
- The Slow Cool-Down is Mandatory: Abrupt temperature changes cause cracking. The slow cool-down process (in-oven, on-counter, then fridge) is your guarantee for a flawless surface. Leftover cheesecake (if there is any!) makes for an incredibly decadent breakfast the next morning.
Serving & Flavor Variations
A perfect New York cheesecake needs minimal adornment, but a simple topping can elevate it.
- Classic Berry Sauce: A simple purée of strawberries or raspberries with a little sugar and lemon juice.
- Salted Caramel Drizzle: The sweet and salty combination is a perfect match for the tangy cheesecake.
- Chocolate Ganache: A rich, dark chocolate ganache poured over the chilled cheesecake is pure decadence.
If you enjoy baking rich, impressive desserts that require a bit of technique, mastering a beautiful chocolate babka could be your next exciting project.
COMMON MISTAKES TO AVOID
- Mistake: Cracks on the surface.
Fix: This is caused by over-baking, over-mixing, or rapid cooling. Master the water bath technique and follow the slow cool-down process exactly as written. - Mistake: A grainy or lumpy filling.
Fix: Your cold ingredients didn’t incorporate properly. Ensure your cream cheese, eggs, and sour cream are all at true room temperature before you begin mixing. - Mistake: A soggy, wet crust.
Fix: Your water bath leaked. Use at least two (preferably three) layers of heavy-duty foil and wrap the pan tightly to create a waterproof seal. Pre-baking the crust also helps it stay crisp.
FAQ
Q: Can I make this cheesecake ahead of time?
A: Absolutely. In fact, it’s better when made a day in advance. It needs at least 6 hours to chill and set properly, but an overnight chill yields the best flavor and texture. It will keep well in the refrigerator for up to 5 days.
Q: What should I serve before this cheesecake?
A: Since this dessert is so rich, a lighter main course is a great choice. A hearty salad, grilled fish, or even a flavorful option like this chipotle lime chicken tacos recipe works well without being too filling.
Q: My cheesecake still cracked! What happened?
A: The most common culprits are opening the oven door during baking, an oven that runs too hot, or skipping the slow cooling process. Even a tiny crack is purely cosmetic—the flavor will still be perfect. Cover it with a fruit topping and no one will ever know. For another delicious, bite-sized dessert idea where cracks aren’t a concern, these mini chocolate fudge tartlets are a must-try.
NUTRITIONAL SNAPSHOT
| Nutrient | Amount per Serving |
|---|---|
| Calories | 520 kcal |
| Protein | 9g |
| Fat | 38g |
| Net Carbs | 35g |
| Fiber | 1g |
| Sugar | 32g |
How to Make Authentic New York Style Cheesecake
Ingredients
- 1 1/2 cups (150g) graham cracker crumbs (from about 10 full sheets)
- 1/4 cup (50g) granulated sugar
- 6 tablespoons (85g) unsalted butter, melted
- 32 oz (four 8-oz packages) full-fat block cream cheese, at room temperature
- 1 1/2 cups (300g) granulated sugar
- 2 teaspoons confectioners' sugar
- 2 tablespoons cornstarch
- 4 large eggs, at room temperature
- 1 large egg yolk, at room temperature
- 1 cup (240g) full-fat sour cream, at room temperature
- 1 tablespoon fresh lemon juice
- 2 teaspoons pure vanilla extract