Effortless Molten Chocolate Lava Cakes
Imagine breaking through a delicate, warm chocolate cake to reveal a decadent, flowing molten center. This recipe delivers that restaurant-quality experience in under 30 minutes, using just a handful of staple ingredients. It’s one of the most rewarding and simple incredible desserts you can make.
The Science of the Molten Center
The “lava” in a lava cake isn’t a separate filling; it’s simply unbaked batter. The magic lies in a high-heat, short-bake method.
- High Temperature: The oven is set to a high heat (425°F / 220°C) to rapidly cook the outside of the cake.
- Rapid Setting: This heat quickly forms a solid cake “wall,” setting the batter from the outside in.
- Perfect Timing: By pulling the cakes from the oven when the edges are firm but the center is still soft and jiggly, you trap a warm, liquid core of batter inside.
Key Ingredient: Choosing Your Chocolate
The quality of your chocolate directly dictates the flavor of your lava cakes. This is not the place for standard chocolate chips.
- Best Choice: Bittersweet Chocolate (60-72% Cacao): This provides a deep, complex flavor that isn’t overly sweet. Look for high-quality baking bars or pistoles (discs).
- Good Alternative: Semisweet Chocolate (50-59% Cacao): If you prefer a slightly sweeter cake, this works well.
- Avoid: Milk chocolate is too sweet and lacks the structure needed. Standard chocolate chips often contain stabilizers that prevent smooth melting.
Step-by-Step Instructions
Yields: 4 individual cakes
Prep Time: 10 minutes
Cook Time: 12-14 minutes
- Prep Oven and Ramekins: Preheat your oven to 425°F (220°C). Generously butter four 6-ounce ramekins. Dust the inside with unsweetened cocoa powder, tapping out any excess. This creates a non-stick surface and a chocolatey crust. Set them on a baking sheet.
- Melt Chocolate and Butter: In a medium microwave-safe bowl, combine the chopped chocolate and butter. Microwave in 30-second intervals, stirring in between, until completely smooth. Alternatively, melt them in a double boiler. Let the mixture cool slightly for a few minutes.
- Beat Eggs and Sugar: In a separate large bowl, use an electric mixer to beat the whole eggs, egg yolks, sugar, and salt on high speed. Continue for 3-5 minutes, until the mixture is pale, thick, and has doubled in volume.
- Combine Mixtures: Gently fold the slightly cooled chocolate mixture into the egg mixture until just combined. Be careful not to deflate the eggs too much.
- Fold in Flour: Sift the flour over the batter and fold it in with a spatula until no streaks remain. Do not overmix.
- Fill Ramekins: Divide the batter evenly among the prepared ramekins, filling each about three-quarters full.
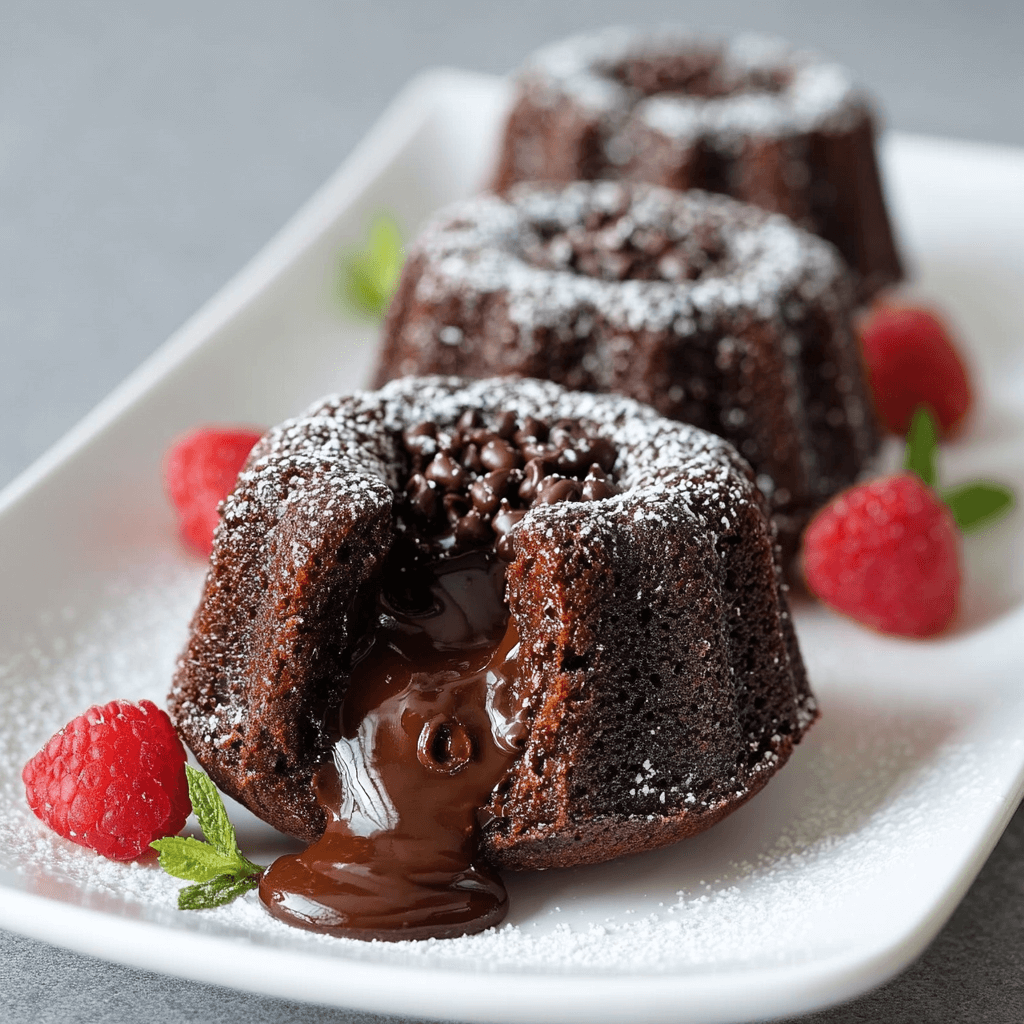
- Bake: Bake for 12-14 minutes. The edges of the cakes should be firm and set, but the centers will look soft and slightly jiggly. This jiggly center is the key to the “lava.”
- Rest and Serve: Let the cakes rest in the ramekins for exactly 2 minutes. This allows them to firm up just enough to be inverted. Run a thin knife around the edge of each ramekin. Place a serving plate on top and carefully flip it over. Lift the ramekin to reveal the cake. Serve immediately.
Pro Tips for Guaranteed Lava Flow
- Don’t Overbake: This is the most critical rule. The visual cue is key: firm edges, soft center. An extra minute can turn your lava cake into a simple (but still delicious) chocolate cake.
- Oven Thermometer: Ovens can be inaccurate. An oven thermometer ensures you’re baking at the precise 425°F required for the rapid-set crust.
- Don’t Overmix: When you fold in the flour, stop as soon as it’s incorporated. Overmixing develops gluten, which can result in a tougher, less delicate cake.
- Serve Immediately: The lava begins to set as the cake cools. For the best molten effect, they must be served hot from the oven. Planning this dessert after one of our hearty dinner recipes? Have your ramekins ready to go before you sit down to eat.
Make-Ahead & Freezing Instructions
These cakes are surprisingly flexible for preparing in advance, making them perfect for dinner parties.
- Refrigerate (Up to 24 Hours): Prepare the batter through Step 5. Divide it into the prepared ramekins, cover with plastic wrap, and refrigerate. When ready to serve, bake directly from the fridge, adding 2-4 minutes to the total bake time. This is a great strategy if you’re also making a comforting Shepherd’s Pie that requires oven time.
- Freeze (Up to 1 Month): Prepare the ramekins and batter as above. Place the filled ramekins on a tray and freeze until solid. Once frozen, you can wrap each ramekin tightly in plastic wrap and store in a freezer bag. Bake directly from frozen, adding 5-8 minutes to the bake time.
Serving & Pairing Suggestions
While incredible on their own, lava cakes are a perfect canvas for simple, elegant pairings.
- Ice Cream: A scoop of high-quality vanilla bean or coffee ice cream creates a fantastic hot-and-cold contrast.
- Fresh Berries: The tartness of raspberries, strawberries, or a mixed berry coulis cuts through the richness of the chocolate beautifully.
- Whipped Cream: A simple dollop of freshly whipped cream adds a light, airy texture.
- Sauces: A drizzle of caramel or raspberry sauce elevates the presentation and flavor. For a different dessert inspiration, consider the elegant simplicity of a delicate vanilla bean flan tart.
For Your Next Project
Once you’ve mastered this iconic dessert, why not tackle a savory challenge? These impressive garlic parmesan chicken roll-ups are a perfect main course to practice your culinary skills.
COMMON MISTAKES TO AVOID
- Mistake: Using chocolate chips instead of high-quality baking chocolate.
Fix: Invest in a good quality baking bar (60-72% cacao). Chocolate chips have stabilizers that resist melting, which can ruin the smooth, liquid center. - Mistake: Overbaking the cakes.
Fix: Trust the jiggle. The center must look underdone when you pull it from the oven. A minute too long and the lava sets completely. - Mistake: Skipping the ramekin prep.
Fix: Always butter and dust with cocoa powder. This two-step process guarantees the cakes will release cleanly when inverted.
FAQ
Q: Can I make these in a muffin tin?
A: Yes, you can use a standard muffin tin. Prepare the cups the same way (butter and cocoa powder) and reduce the baking time to 8-10 minutes, watching them very closely.
Q: Why didn’t my cake have a molten center?
A: This is almost always due to overbaking. Your oven may run hot, or you may have left them in for a minute too long. Next time, pull them out as soon as the edges are set and the center is still wobbly.
Q: Can I make these gluten-free?
A: Absolutely. Simply substitute the all-purpose flour with a high-quality 1-to-1 gluten-free baking flour blend. The small amount of flour means the texture will be nearly identical.
NUTRITIONAL SNAPSHOT
| Nutrient | Amount per Serving |
|---|---|
| Calories | 420 |
| Protein | 7g |
| Fat | 28g |
| Net Carbs | 35g |
| Fiber | 4g |
| Sugar | 29g |
Effortless Molten Chocolate Lava Cakes
Ingredients
- 4 oz (115g) high-quality bittersweet chocolate (60-70% cacao), chopped
- 1/2 cup (113g) unsalted butter, cubed
- 2 large eggs
- 2 large egg yolks
- 1/4 cup (50g) granulated sugar
- 1/8 tsp salt
- 2 tbsp (16g) all-purpose flour
- Unsweetened cocoa powder, for dusting ramekins