The Easiest No-Bake Cheesecake for a Perfect Set Every Time
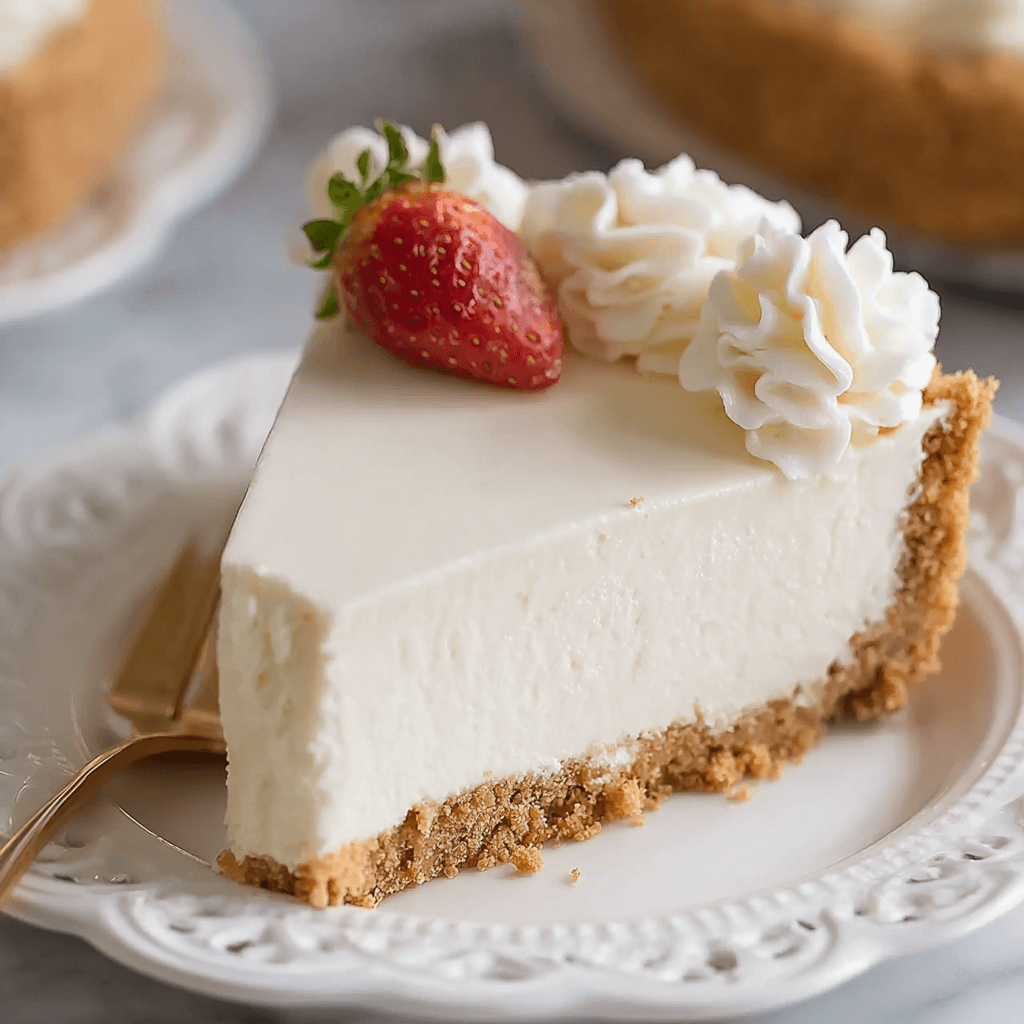
This no-bake cheesecake delivers a rich, tangy flavor and a velvety, firm texture without ever turning on your oven. It’s a foolproof method for achieving that classic cheesecake experience with minimal effort.
If you’re a fan of simple, elegant sweets, you can explore all my other dessert recipes that follow the same philosophy: maximum flavor for minimal fuss.
The Anatomy of a Perfect No-Bake Cheesecake
Understanding the two core components is key to success. Each part plays a critical role in the final structure and flavor.
- The Crust (The Foundation): A simple press-in crust made from graham crackers, sugar, and melted butter. The butter acts as a binder, solidifying in the fridge to create a crisp, sturdy base that won’t crumble when you slice into it.
- The Filling (The Star): This is an aerated cream cheese base. Unlike baked cheesecake, which relies on eggs for structure, this recipe uses the fat in full-fat cream cheese and the stability of whipped heavy cream to set up firmly once chilled. The combination creates a texture that is lighter and more mousse-like than its baked counterpart.
Critical Tools & Ingredients
Gather these before you begin for a smooth workflow. Precision here prevents common issues like a runny filling.
Essential Tools:
- 9-inch springform pan: Critical for easy, clean removal. A 9-inch pie plate works in a pinch, but serving will be less tidy.
- Electric mixer (stand or hand): Necessary for whipping the heavy cream to stiff peaks and beating the cream cheese until completely smooth. Doing this by hand is not recommended.
- Rubber spatula: For scraping the bowl to ensure no lumps of cream cheese are left behind.
Key Ingredients Explained:
- Full-Fat Block Cream Cheese: Do not substitute with whipped or low-fat varieties. The lower fat and higher water content in those products will result in a soft, soupy filling that never sets. It must be at true room temperature to prevent lumps.
- Cold Heavy Whipping Cream: The cream must be very cold to whip into stable, stiff peaks. This incorporated air is essential for the light texture and structure of the cheesecake.
- Lemon Juice: This isn’t just for flavor. The small amount of acid helps to firm up the dairy, providing extra insurance for a perfect set.
Step-by-Step Instructions
Part 1: Prepare the Graham Cracker Crust
- Combine Dry Ingredients: In a medium bowl, mix the graham cracker crumbs and 2 tbsp of granulated sugar.
- Add Butter: Pour the 6 tbsp of melted butter over the crumb mixture. Stir with a fork until all the crumbs are evenly moistened, resembling wet sand.
- Press Into Pan: Firmly press the mixture into the bottom and slightly up the sides of a 9-inch springform pan. Use the flat bottom of a measuring cup to pack it down tightly. This ensures a solid base.
- Chill: Place the crust in the freezer to set for at least 15-20 minutes while you prepare the filling.
Part 2: Create the Cream Cheese Filling
- Whip the Cream: In a large, cold bowl, use an electric mixer to beat the 1 cup of cold heavy cream on high speed until stiff peaks form. This is when the peaks stand straight up when the beaters are lifted. Set aside.
- Beat the Cream Cheese: In a separate large bowl, beat the 16 oz of softened cream cheese, 1/2 cup granulated sugar, and 1/4 cup powdered sugar on medium-high speed until completely smooth and creamy, about 2-3 minutes. Scrape down the sides and bottom of the bowl.
- Add Flavorings: Beat in the 2 tsp of lemon juice and 1 tsp of vanilla extract until just combined.
- Fold Gently: Using a spatula, gently fold the whipped cream into the cream cheese mixture in two or three additions. Be careful not to deflate the air you whipped into the cream. The final mixture should be thick and smooth.
Part 3: Assemble and Chill
- Fill the Crust: Spoon the filling over the chilled crust and spread it into an even layer with your spatula.
- Chill to Set: Cover the cheesecake with plastic wrap (be careful not to let it touch the surface) and refrigerate for a minimum of 6-8 hours, but preferably overnight. Do not rush this step; this is when the cheesecake firms up.
- Serve: Once fully set, run a thin knife around the edge of the pan before releasing the springform collar. Slice with a sharp, clean knife and serve plain or with your favorite toppings.
Flavor Customization Matrix
This base recipe is a blank canvas. Use this matrix to create new flavor combinations. This method is a great starting point for many of my other easy recipes.
| Component | Classic Vanilla | Chocolate Oreo | Lemon Blueberry |
|---|---|---|---|
| Crust | Graham Cracker | 1.5 cups Oreo crumbs (no filling), 4 tbsp butter | Graham Cracker or Golden Oreo |
| Filling Add-in | 1 tsp Vanilla Extract | 1/2 cup melted & cooled semi-sweet chocolate | Zest of 1 lemon, 1 tsp lemon extract |
| Topping | Fresh Berries | Chocolate Ganache | Blueberry Compote, Fresh Blueberries |
Individual desserts are also a great option. The technique for a stable no-bake filling is also key in recipes like these delightful mini banana cream tartlets.
Pro-Tips for a Foolproof Set
A runny cheesecake is the most common failure. Follow these rules to guarantee a firm, sliceable dessert.
- Temperature is Everything: Room temperature cream cheese mixes smoothly without lumps. Very cold heavy cream whips to the stiffest peaks. Don’t compromise on these.
- Don’t Under-whip the Cream: The cream isn’t just for richness; it’s the primary structural agent. Whip it until it’s thick and holds a stiff peak. If it’s soft and droopy, the cheesecake will be too.
- Fold, Don’t Stir: When combining the whipped cream and cream cheese base, use a gentle folding motion with a spatula. Over-mixing will deflate the air you just incorporated, leading to a denser, softer set.
- Patience is a Virtue: The chill time is non-negotiable. The cheesecake needs at least 6-8 hours in a cold refrigerator for the fats to solidify and the structure to set completely. Overnight is even better.
COMMON MISTAKES TO AVOID
- Mistake: A lumpy filling.
Fix: Your cream cheese was too cold. Make sure it is truly at room temperature (soft to the touch) before beating. If you already have lumps, you can sometimes fix it by gently warming the side of the bowl with your hands while beating, but prevention is best. - Mistake: The crust is a crumbly mess.
Fix: The crust was not packed tightly enough, or you used too few crumbs for the amount of butter. Use the flat bottom of a glass to press the crumbs down very firmly into the pan. - Mistake: The filling is soft or runny.
Fix: This is the #1 issue. The cause is usually one of three things: using low-fat cream cheese, not whipping the cream to stiff peaks, or not chilling it long enough. Use full-fat block cream cheese and chill for at least 8 hours for a guaranteed set.
FAQ
Q: Can I use low-fat or whipped cream cheese?
A: No. These products have a higher water content and less fat, which is essential for the cheesecake to set. Using them will result in a soupy filling. You must use full-fat, block-style cream cheese.
Q: How long does no-bake cheesecake last in the fridge?
A: Stored covered in the refrigerator, the cheesecake will stay fresh for up to 5 days. The crust may soften slightly over time.
Q: Can I freeze this cheesecake?
A: Yes! It freezes beautifully. Flash-freeze the entire cheesecake (or individual slices) on a pan until firm, then wrap tightly in plastic wrap and then foil. It can be frozen for up to 3 months. Thaw in the refrigerator overnight before serving. For another fantastic fruit-forward no-bake treat that also stores well, you might love these mini mango cheesecake cubes.
NUTRITIONAL SNAPSHOT
(Estimated for 1 of 10 slices, without toppings)
| Nutrient | Amount per Serving |
|---|---|
| Calories | 410 kcal |
| Protein | 5g |
| Fat | 32g |
| Net Carbs | 25g |
| Fiber | 1g |
| Sugar | 22g |