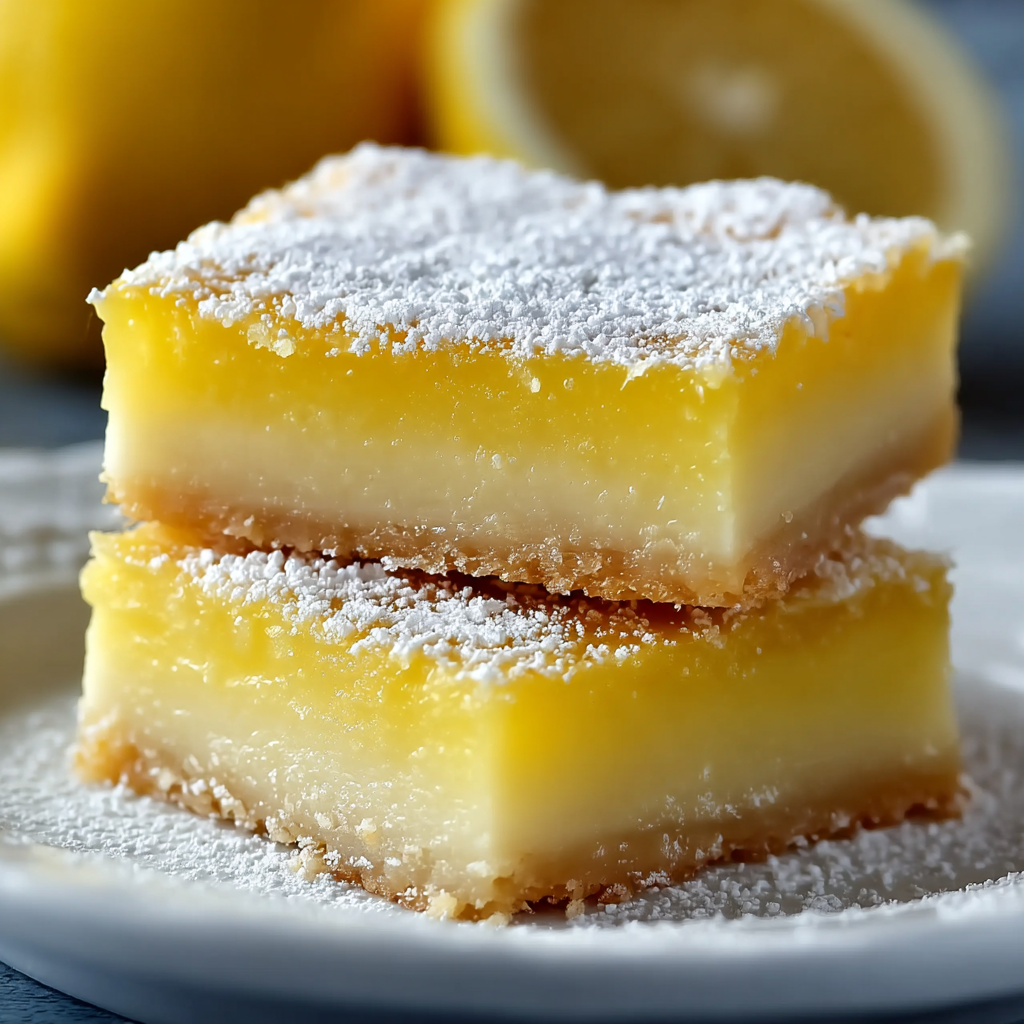
The Best Tangy Lemon Bars with a Buttery Shortbread Crust
These lemon bars strike the perfect balance between a crisp, buttery shortbread crust and a bright, zesty lemon curd filling. This recipe is engineered for success, delivering a professional-bakery result with simple, everyday ingredients. It’s the perfect bright finish after a rich meal like my Apple Cider Braised Pork Shoulder.
The Anatomy of a Perfect Lemon Bar
Understanding the two core components is key to mastering this recipe. Each has a specific function and requires a slightly different technique.
1. The Shortbread Crust:
- Function: To provide a stable, buttery, and slightly salty base that contrasts the tangy filling. It should be firm enough to hold but tender enough to bite through easily.
- Key Ingredients:
- Butter (Cold): Using cold, cubed butter is critical. It creates small pockets that steam during baking, resulting in a flaky, tender texture. Melted butter yields a greasy, dense crust.
- Flour: All-purpose flour provides the structure.
- Powdered Sugar: Dissolves more easily than granulated sugar, creating a smoother, more delicate crumb.
2. The Lemon Curd Filling:
- Function: This is the star of the show. It should be intensely lemony, sweet but not cloying, and set to a smooth, just-firm consistency.
- Key Ingredients:
- Fresh Lemon Juice & Zest: Non-negotiable. Bottled juice lacks the bright, aromatic oils found in fresh zest and has a dull, one-note flavor.
- Eggs: Provide the structure and richness. They are what cause the curd to set when baked.
- Granulated Sugar: Balances the tartness of the lemon.
- Flour: A small amount acts as a stabilizer, ensuring the filling sets properly and doesn’t become weepy.
STEP-BY-STEP INSTRUCTIONS
Prep Time: 15 minutes
Cook Time: 45-50 minutes
Total Time: 1 hour (+ cooling)
Yields: 16 bars
Part 1: The Shortbread Crust
- Preheat & Prep: Preheat your oven to 350°F (175°C). Line an 8×8 inch baking pan with parchment paper, leaving an overhang on two sides to act as a “sling” for easy removal.
- Combine Dry Ingredients: In a medium bowl, whisk together the flour, powdered sugar, and salt.
- Cut in the Butter: Add the cold, cubed butter to the flour mixture. Using a pastry cutter or your fingertips, cut the butter into the flour until the mixture resembles coarse, sandy crumbs.
- Press & Bake: Firmly and evenly press the crumb mixture into the bottom of your prepared pan. Bake for 20-22 minutes, or until the edges are lightly golden. Do not overbake.
Part 2: The Lemon Filling & Final Bake
- Combine Filling Ingredients: While the crust is baking, whisk the granulated sugar and flour together in a large bowl to eliminate lumps. Add the eggs, fresh lemon juice, and lemon zest. Whisk until completely smooth and combined.
- Pour Over Hot Crust: Once the crust is out of the oven, immediately pour the lemon filling over the hot base. This helps create a seamless bond between the two layers.
- Bake Again: Carefully return the pan to the oven and bake for an additional 25-28 minutes. The filling is done when the center is just set and no longer jiggles. The edges may be slightly puffed.
- Cool Completely: Remove from the oven and let the pan cool completely on a wire rack for at least 1 hour.
- Chill: Transfer the pan to the refrigerator and chill for at least 2 more hours, or preferably overnight. Chilling is essential for the filling to set fully for clean cuts.
- Slice & Serve: Use the parchment paper sling to lift the entire block out of the pan. Dust generously with powdered sugar right before slicing with a sharp knife.
Pro-Level Tips for Flawless Results
- Use Room Temperature Eggs: They incorporate more easily and create a smoother, more uniform filling.
- Don’t Over-Bake the Filling: The most common mistake. Pull the bars when the center is just set. It will continue to firm up as it cools. Over-baking leads to a rubbery texture.
- The “Sling” is Your Best Friend: Don’t skip the parchment paper overhang. It makes removing the bars from the pan effortless and prevents you from ruining the first piece.
- Clean Cuts, Every Time: For razor-sharp edges, run a large, sharp knife under hot water and wipe it dry between each cut. The combination of a chilled bar and a hot knife is unbeatable.
- Zest First, Juice Second: Always zest your lemons before you juice them. It’s nearly impossible to do it the other way around.
Serving Suggestions & Pairings
Lemon bars are incredibly versatile. They are the perfect bright counterpoint to a savory spread. Imagine serving these after a meal featuring rich dishes like my creamy Chicken Alfredo Stuffed Peppers.
- With Berries: Serve with a side of fresh raspberries or blueberries for a pop of color and complementary flavor.
- With Cream: A dollop of unsweetened whipped cream or crème fraîche cuts the sweetness and adds a luxurious texture.
- For Dessert Tables: Their bright yellow color makes them a standout on any dessert platter. If you’re building a table with multiple treats, consider adding some chocolatey options for contrast, like these incredible Chocolate Ganache Mini Cakes.
COMMON MISTAKES TO AVOID
- Mistake: A soggy, greasy crust.
- Fix: Ensure your butter is cold and you do not overmix. Also, pre-baking the crust (par-baking) is essential to create a sealed barrier against the wet filling.
- Mistake: A thin, bubbly layer on top of the filling after baking.
- Fix: This is foam from whisking the eggs too vigorously. After whisking your filling, let it sit for a few minutes and skim any foam off the top with a spoon before pouring it onto the crust.
- Mistake: The filling has a slightly “eggy” taste.
- Fix: Use high-quality, fresh ingredients. Abundant fresh lemon zest is the key to masking the egg flavor and providing that signature bright, citrusy aroma. Do not skimp on the zest.
FAQ
Q: Can I use bottled lemon juice?
A: I strongly advise against it. The flavor of fresh-squeezed lemon juice is brighter and more complex. More importantly, you lose out on the essential oils from the lemon zest, which provide most of the aromatic lemon flavor.
Q: Why did my lemon filling crack?
A: This is almost always a sign of over-baking. The eggs in the curd have coagulated too much, causing them to tighten and crack as they cool. Pull them from the oven when the center is just barely set.
Q: Can I make these ahead of time?
A: Absolutely. These are ideal for making ahead. They need to chill for several hours anyway. You can store them, uncut and covered, in the fridge for up to 4 days. If you love prepping party desserts, you might also enjoy these no-fuss Strawberry Cheesecake Crunch Bites which are also great for making in advance.
NUTRITIONAL SNAPSHOT
| Nutrient | Amount per Serving |
|---|---|
| Calories | 215 kcal |
| Protein | 3g |
| Fat | 11g |
| Net Carbs | 25g |
| Fiber | 0.5g |
| Sugar | 18g |
The Best Tangy Lemon Bars with a Buttery Shortbread Crust
Ingredients
- 1 cup (125g) all-purpose flour
- 1/2 cup (113g) cold unsalted butter, cut into 1/2-inch cubes
- 1/4 cup (30g) powdered sugar
- 1/4 tsp salt
- 1 cup (200g) granulated sugar
- 2 large eggs, room temperature
- 2 tbsp all-purpose flour
- 1/2 cup (120ml) fresh lemon juice (from 2-3 lemons)
- 1 tbsp fresh lemon zest
- Powdered sugar, for dusting