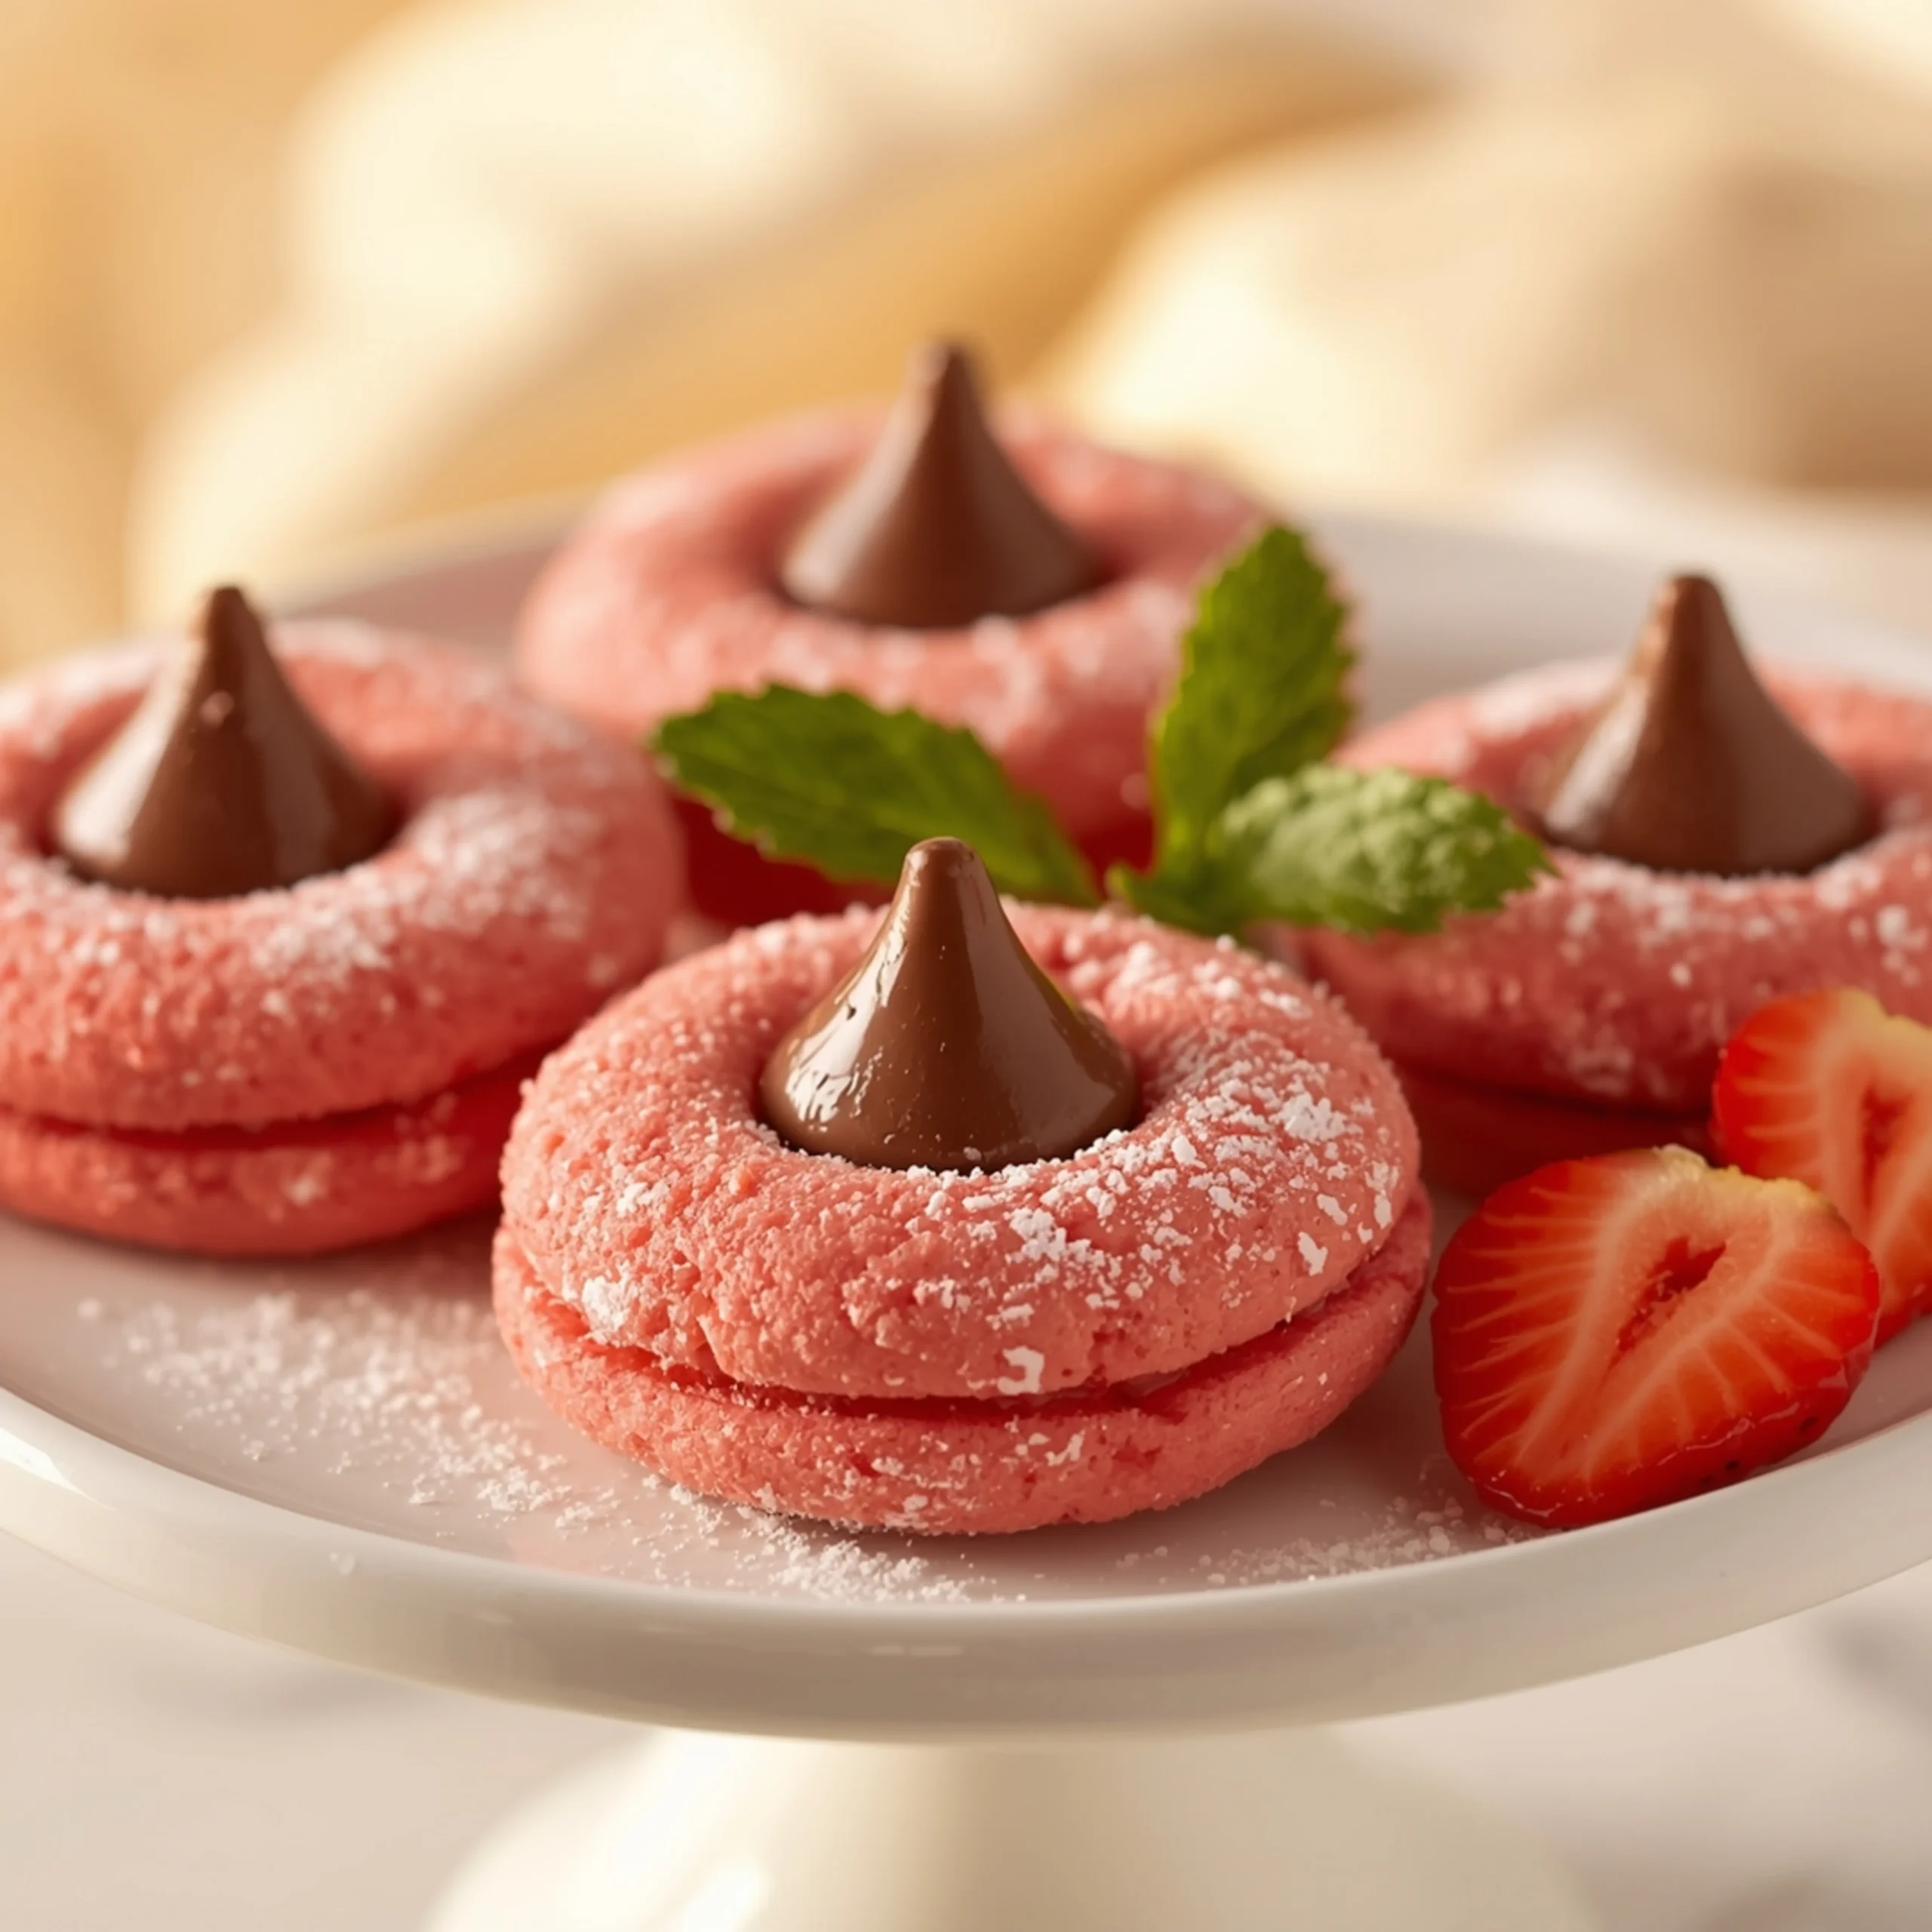
Soft & Chewy Strawberry Kiss Cookies (Simple Recipe)
These strawberry kiss cookies deliver a perfect bite: a soft, buttery cookie base infused with sweet strawberry flavor, crowned with a classic chocolate kiss. They’re incredibly simple to make and are one of my favorite go-to recipes when I need something impressive, fast. If you love easy desserts, this will be your new favorite.
The Engineering: Why This Recipe Works
This cookie’s success hinges on a few key components working in harmony. Understanding them ensures perfect results every time.
- The Base: A butter-rich, sugar cookie-style dough provides the structure. Using softened, room-temperature butter is non-negotiable; it allows for proper creaming with the sugar, creating tiny air pockets that result in a tender, not tough, cookie.
- The Flavor: We use strawberry extract or emulsion instead of fresh fruit. Fresh strawberries release too much water during baking, which would make the cookies cakey and spread excessively. An emulsion provides a robust, baked-in flavor that won’t compromise the texture.
- The Texture: A small amount of cornstarch is the secret weapon for a melt-in-your-mouth texture. It inhibits gluten development, keeping the cookies exceptionally soft and tender, even days after baking.
- The Kiss: The chocolate kiss is added after baking. The residual heat of the cookie is just enough to soften the base of the chocolate, “gluing” it in place without melting the entire candy into a puddle.
Pro Tips for Flawless Kiss Cookies
Execute these steps to graduate from home cook to cookie engineer.
- Chill the Dough: This is the most critical step for preventing spread. Chilling solidifies the butter. When the cold dough hits the hot oven, the cookie sets before the butter fully melts, resulting in a thick, chewy cookie instead of a thin, crispy one. A minimum of 60 minutes is required.
- Uniform Scoops: Use a 1-tablespoon cookie scoop for perfectly uniform cookies. This ensures they all bake at the same rate, so you don’t have a mix of burnt and underdone cookies on the same tray.
- The Perfect Press: Press the chocolate kiss into the center of the cookie within 1-2 minutes of removing it from the oven. The cookie should be puffed and soft. Press down gently but firmly until the edges of the cookie just begin to crack. This anchors the kiss securely.
- Flour Measurement: Do not scoop flour directly from the bag with your measuring cup. This compacts it, adding too much flour and leading to dry, crumbly cookies. To measure correctly: Fluff the flour with a fork, spoon it into your measuring cup, and level it off with the back of a knife.
Ingredient List
Yields: Approx. 30 cookies
Prep time: 15 minutes
Chill time: 1 hour
Bake time: 9-11 minutes
- 1 cup (227g) Unsalted Butter, softened to room temperature
- ¾ cup (150g) Granulated Sugar
- 1 large Egg
- 1 tsp Vanilla Extract
- 1 tsp Strawberry Extract or Emulsion
- 2 ¼ cups (270g) All-Purpose Flour
- 2 tsp Cornstarch
- ½ tsp Baking Soda
- ¼ tsp Salt
- Optional: 2-3 drops red or pink food coloring
- Coating: ¼ cup Granulated Sugar for rolling
- Topping: Approx. 30 Hershey’s Kisses, unwrapped
Step-by-Step Instructions
- Cream Butter & Sugar: In a large bowl with a stand mixer or electric hand mixer, beat the softened butter and ¾ cup of granulated sugar on medium-high speed until light and fluffy, about 2-3 minutes. Scrape down the sides of the bowl.
- Add Wet Ingredients: Add the egg, vanilla extract, and strawberry extract. If using, add the food coloring now. Beat on medium speed until everything is well combined.
- Combine Dry Ingredients: In a separate medium bowl, whisk together the flour, cornstarch, baking soda, and salt.
- Mix the Dough: With the mixer on low speed, gradually add the dry ingredients to the wet ingredients. Mix until just combined—do not overmix. The dough will be soft.
- Chill: Cover the bowl with plastic wrap and chill the dough in the refrigerator for at least 1 hour, or up to 3 days. This step is mandatory for thick cookies.
- Preheat & Prep: When ready to bake, preheat your oven to 350°F (175°C). Line two baking sheets with parchment paper. Place the ¼ cup of sugar for rolling in a small, shallow bowl.
- Shape Cookies: Remove the chilled dough from the fridge. Use a 1-tablespoon cookie scoop to portion the dough. Roll each portion into a smooth ball with your hands, then roll it in the granulated sugar to coat completely.
- Arrange & Bake: Place the sugar-coated dough balls on the prepared baking sheets, about 2 inches apart.
- Bake: Bake for 9-11 minutes. The cookies should be puffed up and the edges just barely set. They will look slightly underdone in the center—this is what you want for a soft cookie.
- Press the Kiss: Remove the baking sheet from the oven. Immediately but gently press one unwrapped chocolate kiss into the center of each hot cookie. The cookie will crack slightly around the edges.
- Cool: Let the cookies cool on the baking sheet for 5-10 minutes before transferring them to a wire rack to cool completely. The chocolate will be soft, so handle with care until it has fully set.
Flavor Variations & Storage
- Chocolate Swaps: Don’t limit yourself to milk chocolate! Hugs (white and milk chocolate), dark chocolate kisses, or even caramel-filled kisses work beautifully.
- Extract Exploration: Swap the strawberry extract for raspberry, cherry, or even almond for a completely different flavor profile.
- Storage: Store baked cookies in an airtight container at room temperature for up to 5 days.
- Make-Ahead: The dough can be made and refrigerated for up to 3 days. You can also roll the dough into balls, freeze them on a baking sheet, and then transfer to a freezer bag for up to 3 months. Bake from frozen, adding 1-2 minutes to the bake time.
These cookies are the perfect end to a simple weeknight meal, like a hassle-free salmon and veggie sheet pan dinner.
COMMON MISTAKES TO AVOID
- Mistake: Pressing the Kisses in before baking.
Fix: Always press the Kisses into the cookies immediately after they come out of the oven. Baking them will result in a melted, misshapen chocolate puddle. - Mistake: Cookies spreading into thin, flat discs.
Fix: You skipped or shortened the chilling time. Chilling the dough for at least 60 minutes is essential to solidify the butter and control the spread. - Mistake: The chocolate Kisses fall off after cooling.
Fix: You either waited too long to press them in, or you didn’t press firmly enough. The cookie needs to be hot and soft to “grab” the chocolate base as it cools and sets.
FAQ
Q: Can I use fresh or frozen strawberries instead of extract?
A: It’s not recommended. Fresh or frozen strawberries contain a lot of water, which will make the dough too wet and cause the cookies to spread excessively and have a cake-like texture. For that concentrated strawberry flavor, stick with an extract or emulsion.
Q: Why did my cookies turn out dry and crumbly?
A: The most likely culprit is too much flour. Be sure to measure your flour by spooning it into the measuring cup and leveling it, not by scooping directly from the bag. Over-baking by even a minute or two can also dry them out.
Q: Can I make these without a mixer?
A: Yes, but it requires more effort. You can cream the softened butter and sugar by hand with a sturdy spatula or wooden spoon. It will take several minutes of vigorous mixing to get it light and fluffy.
NUTRITIONAL SNAPSHOT
| Nutrient | Amount per Serving |
|---|---|
| Calories | 115 kcal |
| Protein | 1.2g |
| Fat | 6.5g |
| Net Carbs | 12.8g |
| Fiber | 0.3g |
| Sugar | 8g |
Disclaimer: Values are estimates and will vary based on exact ingredients used.
For another impressive dessert, consider the beautiful Chocolate Yule Log (Bûche de Noël) recipe for your next holiday gathering.

Soft & Chewy Strawberry Kiss Cookies (Simple Recipe)
These strawberry kiss cookies deliver a perfect bite: a soft, buttery cookie base infused with sweet strawberry flavor, crowned with a classic chocolate kiss. They're incredibly simple to make and are one of my favorite go-to recipes when I need something impressive, fast. If you love easy desserts, this will be your new favorite.
Ingredients
- 1 cup Unsalted Butter, softened
- ¾ cup Granulated Sugar
- 1 large Egg
- 1 tsp Vanilla Extract
- 1 tsp Strawberry Extract or Emulsion
- 2 ¼ cups All-Purpose Flour
- 2 tsp Cornstarch
- ½ tsp Baking Soda
- ¼ tsp Salt
- 2-3 drops red or pink food coloring (optional)
- ¼ cup Granulated Sugar for rolling
- Approx. 30 Hershey's Kisses, unwrapped
Instructions
- In a large bowl with a stand mixer or electric hand mixer, beat the softened butter and ¾ cup of granulated sugar on medium-high speed until light and fluffy, about 2-3 minutes. Scrape down the sides of the bowl.
- Add the egg, vanilla extract, and strawberry extract. If using, add the food coloring now. Beat on medium speed until everything is well combined.
- In a separate medium bowl, whisk together the flour, cornstarch, baking soda, and salt.
- With the mixer on low speed, gradually add the dry ingredients to the wet ingredients. Mix until just combined—do not overmix. The dough will be soft.
- Cover the bowl with plastic wrap and chill the dough in the refrigerator for at least 1 hour, or up to 3 days. This step is mandatory for thick cookies.
- When ready to bake, preheat your oven to 350°F (175°C). Line two baking sheets with parchment paper. Place the ¼ cup of sugar for rolling in a small, shallow bowl.
- Remove the chilled dough from the fridge. Use a 1-tablespoon cookie scoop to portion the dough. Roll each portion into a smooth ball with your hands, then roll it in the granulated sugar to coat completely.
- Place the sugar-coated dough balls on the prepared baking sheets, about 2 inches apart.
- Bake for 9-11 minutes. The cookies should be puffed up and the edges just barely set. They will look slightly underdone in the center—this is what you want for a soft cookie.
- Remove the baking sheet from the oven. Immediately but gently press one unwrapped chocolate kiss into the center of each hot cookie. The cookie will crack slightly around the edges.
- Let the cookies cool on the baking sheet for 5-10 minutes before transferring them to a wire rack to cool completely. The chocolate will be soft, so handle with care until it has fully set.