
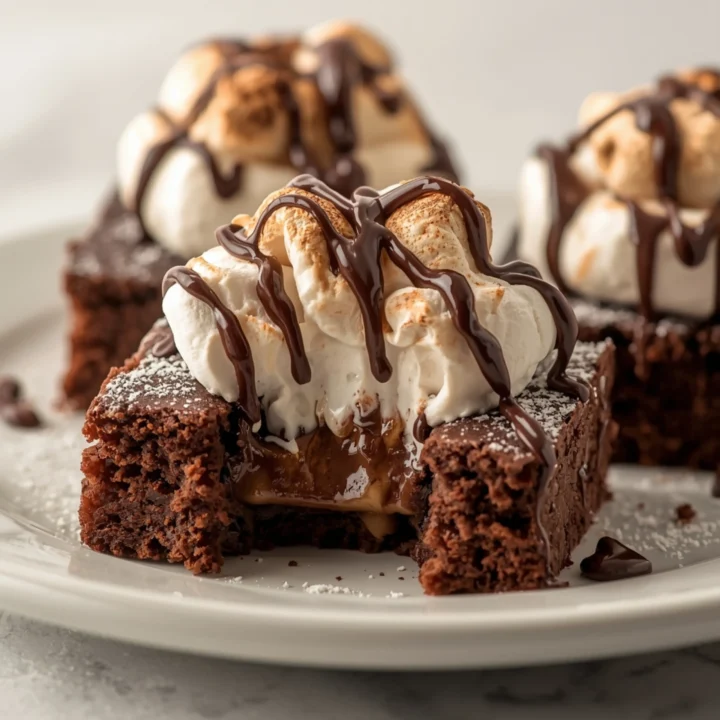
Rich Hot Chocolate Brownies with Toasted Marshmallow
These Hot Chocolate Brownies deliver a dense, fudgy center and a crackly top, perfectly capturing the flavor of a cozy mug of hot cocoa. This recipe is engineered for a rich chocolate flavor and a perfectly gooey, toasted marshmallow topping that won’t burn. If you’re a fan of decadent, comforting treats, explore my other dessert recipes for more inspiration.
The “Hot Chocolate” Advantage: Why This Recipe Works
Standard brownies rely solely on cocoa powder and/or melted chocolate. This recipe introduces a key ingredient: high-quality hot chocolate mix.
- Deeper Flavor: Hot chocolate mix often contains powdered milk, sugar, and emulsifiers. This creates a creamier, more nuanced chocolate flavor reminiscent of actual liquid hot chocolate.
- Fudgy Texture: The extra milk solids and sugar in the mix contribute to a denser, chewier, and fudgier crumb. It prevents the brownies from becoming too cakey.
- Enhanced Sweetness: The mix provides a balanced sweetness that complements the bitterness of the dark cocoa powder, creating a more complex and satisfying taste profile.
Engineer’s Toolkit: Essential Ingredients & Equipment
Precision is key. Using the right components prevents common failures.
Key Ingredients:
- Unsalted Butter: Gives you full control over the salt content.
- Granulated & Brown Sugar: A combination is critical. Granulated sugar creates the classic crackly top, while brown sugar adds moisture and a slight molasses note for chewiness.
- High-Quality Hot Chocolate Mix: Choose a rich, dark variety. Avoid mixes with dehydrated mini marshmallows, as they will melt unpredictably.
- Dutch-Process Unsweetened Cocoa Powder: This cocoa is less acidic, providing a smoother, darker, and more intense chocolate flavor that won’t react poorly with other ingredients.
- Large Eggs: Use room temperature eggs. They emulsify better into the batter, creating a more uniform texture.
- Mini Marshmallows: Their small size ensures they melt evenly and create a cohesive topping layer without large air gaps.
Essential Equipment:
- 8×8 or 9×9 Inch Metal Baking Pan: Metal conducts heat evenly, ensuring the edges and center cook at a similar rate. Glass or ceramic pans can lead to over-baked edges.
- Parchment Paper Sling: Line the pan with parchment paper, leaving an overhang on two sides. This allows you to lift the entire batch of brownies out cleanly for perfect slicing.
- Kitchen Scale: For baking, volume (cups) is imprecise. A scale guarantees the correct flour-to-fat ratio, which is the secret to a perfect brownie texture every time.
For more foundational baking guides and ideas, you can browse all my easy-to-follow recipes.
STEP-BY-STEP INSTRUCTIONS
Prep Time: 15 minutes
Cook Time: 35-40 minutes
Total Time: 55 minutes
Phase 1: Prepare the Brownie Batter
- Preheat & Prep: Preheat your oven to 350°F (175°C). Create a parchment paper sling in your 8×8 inch metal baking pan and lightly grease it.
- Melt Butter & Sugars: In a medium saucepan over low heat, melt the unsalted butter. Remove from heat and whisk in the granulated sugar and brown sugar until fully combined. The mixture will look grainy.
- Incorporate Cocoa & Hot Chocolate: Whisk in the Dutch-process cocoa powder and hot chocolate mix until smooth. The mixture will thicken considerably.
- Add Eggs & Vanilla: Add the room temperature eggs one at a time, whisking vigorously for about 30 seconds after each addition until the batter becomes glossy and smooth. This step is crucial for developing the crackly top. Stir in the vanilla extract and salt.
- Fold in Dry Ingredients: Gently fold in the all-purpose flour using a spatula until just combined. Do not overmix. A few streaks of flour are acceptable.
- Add Chocolate Chips: Fold in the semi-sweet chocolate chips.
Phase 2: Bake & Add Topping
- First Bake: Pour the batter into your prepared pan and spread it into an even layer. Bake for 25-30 minutes. The brownies should be set around the edges, and a toothpick inserted into the center should come out with moist crumbs, not wet batter.
- Add Marshmallows: Carefully remove the pan from the oven. Immediately sprinkle the mini marshmallows in an even, compact layer over the top of the hot brownies.
- Second Bake (Melt & Toast): Return the pan to the oven and bake for another 3-5 minutes, just until the marshmallows are puffed and slightly melted.
- Broil (Optional but Recommended): For a golden, toasted “campfire” finish, turn your oven to the broil setting (high). Place the pan on a middle rack (NOT the top rack) and broil for 30-60 seconds. Watch constantly, as marshmallows can burn in an instant. Remove as soon as they are golden brown.
- Cool Completely: Let the brownies cool in the pan on a wire rack for at least 2 hours, or until they reach room temperature. This step is non-negotiable for clean cuts. Chilling them in the fridge for 30 minutes before slicing can also help.
- Slice & Serve: Use the parchment sling to lift the brownies from the pan. Use a sharp, greased knife to cut into squares.
Customization & Flavor Matrix
These brownies are a perfect canvas for experimentation.
- Spice It Up: Add 1/2 teaspoon of cinnamon or a pinch of cayenne pepper to the dry ingredients for a Mexican hot chocolate flair.
- Texture Boost: Mix in 1/2 cup of toasted pecans or chopped walnuts with the chocolate chips for added crunch.
- Swirl-Ins: After pouring the batter into the pan, dollop a few spoonfuls of salted caramel sauce or peanut butter on top and gently swirl with a knife before the first bake.
- Festive Flavors: For a holiday version, consider adding 1/4 teaspoon of peppermint extract. This pairs beautifully with chocolate, an idea inspired by these delicious peppermint chocolate chip cookies.
COMMON MISTAKES TO AVOID
-
Mistake: Overbaking the brownies before adding the marshmallows.
Fix: Pull the brownies out when a toothpick shows moist, fudgy crumbs, not when it’s perfectly clean. They will continue to cook from residual heat. -
Mistake: Broiling the marshmallows too close to the heating element.
Fix: Always use a middle oven rack for broiling the topping. This diffuses the intense heat and gives you more control, preventing the marshmallows from turning black in seconds. -
Mistake: Slicing the brownies while they are still warm.
Fix: Be patient. A complete cool-down allows the chocolate and marshmallow to set, ensuring clean, sharp squares instead of a gooey mess. For ultra-clean cuts, chill the slab in the fridge for 30 minutes.
FAQ
Q: Can I use a different pan size?
A: Yes, but you must adjust the baking time. For a 9×13 inch pan, the brownies will be thinner; start checking for doneness around 20-22 minutes. For a 9-inch round pan, they may need slightly longer.
Q: How should I store Hot Chocolate Brownies?
A: Store them in an airtight container at room temperature for up to 4 days. The marshmallow topping may become slightly sticky over time. Do not refrigerate, as it will dry out the brownie base.
Q: Can I make these ahead of time?
A: Absolutely. They are even fudgier on day two. Bake them completely, let them cool, and store them uncut in the pan, tightly covered. Slice just before serving for the freshest appearance.
If you enjoyed this decadent recipe, you might also like to try these fruity and creamy cherry cheesecake bars for your next baking project. Or for a lighter treat, this creamy blueberry coconut smoothie is a fantastic option.
NUTRITIONAL SNAPSHOT
| Nutrient | Amount per Serving (1 of 16) |
|---|---|
| Calories | 245 kcal |
| Protein | 3g |
| Fat | 13g |
| Net Carbs | 28g |
| Fiber | 2g |
| Sugar | 22g |
Disclaimer: Values are estimates and can vary based on specific ingredients used.
Rich Hot Chocolate Brownies with Toasted Marshmallow
These Hot Chocolate Brownies deliver a dense, fudgy center and a crackly top, perfectly capturing the flavor of a cozy mug of hot cocoa. This recipe is engineered for a rich chocolate flavor and a perfectly gooey, toasted marshmallow topping that won't burn. If you’re a fan of decadent, comforting treats, explore my other dessert recipes for more inspiration.
Ingredients
- 1/2 cup (113g) unsalted butter, melted
- 1 cup (200g) granulated sugar
- 1/4 cup (55g) packed light brown sugar
- 1/2 cup (45g) Dutch-process unsweetened cocoa powder
- 1/2 cup (60g) high-quality hot chocolate mix
- 2 large eggs, room temperature
- 1 teaspoon vanilla extract
- 1/4 teaspoon salt
- 1/2 cup (60g) all-purpose flour
- 1/2 cup (85g) semi-sweet chocolate chips
- 2 cups (90g) mini marshmallows
Instructions
- Preheat your oven to 350°F (175°C). Create a parchment paper sling in your 8x8 inch metal baking pan and lightly grease it.
- In a medium saucepan over low heat, melt the unsalted butter. Remove from heat and whisk in the granulated sugar and brown sugar until fully combined. The mixture will look grainy.
- Whisk in the Dutch-process cocoa powder and hot chocolate mix until smooth. The mixture will thicken considerably.
- Add the room temperature eggs one at a time, whisking vigorously for about 30 seconds after each addition until the batter becomes glossy and smooth. This step is crucial for developing the crackly top. Stir in the vanilla extract and salt.
- Gently fold in the all-purpose flour using a spatula until just combined. Do not overmix. A few streaks of flour are acceptable.
- Fold in the semi-sweet chocolate chips.
- Pour the batter into your prepared pan and spread it into an even layer. Bake for 25-30 minutes. The brownies should be set around the edges, and a toothpick inserted into the center should come out with moist crumbs, not wet batter.
- Carefully remove the pan from the oven. Immediately sprinkle the mini marshmallows in an even, compact layer over the top of the hot brownies.
- Return the pan to the oven and bake for another 3-5 minutes, just until the marshmallows are puffed and slightly melted.
- For a golden, toasted "campfire" finish, turn your oven to the broil setting (high). Place the pan on a middle rack (NOT the top rack) and broil for 30-60 seconds. Watch constantly, as marshmallows can burn in an instant. Remove as soon as they are golden brown.
- Let the brownies cool in the pan on a wire rack for at least 2 hours, or until they reach room temperature. This step is non-negotiable for clean cuts. Chilling them in the fridge for 30 minutes before slicing can also help.
- Use the parchment sling to lift the brownies from the pan. Use a sharp, greased knife to cut into squares.