
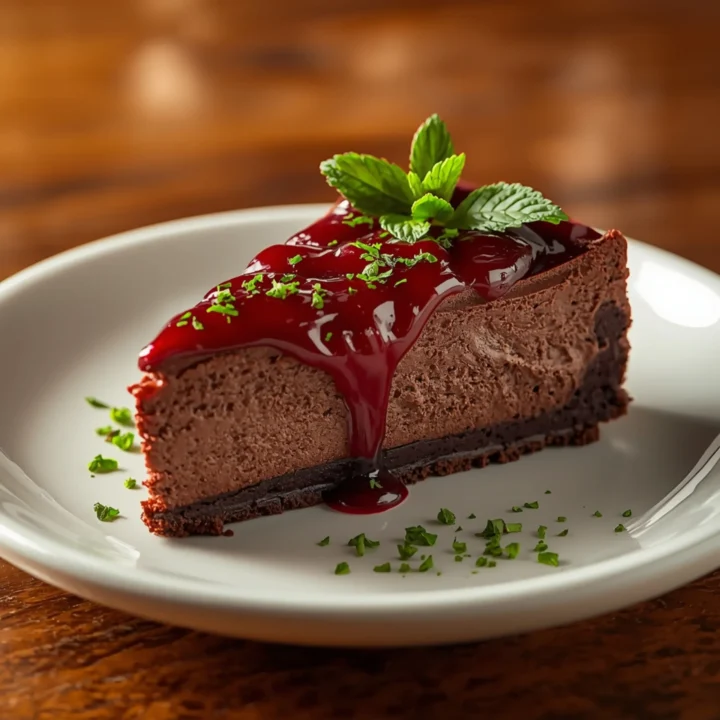
Rich Dark Chocolate Cherry Cheesecake (A No-Fail Recipe)
This Dark Chocolate Cherry Cheesecake features a crisp chocolate crust, a dense, creamy dark chocolate filling, and a bright, tangy cherry topping. It’s a showstopper built on simple techniques for a perfect result. This recipe quickly became one of my most requested desserts, delivering a truly decadent experience.
Cheesecake Gear: The Essential Toolkit
The right tools are non-negotiable for cheesecake success. They ensure even cooking and a clean presentation.
- 9-inch Springform Pan: This is critical. The removable sides allow you to release the delicate cheesecake without inverting it.
- Electric Mixer (Stand or Hand): Necessary for achieving a lump-free, aerated filling. Whipping cream cheese by hand is a recipe for a sore arm and a lumpy texture.
- Large Roasting Pan: For the water bath (bain-marie). It must be large enough to hold the springform pan with at least an inch of space around it.
- Heavy-Duty Aluminum Foil: You’ll need two large sheets to wrap the outside of your springform pan, creating a waterproof seal for the water bath.
Ingredient Deep Dive: Why These Components Work
Each ingredient is chosen for its specific function, creating a balanced and structurally sound cheesecake.
- Full-Fat Block Cream Cheese: Do not substitute with low-fat or whipped cream cheese. The high fat content is essential for a rich, dense, and creamy texture that sets properly. It must be at room temperature to prevent lumps.
- High-Quality Dark Chocolate (60-70%): The cacao percentage matters. This range provides intense chocolate flavor without being overly sweet or bitter, perfectly complementing the sweet cherries.
- Sour Cream: This is the secret to a tangy, ultra-creamy cheesecake. It adds moisture and a slight acidity that cuts through the richness of the cream cheese and chocolate.
- Room Temperature Eggs: Cold eggs can cause the cream cheese mixture to curdle and become lumpy. Room temp eggs incorporate smoothly, creating a homogenous, silky batter.
The combination of dark chocolate and tart fruit is a classic for a reason. While this recipe uses cherries, exploring similar pairings, like in a raspberry chocolate lasagna, can yield equally delicious results.
Step-by-Step Instructions
Follow this sequence precisely. Do not rush the cooling steps.
Part 1: Prepare the Cherry Topping
- Combine: In a small saucepan, combine the pitted cherries, 1/4 cup sugar, water, and cornstarch. Stir until the cornstarch dissolves.
- Cook: Bring the mixture to a simmer over medium heat, stirring occasionally. Cook for 5-7 minutes, until the sauce has thickened and the cherries have softened.
- Finish: Remove from heat and stir in the lemon juice. Transfer to a bowl and let it cool completely. You can place it in the refrigerator to speed this up.
Part 2: Build the Chocolate Crust
- Preheat & Prep: Adjust your oven rack to the middle position and preheat to 350°F (175°C). Wrap the outside of a 9-inch springform pan with two layers of heavy-duty aluminum foil, ensuring no gaps for water to seep in.
- Mix Crust: In a medium bowl, combine the chocolate cookie crumbs, melted butter, and 1 tablespoon of sugar. The mixture should resemble wet sand.
- Press: Firmly press the crumb mixture into the bottom and slightly up the sides of the prepared springform pan. Use the bottom of a flat glass to pack it tightly.
- Bake: Bake for 10 minutes. Remove and let it cool completely on a wire rack.
Part 3: Engineer the Cheesecake Filling
- Melt Chocolate: Melt the dark chocolate in a microwave-safe bowl in 30-second increments, stirring between each, until smooth. Set aside to cool slightly.
- Beat Cream Cheese: In a large bowl using an electric mixer, beat the room temperature cream cheese on medium speed until completely smooth and creamy, about 2-3 minutes. Scrape down the sides and bottom of the bowl frequently.
- Add Sugar & Wet Ingredients: Add the 1 1/4 cups of sugar and beat until smooth. Add the sour cream and vanilla, mixing on low speed until just combined.
- Incorporate Eggs: Add the room temperature eggs one at a time, mixing on low speed after each addition until the yolk just disappears. DO NOT OVERMIX. Overmixing incorporates too much air, which causes cracks.
- Fold in Chocolate: Gently fold in the melted and cooled dark chocolate with a spatula until the batter is uniform in color.
- Pour: Pour the filling over the cooled crust and smooth the top.
Part 4: The Water Bath & Baking
- Set Up Bath: Place the foil-wrapped springform pan inside your large roasting pan. Carefully pour boiling water into the roasting pan until it comes about 1 inch up the sides of the cheesecake pan.
- Bake: Carefully transfer to the oven. Bake at 350°F (175°C) for 60-70 minutes. The cheesecake is done when the edges are set, but the center 2-3 inches still have a slight jiggle. It will continue to set as it cools.
- Cool Down (CRITICAL): Turn the oven off, crack the oven door open, and let the cheesecake cool inside the oven for 1 hour. This gradual temperature change is key to preventing cracks.
- Chill: Remove the cheesecake from the water bath and the foil. Let it cool on a wire rack until it reaches room temperature. Then, cover loosely with plastic wrap and refrigerate for at least 6 hours, but preferably overnight.
Part 5: Assemble and Serve
- Release: Once fully chilled, run a thin knife around the edge of the cheesecake before releasing the springform pan’s sides.
- Top: Spoon the cooled cherry topping over the cheesecake before slicing and serving.
The No-Crack Method: A Perfect Top, Every Time
Cracks are the enemy of a beautiful cheesecake. They are caused by one of three things: over-mixing, over-baking, or sudden temperature changes. Here’s how to guarantee a smooth top.
- Low Speed is Law: After adding the eggs, keep your mixer on its lowest setting. You are combining, not whipping.
- The Jiggle Test: Learn to spot the “slight jiggle” in the center. If the whole cake wobbles, it needs more time. If it’s rock solid, it’s likely over-baked.
- The Gradual Cool-Down: The 1-hour rest in the turned-off, cracked-open oven is the most important step. It prevents the cheesecake from shrinking too quickly, which is the primary cause of surface cracks.
Make-Ahead & Storage Strategy
This is the perfect dessert to prepare in advance, making it ideal for gatherings. For more recipes that you can prep ahead of time, a well-organized plan is always key.
- Refrigeration: The cheesecake (without the topping) can be stored in the refrigerator, covered, for up to 4 days. The flavor actually deepens and improves by day two.
- Freezing:
- Chill the cheesecake completely as directed.
- Place the uncovered cheesecake in the freezer for 1 hour to firm up.
- Remove and wrap tightly in two layers of plastic wrap, followed by a layer of aluminum foil.
- Freeze for up to 2 months.
- To thaw, transfer the wrapped cheesecake to the refrigerator and let it thaw overnight. Add the cherry topping just before serving.
COMMON MISTAKES TO AVOID
- Mistake: Using cold ingredients. Fix: Let your cream cheese, eggs, and sour cream sit out for at least 2 hours to reach true room temperature. This ensures a smooth, lump-free batter.
- Mistake: Over-mixing the batter after adding eggs. Fix: Mix on the lowest speed possible and stop as soon as each egg is incorporated. Excess air creates bubbles that rise and cause cracks.
- Mistake: Cooling the cheesecake too quickly. Fix: Follow the gradual cool-down process meticulously. The 1-hour rest in the cooling oven is not optional; it’s essential for a crack-free surface.
FAQ
Q: Why did my cheesecake crack even with a water bath?
A: The most common culprits are over-baking or cooling it too fast. Even with a water bath, cracking the oven door and letting it cool gradually for an hour is a critical step to prevent the surface from contracting too quickly.
Q: Can I use a different type of crust?
A: Absolutely. A classic graham cracker crust or a shortbread crust would also be delicious. Simply substitute the chocolate cookie crumbs with an equal amount of your preferred crumb.
Q: How do I know for sure when my cheesecake is done baking?
A: The “jiggle test” is your best indicator. The outer 2-3 inches of the cheesecake should look set and matte, while the very center should still have a slight wobble, similar to Jell-O. It will firm up completely as it chills.
For those looking for a lighter, but still delicious, fruit-forward dessert, a chia seed pudding with berries offers a fantastic and healthy alternative.
NUTRITIONAL SNAPSHOT
(Estimates for 1/12th of the cake)
| Nutrient | Amount per Serving |
|---|---|
| Calories | 580 kcal |
| Protein | 9g |
| Fat | 42g |
| Net Carbs | 38g |
| Fiber | 3g |
| Sugar | 35g |
Rich Dark Chocolate Cherry Cheesecake (A No-Fail Recipe)
This Dark Chocolate Cherry Cheesecake features a crisp chocolate crust, a dense, creamy dark chocolate filling, and a bright, tangy cherry topping. It's a showstopper built on simple techniques for a perfect result.
Ingredients
- 2 cups chocolate cookie crumbs (from ~22 Oreos, filling removed)
- 6 tablespoons unsalted butter (melted)
- 1 tablespoon granulated sugar
- 2 cups pitted sweet cherries (fresh or frozen)
- 1/4 cup granulated sugar
- 2 tablespoons water
- 1 tablespoon cornstarch
- 1 tablespoon lemon juice
- 32 ounces (four 8-oz blocks) full-fat cream cheese (room temperature)
- 1 1/4 cups granulated sugar
- 1/2 cup sour cream (room temperature)
- 1 teaspoon pure vanilla extract
- 4 large eggs (room temperature)
- 8 ounces high-quality dark chocolate (60-70% cacao, melted and cooled)
Instructions
- In a small saucepan, combine the pitted cherries, 1/4 cup sugar, water, and cornstarch. Stir until the cornstarch dissolves.
- Bring the mixture to a simmer over medium heat, stirring occasionally. Cook for 5-7 minutes, until the sauce has thickened and the cherries have softened.
- Remove from heat and stir in the lemon juice. Transfer to a bowl and let it cool completely. You can place it in the refrigerator to speed this up.
- Adjust your oven rack to the middle position and preheat to 350°F (175°C). Wrap the outside of a 9-inch springform pan with two layers of heavy-duty aluminum foil, ensuring no gaps for water to seep in.
- In a medium bowl, combine the chocolate cookie crumbs, melted butter, and 1 tablespoon of sugar. The mixture should resemble wet sand.
- Firmly press the crumb mixture into the bottom and slightly up the sides of the prepared springform pan. Use the bottom of a flat glass to pack it tightly.
- Bake for 10 minutes. Remove and let it cool completely on a wire rack.
- Melt the dark chocolate in a microwave-safe bowl in 30-second increments, stirring between each, until smooth. Set aside to cool slightly.
- In a large bowl using an electric mixer, beat the room temperature cream cheese on medium speed until completely smooth and creamy, about 2-3 minutes. Scrape down the sides and bottom of the bowl frequently.
- Add the 1 1/4 cups of sugar and beat until smooth. Add the sour cream and vanilla, mixing on low speed until just combined.
- Add the room temperature eggs one at a time, mixing on low speed after each addition until the yolk just disappears. DO NOT OVERMIX. Overmixing incorporates too much air, which causes cracks.
- Gently fold in the melted and cooled dark chocolate with a spatula until the batter is uniform in color.
- Pour the filling over the cooled crust and smooth the top.
- Place the foil-wrapped springform pan inside your large roasting pan. Carefully pour boiling water into the roasting pan until it comes about 1 inch up the sides of the cheesecake pan.
- Carefully transfer to the oven. Bake at 350°F (175°C) for 60-70 minutes. The cheesecake is done when the edges are set, but the center 2-3 inches still have a slight jiggle. It will continue to set as it cools.
- Turn the oven off, crack the oven door open, and let the cheesecake cool inside the oven for 1 hour. This gradual temperature change is key to preventing cracks.
- Remove the cheesecake from the water bath and the foil. Let it cool on a wire rack until it reaches room temperature. Then, cover loosely with plastic wrap and refrigerate for at least 6 hours, but preferably overnight.
- Once fully chilled, run a thin knife around the edge of the cheesecake before releasing the springform pan's sides.
- Spoon the cooled cherry topping over the cheesecake before slicing and serving.