
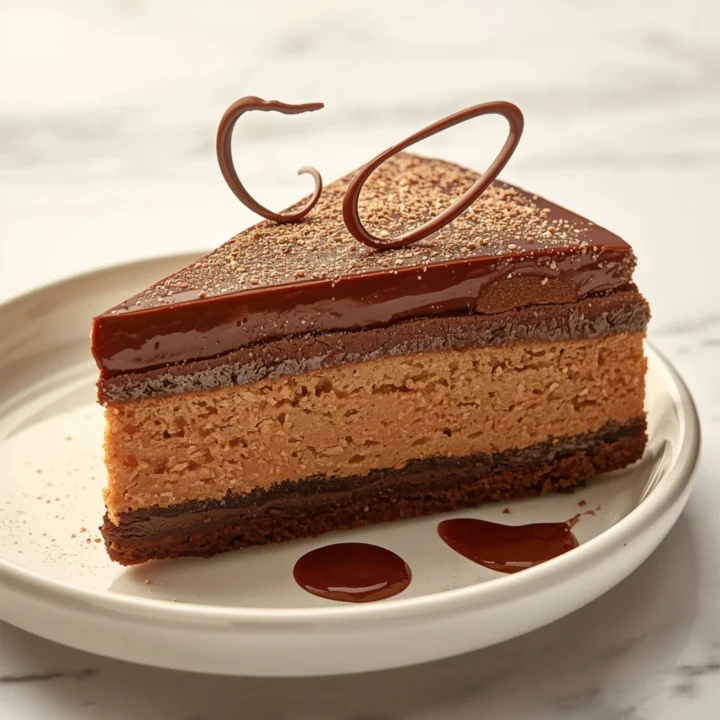
Rich Chocolate Biscuit Cake (No Oven Needed)
This no-bake chocolate biscuit cake delivers a deeply satisfying crunch and a rich, fudgy texture without ever turning on your oven. It’s a powerhouse of flavor and one of the simplest, most rewarding desserts you can make. The blueprint is simple: crunchy biscuits suspended in a dense, decadent chocolate base.
Step-by-Step Instructions
- Prep Your Pan: Line an 8×8 inch (20×20 cm) square pan with parchment paper, leaving an overhang on two sides to act as handles for easy removal later.
- Break the Biscuits: Break the biscuits into small, irregular pieces (about 1/2 to 1-inch). You want a mix of larger chunks and smaller crumbs for texture. Place them in a large bowl.
- Create the Chocolate Base: In a medium saucepan, melt the butter, sugar, and cocoa powder over low-medium heat. Stir constantly until the butter is fully melted and the sugar has dissolved. The mixture should be smooth and glossy.
- Temper the Egg: Remove the saucepan from the heat. In a small bowl, lightly beat the egg. Very slowly, pour about a quarter of the hot chocolate mixture into the beaten egg, whisking vigorously. This gently raises the egg’s temperature to prevent it from scrambling.
- Combine & Cook: Pour the tempered egg mixture back into the saucepan with the rest of the chocolate base. Return to low heat and cook, stirring constantly, for 2 minutes. The mixture will thicken noticeably.
- Melt Final Chocolate: Remove from heat again. Add the 4 oz of chopped semi-sweet chocolate and the vanilla extract. Stir until the chocolate is completely melted and the mixture is silky smooth.
- Combine Components: Pour the hot chocolate mixture over the broken biscuits in the large bowl. Use a spatula to gently fold everything together until every biscuit piece is thoroughly coated.
- Press and Chill (Phase 1): Transfer the mixture to your prepared pan. Press it down firmly and evenly with the back of a spoon or a spatula to eliminate air pockets. Refrigerate for at least 30 minutes while you prepare the topping.
- Make the Ganache: Place the remaining 4 oz of chopped chocolate in a heatproof bowl. Heat the heavy cream in a small saucepan until it just begins to simmer around the edges (do not boil). Pour the hot cream over the chocolate and let it sit undisturbed for 5 minutes.
- Finish the Ganache: Whisk the chocolate and cream mixture slowly, starting from the center and working your way out, until a smooth, glossy ganache forms.
- Top and Chill (Phase 2): Pour the ganache over the chilled biscuit base. Tilt the pan to spread it into an even layer. Refrigerate the cake for at least 4 hours, or preferably overnight, until completely firm.
- Slice and Serve: Use the parchment paper handles to lift the cake from the pan. For clean cuts, use a large, sharp knife dipped in hot water and wiped dry between each slice.
The Biscuit Matrix: Choosing Your Base
The biscuit is the structural backbone of this cake. Your choice directly impacts the final texture and sweetness.
- Digestive Biscuits (The Classic): The traditional choice. They offer a semi-sweet, slightly wheaty flavor and a sandy, crumbly texture that softens perfectly.
- Rich Tea Biscuits (The UK Standard): Plainer and less sweet than digestives, allowing the chocolate to be the star. They provide a firmer, snappier crunch.
- Shortbread Cookies (The Buttery Upgrade): For an ultra-rich cake. The high butter content makes the final product incredibly decadent and tender.
- Graham Crackers (The American Option): Adds a distinct honey and cinnamon note. The texture is crisp and porous, soaking up the chocolate beautifully.
Engineering the Perfect Chocolate Binder
The chocolate mixture isn’t just for flavor; it’s a carefully engineered system that holds the cake together. Understanding its components helps you troubleshoot and customize. While we offer a wide range of simple recipes, this one has a bit of science behind it.
- The Fat (Butter): Provides richness, flavor, and a smooth mouthfeel. Using unsalted butter gives you full control over the final salt balance.
- The Emulsifier (Egg): A lightly cooked egg adds incredible richness and acts as a binder, creating a fudgy, cohesive texture that helps the cake set firmly. Tempering is non-negotiable to avoid a scrambled mess.
- The Structure (Melted Chocolate): When the cake chills, the cocoa solids and cocoa butter in the melted chocolate crystallize, providing the primary structure that holds the biscuit pieces together. Use a quality chocolate with at least 50-60% cacao for the best results.
Blueprint for Customization: Add-ins & Flavor Mods
This base recipe is a blank canvas. Use a 1/2 to 1 cup total of add-ins to avoid compromising the cake’s structure.
- For Crunch & Texture:
- Toasted walnuts, pecans, or almonds
- Mini marshmallows (add at the very end with the biscuits)
- For a Chewy Contrast:
- Dried cherries, cranberries, or chopped apricots
- Shredded coconut
- For Aromatic Depth:
- 1-2 teaspoons of instant espresso powder (dissolved in the butter)
- The zest of one orange
- 1-2 tablespoons of liqueur like dark rum, amaretto, or Cointreau
- For a Fruity Twist: For cooks who love combining fruit and chocolate, adding dried cherries or orange zest is a great start. This approach to pairing flavors is also explored in unique desserts like these delightful strawberry pop-tart sugar cookies.
COMMON MISTAKES TO AVOID
- Mistake: The chocolate sauce has bits of scrambled egg in it.
Fix: You skipped the tempering step. Always add the hot liquid to the egg slowly while whisking constantly before adding it all back to the saucepan. - Mistake: The cake falls apart when sliced.
Fix: It needs more time to set. This cake is not ready in an hour. Give it a minimum of 4 hours in the refrigerator, but overnight is best for a firm, clean slice. Ensure you pressed the base firmly into the pan. - Mistake: The ganache topping is greasy or split.
Fix: The cream was too hot or you stirred it too aggressively. Let the hot cream sit on the chocolate for a full 5 minutes to melt it gently, then whisk slowly and smoothly until it comes together.
FAQ
Q: Can I make this recipe vegan or dairy-free?
A: Yes. Use a high-quality plant-based butter block, vegan-certified biscuits (many digestive and shortbread-style cookies are), and a plant-based heavy cream alternative for the ganache. Use a “flax egg” (1 tbsp ground flaxseed + 3 tbsp water) in place of the chicken egg.
Q: What is the best way to store the chocolate biscuit cake?
A: Store it in an airtight container in the refrigerator for up to 5 days. The flavors actually meld and improve after the first day. It can also be frozen for up to 2 months.
Q: I don’t want to use a raw egg. Is there a substitute?
A: While the egg is briefly cooked in this recipe, you can omit it. To compensate for the lost richness and binding power, substitute the egg with 2 tablespoons of golden syrup or light corn syrup, added with the butter and sugar. The texture will be slightly chewier. For those who prefer baked desserts with rich, complex fillings, a Texas Chocolate Pecan Pie is an excellent alternative that uses a fully-baked custard.
NUTRITIONAL SNAPSHOT
| Nutrient | Amount per Serving |
|---|---|
| Calories | 410 kcal |
| Protein | 5g |
| Fat | 26g |
| Net Carbs | 38g |
| Fiber | 3g |
| Sugar | 25g |
*Estimates are based on 1/12th of the cake.*
Rich Chocolate Biscuit Cake (No Oven Needed)
This no-bake chocolate biscuit cake delivers a deeply satisfying crunch and a rich, fudgy texture without ever turning on your oven. It's a powerhouse of flavor and one of the simplest, most rewarding desserts you can make. The blueprint is simple: crunchy biscuits suspended in a dense, decadent chocolate base.
Ingredients
- 8 oz (225g) digestive biscuits or other plain, crisp cookies
- 1/2 cup (113g) unsalted butter, cubed
- 1/2 cup (100g) granulated sugar
- 1/4 cup (25g) unsweetened cocoa powder
- 1 large egg
- 4 oz (115g) semi-sweet chocolate, finely chopped
- 1 tsp vanilla extract
- 4 oz (115g) semi-sweet chocolate, finely chopped (for ganache topping)
- 1/2 cup (120ml) heavy cream
Instructions
- Line an 8x8 inch (20x20 cm) square pan with parchment paper, leaving an overhang on two sides to act as handles for easy removal later.
- Break the biscuits into small, irregular pieces (about 1/2 to 1-inch). You want a mix of larger chunks and smaller crumbs for texture. Place them in a large bowl.
- In a medium saucepan, melt the butter, sugar, and cocoa powder over low-medium heat. Stir constantly until the butter is fully melted and the sugar has dissolved. The mixture should be smooth and glossy.
- Remove the saucepan from the heat. In a small bowl, lightly beat the egg. Very slowly, pour about a quarter of the hot chocolate mixture into the beaten egg, whisking vigorously. This gently raises the egg's temperature to prevent it from scrambling.
- Pour the tempered egg mixture back into the saucepan with the rest of the chocolate base. Return to low heat and cook, stirring constantly, for 2 minutes. The mixture will thicken noticeably.
- Remove from heat again. Add the 4 oz of chopped semi-sweet chocolate and the vanilla extract. Stir until the chocolate is completely melted and the mixture is silky smooth.
- Pour the hot chocolate mixture over the broken biscuits in the large bowl. Use a spatula to gently fold everything together until every biscuit piece is thoroughly coated.
- Transfer the mixture to your prepared pan. Press it down firmly and evenly with the back of a spoon or a spatula to eliminate air pockets. Refrigerate for at least 30 minutes while you prepare the topping.
- Place the remaining 4 oz of chopped chocolate in a heatproof bowl. Heat the heavy cream in a small saucepan until it just begins to simmer around the edges (do not boil). Pour the hot cream over the chocolate and let it sit undisturbed for 5 minutes.
- Whisk the chocolate and cream mixture slowly, starting from the center and working your way out, until a smooth, glossy ganache forms.
- Pour the ganache over the chilled biscuit base. Tilt the pan to spread it into an even layer. Refrigerate the cake for at least 4 hours, or preferably overnight, until completely firm.
- Use the parchment paper handles to lift the cake from the pan. For clean cuts, use a large, sharp knife dipped in hot water and wiped dry between each slice.