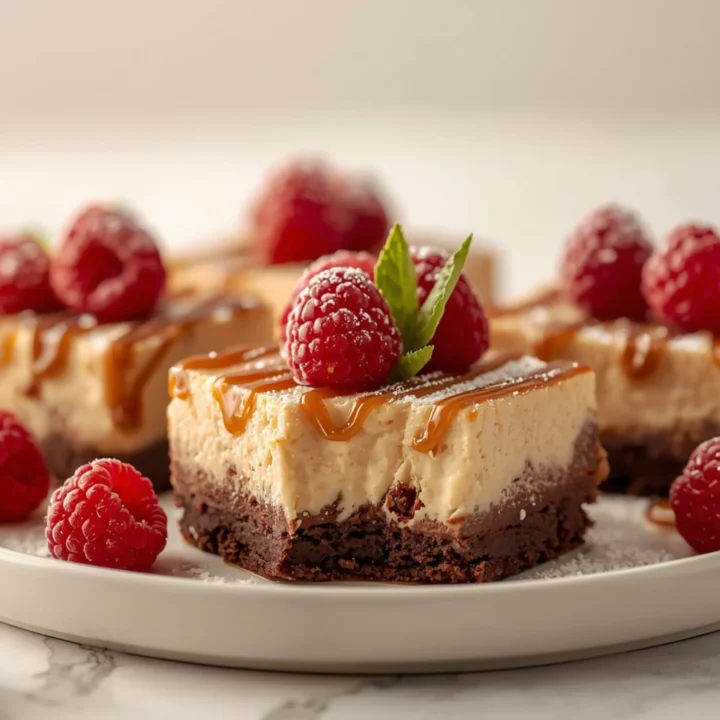
Rich Brownie Bottom Bars with a Creamy Cheesecake Topping
These bars deliver a perfect two-for-one dessert experience: a dense, fudgy brownie base topped with a layer of smooth, tangy cheesecake. If you love a creative twist on classic desserts, much like my popular Cheesecake Egg Rolls, this recipe is your new go-to for potlucks and parties.
The Anatomy of the Perfect Bar
This recipe’s success lies in its textural contrast. Each layer is engineered for a specific purpose, creating a balanced and satisfying bite.
- The Fudgy Foundation: We build a brownie base that is intentionally dense and moist. It uses melted butter and minimal leavening to prevent it from becoming cakey, ensuring it can support the cheesecake layer without crumbling.
- The Creamy Counterpart: The cheesecake layer is smooth, tangy, and rich. Using full-fat cream cheese and a touch of sour cream provides the classic cheesecake flavor and a velvety texture that cuts through the brownie’s deep chocolate notes.
STEP-BY-STEP INSTRUCTIONS
Prep Time: 20 minutes
Cook Time: 35-40 minutes
Chill Time: 4 hours (minimum)
Yields: 16 bars
Part 1: The Brownie Base
- Preheat & Prep: Preheat your oven to 350°F (175°C). Line an 8×8 inch baking pan with parchment paper, leaving an overhang on two sides to act as “handles” for easy removal.
- Melt: In a microwave-safe bowl, melt the unsalted butter and semi-sweet chocolate chips together in 30-second intervals, stirring until smooth.
- Combine Wet Ingredients: In a separate large bowl, whisk together the granulated sugar, eggs, and vanilla extract until well combined and slightly pale.
- Add Chocolate: Pour the melted chocolate mixture into the egg mixture and whisk until fully incorporated.
- Fold in Dry Ingredients: Add the all-purpose flour, unsweetened cocoa powder, and salt. Use a spatula to fold everything together until just combined. Do not overmix.
- First Bake: Pour the brownie batter into your prepared pan and spread it into an even layer. Bake for 15-18 minutes. The brownie will be partially cooked.
Part 2: The Cheesecake Topping
- Beat Cream Cheese: While the brownie base is baking, add the room temperature cream cheese and granulated sugar to a medium bowl. Use an electric mixer to beat on medium speed until completely smooth and creamy, scraping down the sides as needed.
- Add Egg & Flavor: Add the egg, sour cream, and vanilla extract. Mix on low speed until just combined. Overmixing can cause cracks.
- Assemble: Remove the brownie base from the oven. Carefully pour the cheesecake mixture over the hot brownie layer and spread it evenly.
- Final Bake: Return the pan to the oven and bake for an additional 20-25 minutes. The edges of the cheesecake should be set, but the center will still have a slight jiggle.
- Cool & Chill: Let the pan cool completely on a wire rack at room temperature for at least 1 hour. Then, cover and transfer to the refrigerator to chill for at least 4 hours, or preferably overnight. Chilling is essential for the cheesecake to set.
- Slice & Serve: Once fully chilled, use the parchment paper handles to lift the bars out of the pan. Use a sharp, clean knife to slice into 16 squares.
Pro Tips for Flawless Layers
Get bakery-quality results by focusing on these key details.
- Room Temperature is Non-Negotiable: For the cheesecake layer, your cream cheese, egg, and sour cream must be at room temperature. This is the secret to a lump-free, silky smooth texture.
- Don’t Overmix the Cheesecake: Once the egg is added, mix on low speed and only until the ingredients are just combined. Overmixing incorporates too much air, which can cause the cheesecake layer to puff up and crack as it cools.
- The “Jiggle” Test: The bars are done when the center has a slight, consistent jiggle (like Jell-O). If it looks liquidy or sloshes, it needs more time. If it’s completely firm, it’s slightly overbaked but will still be delicious.
- Cooling is Mandatory: Do not rush the cooling and chilling process. A gradual cool-down prevents cracking, and a long chill time allows the cheesecake to set fully for clean, perfect slices.
Ingredient Deep Dive
- Cocoa Powder: Use unsweetened natural cocoa powder for a classic, intense chocolate flavor. Dutch-processed cocoa will also work, yielding a darker, less acidic brownie.
- Cream Cheese: Always use full-fat, block-style cream cheese. Whipped cream cheese or low-fat versions contain more water and stabilizers, which will prevent the cheesecake from setting properly.
- Chocolate: A quality semi-sweet chocolate (chips or a chopped bar) will provide the best flavor for the brownie base. It offers a balance that isn’t overly sweet.
Flavor Variations & Customization
These bars are a perfect canvas for creativity. If you’re a fan of single-serving desserts, my No-Bake Biscoff Cheesecake Cups offer another great customizable idea.
- Peanut Butter Swirl: After pouring the cheesecake layer, drop spoonfuls of melted creamy peanut butter on top and use a knife to create a swirl pattern.
- Raspberry Ripple: Gently swirl 1/4 cup of seedless raspberry jam into the cheesecake topping before baking.
- Mint Chocolate: Add 1/2 teaspoon of peppermint extract to the brownie batter and top the finished, chilled bars with crushed mint candies.
When planning a full menu, starting with a light appetizer provides a great contrast to this rich dessert. Consider something bright and fresh like these Caprese Skewers with Cranberry Glaze to balance the palate.
COMMON MISTAKES TO AVOID
- Mistake: A lumpy cheesecake layer.
Fix: Ensure your cream cheese, egg, and sour cream are all at true room temperature. Cold cream cheese is the number one cause of lumps. - Mistake: Cutting the bars too soon.
Fix: Be patient. The bars need at least 4 hours in the refrigerator (overnight is better) to fully set. Cutting them while warm will result in a messy, unset center. - Mistake: A cracked cheesecake surface.
Fix: This is usually caused by overmixing the cheesecake batter or drastic temperature changes. Mix on low speed once the egg is added, and let the bars cool gradually on the counter before refrigerating.
FAQ
Q: Can I use a boxed brownie mix for the base?
A: Yes, you can. Prepare a mix for an 8×8 pan according to package directions. Bake it for about 2/3 of its recommended time, then pour the cheesecake topping over it and finish baking as directed in this recipe.
Q: How do I get clean, sharp slices?
A: For the cleanest cuts, use a large, sharp knife. Run the blade under hot water and wipe it dry between each and every cut.
Q: How should I store these bars?
A: Store them in an airtight container in the refrigerator for up to 5 days. They are not recommended for freezing, as the cheesecake texture can become watery upon thawing.
These bars are a guaranteed crowd-pleaser, perfect for any occasion that calls for a truly decadent treat. If you’re a fan of rich cocoa desserts, you might also love this classic Cocoa Tiramisu.
NUTRITIONAL SNAPSHOT
| Nutrient | Amount per Serving |
|---|---|
| Calories | 310 kcal |
| Protein | 5g |
| Fat | 20g |
| Net Carbs | 28g |
| Fiber | 2g |
| Sugar | 22g |