No-Bake Peach Cobbler Cheesecake Cones
This recipe combines the warm, spiced comfort of peach cobbler with the cool, tangy creaminess of cheesecake, all packed into a crisp waffle cone. It’s a fast, no-oven dessert that delivers maximum flavor with minimal effort, making it one of the most popular desserts on our site. Get ready for a handheld masterpiece.
STEP-BY-STEP INSTRUCTIONS
Phase 1: Prepare the Peach Cobbler Topping
- Melt Butter: In a medium saucepan over medium heat, melt the butter.
- Sauté Peaches: Add the diced peaches, brown sugar, cinnamon, and nutmeg. Stir to combine and cook for 4-5 minutes, until the peaches soften and the sugar dissolves.
- Thicken: In a small bowl, whisk together the cornstarch and water to create a slurry. Pour it into the peach mixture, stirring constantly.
- Simmer: Bring the mixture to a gentle simmer and cook for 1-2 minutes, until it has thickened into a glossy sauce.
- Cool Completely: Remove from heat and transfer to a separate bowl. Let it cool to room temperature, then chill in the refrigerator for at least 20 minutes. This step is critical.
Phase 2: Create the Cheesecake Filling & Crumble
- Make Crumble: In a food processor, pulse the graham crackers into coarse crumbs. Add the melted butter and sugar, pulsing until it resembles wet sand. Set aside.
- Beat Cream Cheese: In a large bowl, use a hand mixer to beat the room-temperature cream cheese until it’s completely smooth and free of lumps.
- Add Sugar & Vanilla: Beat in the powdered sugar and vanilla extract until well combined.
- Whip Cream: In a separate, chilled bowl, whip the heavy cream until stiff peaks form.
- Fold: Gently fold the whipped cream into the cream cheese mixture in two or three additions, being careful not to deflate the air. The final filling should be light and fluffy.
Phase 3: Assemble the Cones
- First Layer: Pipe or spoon about 1 tablespoon of the cheesecake filling into the bottom of each waffle cone.
- Add Peaches: Spoon about 1 tablespoon of the cooled peach topping over the filling.
- Top Layer: Add another layer of cheesecake filling, bringing it to the top of the cone.
- Garnish: Generously sprinkle the graham cracker crumble over the top of the filling.
- Serve Immediately: For the best texture, serve the cones right away.
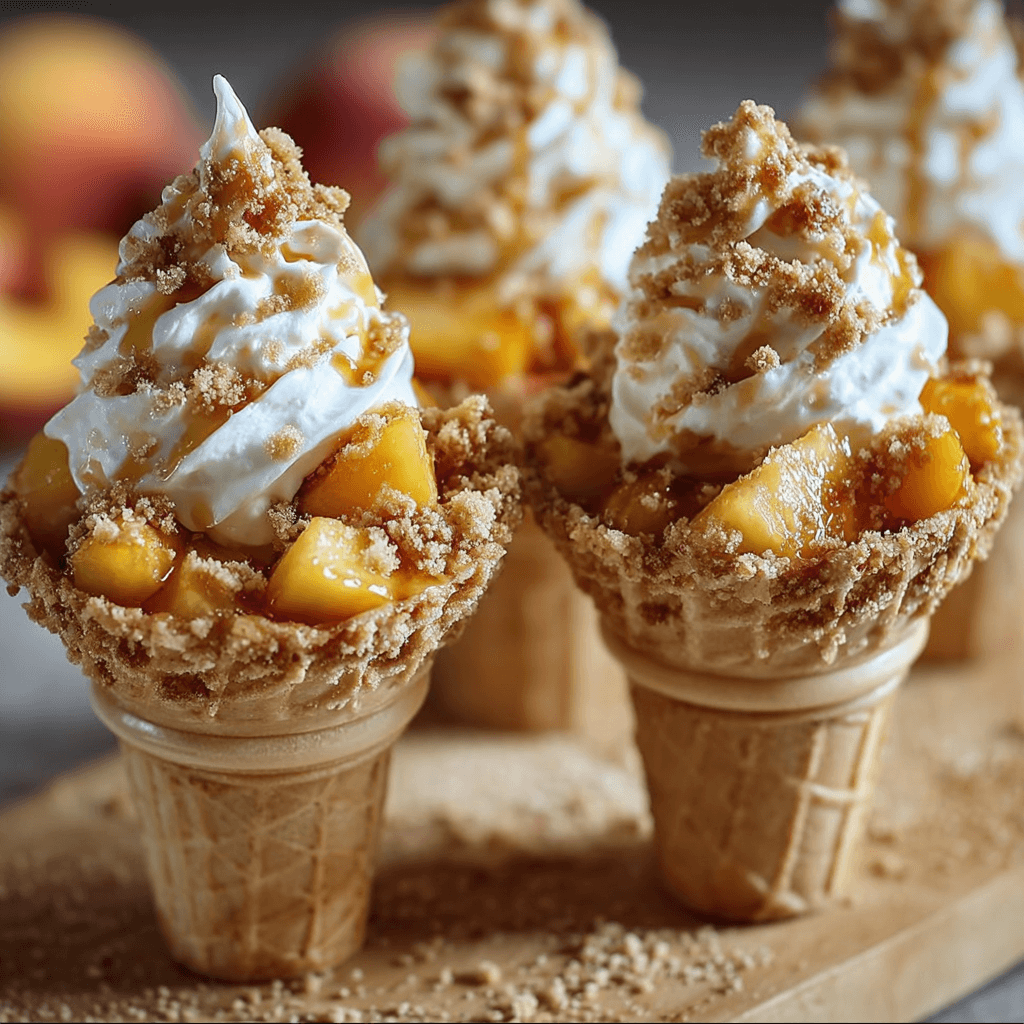
Component Breakdown: Engineering Your Cones
This recipe’s success lies in the synergy of its four distinct parts. Understanding their function helps you execute it perfectly.
- The Cone: This is your vessel. A high-quality waffle cone provides the structural integrity and a crisp, slightly sweet crunch that contrasts with the soft fillings.
- The No-Bake Cheesecake Filling: This is the cool, creamy core. Using full-fat cream cheese and whipping heavy cream creates a stable, tangy, and light-as-air texture without any baking.
- The Peach Topping: This provides the classic “cobbler” element. Cooking the peaches down with warm spices creates a concentrated, jammy flavor that cuts through the richness of the cheesecake.
- The Graham Cracker Crumble: This is the textural stand-in for a cobbler’s crust. It adds a buttery, sandy crunch that completes the dessert experience.
Achieving Peak Texture: Pro Tips
Texture is everything in this recipe. The goal is a crisp cone, a silky filling, and tender fruit. Here’s how to nail it.
- Room Temp is Non-Negotiable: Your cream cheese must be at room temperature. Cold cream cheese results in a lumpy filling that no amount of mixing can fix.
- Chill Your Tools: For the fluffiest whipped cream, chill your mixing bowl and beaters in the freezer for 10-15 minutes beforehand. This helps the cream whip up faster and hold its volume.
- Cool the Topping Completely: Placing warm peach topping in the cone will melt the cheesecake filling and turn the cone soggy instantly. Don’t rush this step. Just like with the fruit compotes in many of our breakfast recipes, temperature control is key.
- Assemble Just-in-Time: Moisture is the enemy of a crisp cone. Assemble these immediately before you plan to serve them for the best possible crunch.
Flavor Customization Matrix
Once you master the base recipe, use this matrix to create variations. This is the perfect dessert to follow a light, flavorful meal like Grilled Lemon Herb Chicken with Quinoa Salad.
| Component | Swap/Addition | Flavor Profile |
|---|---|---|
| Fruit | • Mixed Berries • Cinnamon Apples • Cherry Pie Filling | • Tart & Fresh • Autumnal & Warm • Sweet & Classic |
| Spices | • Add Cardamom/Ginger • Add Almond Extract | • Aromatic & Spicy • Nutty & Fragrant |
| Crumble | • Use Biscoff Cookies • Add Toasted Pecans | • Caramelized & Spiced • Rich & Nutty |
| Filling | • Mix in Lemon Zest • Swirl in Salted Caramel | • Bright & Zesty • Sweet & Salty |
Strategic Prep: Make-Ahead & Assembly Guide
You can prepare all the components ahead of time, making assembly a 5-minute job.
- Peach Topping: Can be made up to 3 days in advance. Store in an airtight container in the refrigerator.
- Cheesecake Filling: Can be made up to 2 days in advance. Store in an airtight container in the refrigerator. It may need a gentle stir before using.
- Graham Cracker Crumble: Can be made up to 1 week in advance. Store in an airtight container at room temperature.
- Day of Serving: Lay out your cones, prepped fillings, and topping. Assemble just before walking them out to your guests.
COMMON MISTAKES TO AVOID
- Mistake: Using a hot or warm peach filling.
Fix: Ensure the topping is completely cooled, preferably chilled, before it comes anywhere near the cheesecake filling or the cone. - Mistake: Getting a lumpy cheesecake filling.
Fix: Your cream cheese was too cold. Let it sit on the counter for at least an hour to soften to true room temperature before you begin mixing. - Mistake: Pre-assembling the cones to save time.
Fix: Never assemble more than 10-15 minutes before serving. The cone will absorb moisture from the fillings and lose its essential crunch.
FAQ
Q: Can I use fresh peaches instead of canned?
A: Absolutely. Use about 3-4 ripe peaches, peeled and diced. You may need to add an extra tablespoon of brown sugar and cook them for a few minutes longer to soften.
Q: How do I store leftovers?
A: An assembled cone doesn’t store well. It’s best to store the components separately in airtight containers in the fridge and assemble a fresh cone when you’re ready to eat.
Q: Can I make this dessert gluten-free?
A: Yes, easily. Simply substitute the waffle cones for a gluten-free variety and use gluten-free graham crackers for the crumble.
For Your Next Project
If you enjoyed the creative layering of this dessert, consider exploring other deconstructed concepts. For a festive holiday idea, this Gingerbread Trifle recipe offers a similar approach with different flavors. Or, for a savory twist, this Crispy Bang Bang Chicken is another crowd-pleaser.
NUTRITIONAL SNAPSHOT
| Nutrient | Amount per Serving |
|---|---|
| Calories | 410 kcal |
| Protein | 5g |
| Fat | 22g |
| Net Carbs | 46g |
| Fiber | 2g |
| Sugar | 31g |
No-Bake Peach Cobbler Cheesecake Cones
Ingredients
- 1 tbsp unsalted butter
- 1 (15-ounce) can sliced peaches in juice, drained and diced
- 1/4 cup packed light brown sugar
- 1/2 tsp ground cinnamon
- 1/4 tsp ground nutmeg
- 1 tsp cornstarch
- 2 tsp water
- 8 ounces cream cheese, at room temperature
- 1/2 cup powdered sugar
- 1 tsp vanilla extract
- 3/4 cup cold heavy whipping cream
- 8-10 waffle cones
- 4 full sheets of graham crackers (about 1/2 cup crumbs)
- 2 tbsp unsalted butter, melted
- 1 tbsp granulated sugar