How to Make Perfect Red Velvet Cream Cheese Stuffed Cookies
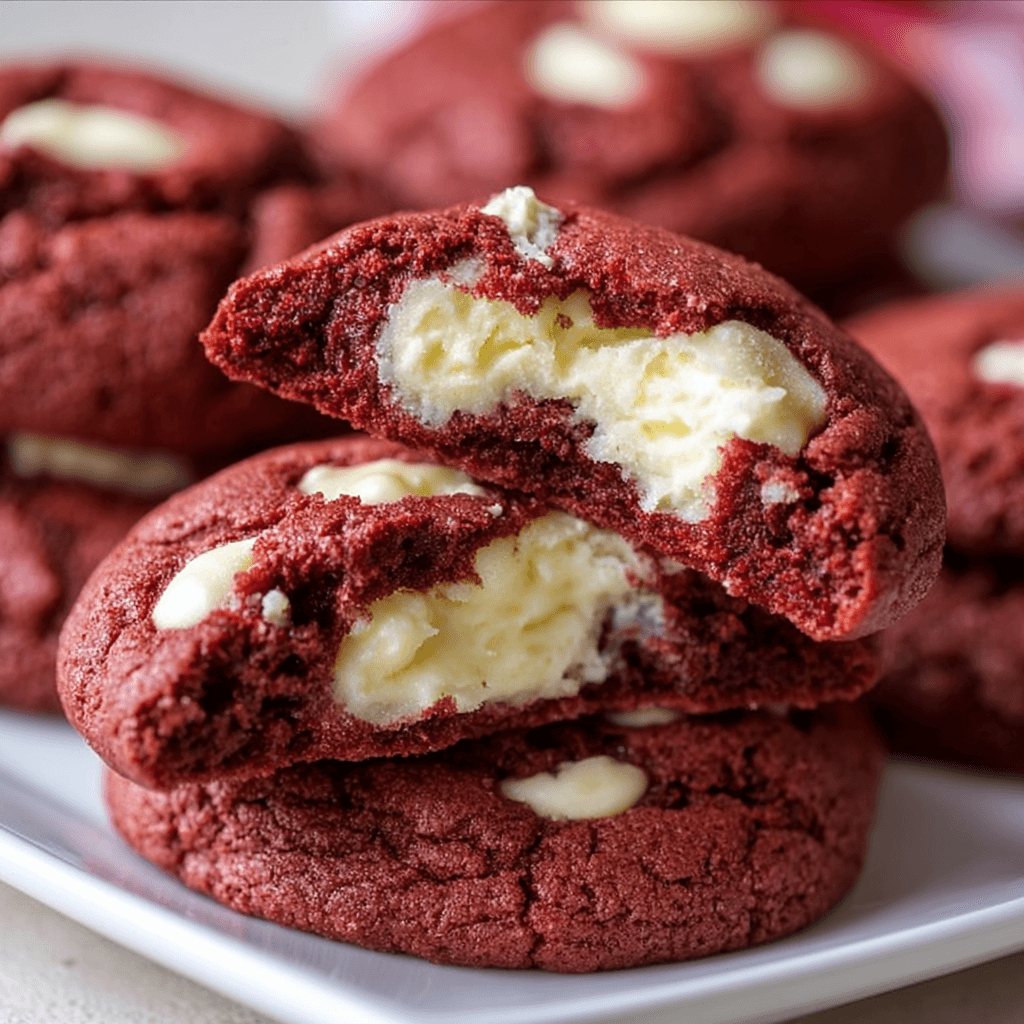
These Red Velvet Cream Cheese Stuffed Cookies deliver a striking visual and an even better flavor: a soft, chocolatey red velvet exterior that breaks open to reveal a tangy, molten cream cheese center. This recipe is engineered for success, bypassing common pitfalls to produce a bakery-quality result. It’s one of our most requested decadent desserts, and for good reason.
The Chilling Protocol: Why It’s Non-Negotiable
For stuffed cookies, chilling is not a suggestion—it’s a critical control step. It prevents the two primary failure points: a leaky filling and excessive cookie spread.
- Filling Integrity: Freezing the cream cheese balls ensures they remain solid for the first several minutes of baking. This allows the cookie dough to set around the filling before it has a chance to melt and escape.
- Dough Structure: Chilling the final, assembled cookie dough balls solidifies the butter. Cold butter melts more slowly in the oven, meaning the cookie edges set before the butter fully melts. This results in a thicker, softer cookie that doesn’t spread into a thin, flat disc.
Key Ingredient Breakdown
The classic red velvet flavor is a delicate balance of mild chocolate, buttermilk tang, and vanilla. Here’s how our components work together:
- Natural Cocoa Powder: Use natural, not Dutch-processed, cocoa. Its acidity reacts with the baking soda for a proper lift and contributes to the classic reddish-brown undertone.
- White Vinegar & Buttermilk: These acids provide the signature “tang” of red velvet cake. They also react with the baking soda to create a tender, soft crumb.
- Cornstarch: A small amount of cornstarch inhibits gluten development, resulting in a softer, more tender cookie that stays soft for days.
- Gel Food Coloring: Gel color is highly concentrated. It provides a vibrant red hue without adding excess liquid, which can alter the cookie’s texture and require a bitter amount of coloring.
Step-by-Step Instructions
Part 1: Prepare the Cream Cheese Filling
- Mix Filling: In a small bowl, beat the softened cream cheese, powdered sugar, and vanilla extract with a hand mixer until smooth and completely combined.
- Portion & Freeze: Scoop 12 small, equal-sized portions (about 1 teaspoon each) of the filling. Roll them into smooth balls and place them on a parchment-lined plate or small baking sheet.
- Freeze Solid: Place the plate in the freezer for at least 30-60 minutes, or until the balls are completely firm. This is a crucial step.
Part 2: Make the Red Velvet Cookie Dough
- Combine Dry Ingredients: In a medium bowl, whisk together the all-purpose flour, cocoa powder, cornstarch, baking soda, and salt. Set aside.
- Cream Butter & Sugars: In a large bowl using a stand mixer or hand mixer, beat the softened butter, granulated sugar, and brown sugar on medium-high speed until light and fluffy (about 2-3 minutes).
- Add Wet Ingredients: Add the egg, buttermilk, white vinegar, and vanilla extract. Mix on low speed until just combined. Scrape down the sides of the bowl.
- Add Color: Add 1-2 teaspoons of red gel food coloring and mix until the color is uniform. Start with 1 teaspoon and add more if needed to reach your desired shade of red.
- Combine Wet & Dry: Gradually add the dry ingredient mixture to the wet ingredients, mixing on low speed until just combined. Do not overmix. If using, fold in the white chocolate chips.
- Chill Dough (Optional but Recommended): Cover the bowl and chill the cookie dough for at least 30 minutes. This makes it less sticky and easier to handle.
Part 3: Assemble and Bake
- Preheat & Prep: Preheat your oven to 350°F (175°C). Line two large baking sheets with parchment paper.
- Portion Dough: Scoop a portion of cookie dough (about 1.5 tablespoons). Flatten it into a disc in the palm of your hand.
- Stuff the Cookie: Place one frozen cream cheese ball in the center of the dough disc. Carefully wrap the dough around the filling, pinching the seams to seal it completely. Roll into a smooth ball.
- Arrange & Chill Again: Place the assembled cookie dough balls on the prepared baking sheet, about 2 inches apart. For best results, place the entire sheet in the freezer for 15 minutes before baking to prevent spreading.
- Bake: Bake for 11-13 minutes. The edges should be set, but the centers will look slightly soft and puffy. Do not overbake.
- Cool: Let the cookies cool on the baking sheet for 10 minutes before transferring them to a wire rack to cool completely. The filling will be very hot.
Pro-Tips for Flawless Execution
- Work Quickly: When assembling the cookies, work with one frozen cream cheese ball at a time, leaving the rest in the freezer. This prevents them from softening.
- Ensure a Perfect Seal: Double-check that the cream cheese is fully encased in dough. Any small gaps can cause the filling to leak during baking.
- Don’t Overbake: The key to a soft cookie is pulling it from the oven when the center still looks a bit underdone. It will continue to cook on the hot baking sheet. This method is a staple across many of our other easy-to-follow recipes.
- Embrace Variations: For a different texture and flavor profile, consider swapping the white chocolate chips for dark chocolate or even trying a different type of cookie altogether, like a rich brown butter skillet cookie.
After mastering a decadent dessert, you might find yourself looking for a savory project to tackle next. Building contrasting flavors is a great way to expand your kitchen skills, perhaps by trying a beautiful layered ratatouille bake.
COMMON MISTAKES TO AVOID
Mistake: The cream cheese filling leaked out during baking.
Fix: Your filling wasn’t frozen solid, or you had a small hole in the dough. Ensure the filling is rock-hard and that the dough is completely sealed around it before baking. A final 15-minute freeze of the assembled cookie balls provides extra insurance.
Mistake: The cookies spread too thin and became crispy.
Fix: The dough was too warm. Chilling the assembled dough balls for at least 15 minutes before baking is the most effective fix. Also, ensure your butter was softened, not melted.
Mistake: The red color looks dull, brownish, or tastes bitter.
Fix: You likely used liquid food coloring or too much of it. Use a high-quality gel food coloring for a vibrant red without excess liquid or off-flavors. Using natural cocoa powder (not Dutch-processed) also helps maintain the color’s integrity.
FAQ
Q: Can I make the dough ahead of time?
A: Yes. The un-stuffed cookie dough can be refrigerated for up to 3 days. The assembled, unbaked cookie balls can be frozen for up to 2 months. Bake directly from frozen, adding 1-2 minutes to the bake time.
Q: Can I use low-fat cream cheese?
A: It is not recommended. Full-fat block cream cheese has the stability and rich flavor needed for the filling. Low-fat or whipped versions contain more water and will likely become runny and leak during baking.
Q: Why do my cookies taste like plain chocolate cookies instead of red velvet?
A: You may have skipped the acid components. The small amounts of buttermilk and white vinegar are not for leavening alone; they provide the subtle, signature tang that distinguishes red velvet from a standard chocolate cookie. For a different savory taste profile, some recipes even use acidity to balance richness, like in this unique onion boil recipe.
NUTRITIONAL SNAPSHOT
| Nutrient | Amount per Serving |
|---|---|
| Calories | 215 est. |
| Protein | 2g |
| Fat | 11g |
| Net Carbs | 26g |
| Fiber | 1g |
| Sugar | 18g |
How to Make Perfect Red Velvet Cream Cheese Stuffed Cookies
Ingredients
- 4 oz (113g) full-fat block cream cheese, softened
- 1/2 cup (60g) powdered sugar
- 1/4 tsp vanilla extract
- 1 1/2 cups (180g) all-purpose flour
- 1/4 cup (25g) unsweetened cocoa powder (natural)
- 1 tsp cornstarch
- 1/2 tsp baking soda
- 1/4 tsp salt
- 1/2 cup (113g) unsalted butter, softened
- 3/4 cup (150g) granulated sugar
- 1/4 cup (50g) packed light brown sugar
- 1 large egg, room temperature
- 1 tbsp buttermilk
- 1 tsp white vinegar
- 1 tsp vanilla extract
- 1-2 tsp red gel food coloring
- 1/2 cup (85g) white chocolate chips (optional)