
Biscoff Stuffed Chocolate Cookies: A Step-by-Step Guide
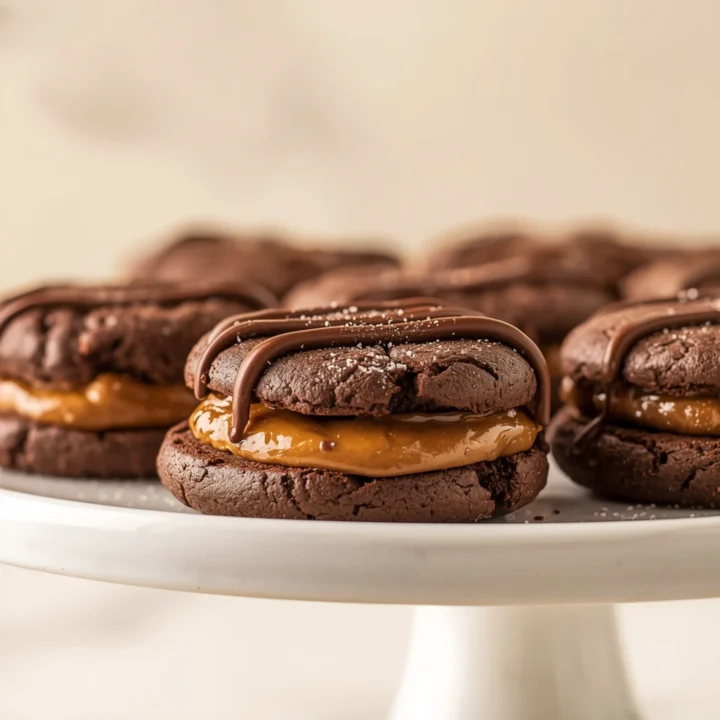
Imagine a rich, dark chocolate cookie with chewy edges and a soft, fudgy center. Now, picture breaking it open to reveal a molten core of warm Biscoff cookie butter. This recipe delivers that perfect contrast of deep cocoa and sweet, spiced cookie butter. If you’re looking for standout desserts, this is the one.
Introduction
Imagine a rich, dark chocolate cookie with chewy edges and a soft, fudgy center. Now, picture breaking it open to reveal a molten core of warm Biscoff cookie butter. This recipe delivers that perfect contrast of deep cocoa and sweet, spiced cookie butter. If you’re looking for standout desserts, this is the one.
The Core Components: Dough & Filling
This cookie’s success hinges on two parts working in perfect harmony.
- The Chocolate Dough: We use Dutch-process cocoa and a touch of espresso powder. This creates a deep, not-too-sweet chocolate flavor that perfectly balances the sweet filling. Brown sugar ensures a chewy, moist texture.
- The Biscoff Filling: The key is to freeze the Biscoff spread. This creates a solid disc that can be easily wrapped in dough, preventing it from melting out during baking and ensuring a distinct, gooey center.
Ingredient Deep Dive: Why Dutch-Process Cocoa?
Choosing the right cocoa powder is critical for both flavor and appearance.
- Flavor Profile: Dutch-process cocoa is washed with an alkaline solution, which neutralizes its acidity. This results in a smoother, less bitter, and more intensely chocolatey flavor. It’s the “Oreo” flavor you know and love.
- Color: It produces a much darker, almost black cookie, which creates a stunning visual contrast with the light brown Biscoff filling.
- Can I use natural cocoa? You can, but the cookies will be lighter in color, slightly more acidic/bitter, and will spread a bit more due to its reaction with the baking soda. For the intended result, stick with Dutch-process.
Mastering the Stuffing Technique
This is the most important step. A poor seal means the filling will leak during baking.
- Frozen Discs are Non-Negotiable: Scoop Biscoff spread onto parchment paper and freeze for at least 30 minutes. They must be solid.
- Flatten the Dough: Take a scoop of cookie dough and flatten it into a pancake in your palm.
- Center the Filling: Place one frozen Biscoff disc directly in the center.
- Encase and Seal: Gently fold the dough up and around the disc. Pinch the seams together firmly to create a seamless ball.
- Roll Smooth: Roll the ball between your palms to smooth it out. Any visible cracks are potential leak points.
Step-by-Step Instructions
- Part 1: Prepare the Biscoff Filling
- Line a small baking sheet or plate with parchment paper.
- Scoop 12 heaping teaspoons (about 15g each) of Biscoff spread onto the parchment paper, spacing them apart.
- Use a spoon or your finger to slightly flatten them into thick discs.
- Freeze for at least 30-60 minutes, or until completely solid. Do not skip this step.
- Part 2: Make the Chocolate Cookie Dough
- Combine Dry Ingredients: In a medium bowl, whisk together the all-purpose flour, Dutch-process cocoa powder, baking soda, and salt. Set aside.
- Cream Butter & Sugars: In a large bowl using a stand mixer or hand mixer, beat the softened unsalted butter, granulated sugar, and light brown sugar on medium-high speed until light and fluffy (about 2-3 minutes).
- Add Wet Ingredients: Beat in the egg and vanilla extract until just combined.
- Incorporate Dry Ingredients: Add the dry ingredient mixture to the wet ingredients in two batches, mixing on low speed until just a few streaks of flour remain. Do not overmix.
- Chill the Dough (Optional but Recommended): For thicker cookies, cover the bowl and chill the dough for at least 30 minutes. This makes it easier to handle.
- Part 3: Assemble and Bake
- Preheat & Prepare: Preheat your oven to 350°F (175°C). Line two large baking sheets with parchment paper.
- Scoop Dough: Using a medium cookie scoop (about 2 tablespoons), portion out the dough.
- Stuff the Cookies: Take one scoop of dough, flatten it in your palm, place a frozen Biscoff disc in the center, and wrap the dough around it, sealing it completely. Roll into a smooth ball.
- Arrange on Sheet: Place the dough balls 2-3 inches apart on the prepared baking sheets.
- Bake: Bake for 11-13 minutes. The edges should be set, but the center will look slightly underdone. This is the key to a soft center.
- Cool: Let the cookies cool on the baking sheet for 5-10 minutes before transferring them to a wire rack to cool completely. Sprinkle with flaky sea salt while they are still warm, if desired.
Pro Tips for Perfect Texture
Achieving the ideal chewy-on-the-outside, gooey-on-the-inside texture is easy with these tips.
- Don’t Overbake: This is the #1 rule for soft cookies. Pull them from the oven when the centers still look soft. They will continue to cook on the hot pan.
- Measure Flour Correctly: Spoon your flour into the measuring cup and level it off. Scooping directly from the bag compacts the flour, leading to dry, cakey cookies.
- Use Room Temperature Ingredients: A room temperature egg and butter will emulsify better, creating a more uniform dough structure.
- Bang the Pan: For flatter, chewier cookies with crinkly tops, firmly bang the baking sheet on the counter 2-3 times midway through baking.
These cookies are a fantastic way to cap off a meal. They provide a sweet, satisfying finish after a savory main course like a rich Italian onion soup with fontina. And for more tested recipes that work every time, you can always browse our archives.
COMMON MISTAKES TO AVOID
- Mistake: Leaking Biscoff filling.
Fix: Ensure your Biscoff discs are frozen completely solid and that you’ve sealed the dough ball tightly with no cracks. - Mistake: Cookies spread too thin and became flat.
Fix: Chill your dough for at least 30 minutes before scooping. Also, double-check your flour measurement; too little flour can cause excessive spread. - Mistake: The cookies are hard or dry.
Fix: You likely overbaked them. Pull them from the oven when the centers are still visibly soft. They will set up perfectly as they cool.
FAQ
Q: Can I use creamy peanut butter instead of Biscoff?
A: Absolutely. The freezing method works perfectly for peanut butter, Nutella, or any other thick, creamy spread.
Q: How do I store these cookies?
A: Store them in an airtight container at room temperature for up to 4 days. The Biscoff center will be firm at room temp but will soften beautifully if you microwave a cookie for 10 seconds.
Q: Can I freeze the cookie dough?
A: Yes. Assemble the stuffed, unbaked cookie dough balls and freeze them on a baking sheet. Once solid, transfer to a zip-top bag. You can bake them directly from frozen; just add 2-3 minutes to the baking time. This is a great way to have dessert ready after appetizers like BBQ bourbon venison meatballs.
NUTRITIONAL SNAPSHOT
(Estimates are per cookie)
| Nutrient | Amount per Serving |
|---|---|
| Calories | 310 kcal |
| Protein | 4g |
| Fat | 16g |
| Net Carbs | 38g |
| Fiber | 2g |
| Sugar | 25g |
Biscoff Stuffed Chocolate Cookies: A Step-by-Step Guide
Imagine a rich, dark chocolate cookie with chewy edges and a soft, fudgy center, which, when broken open, reveals a molten core of warm Biscoff cookie butter. This recipe delivers that perfect contrast of deep cocoa and sweet, spiced cookie butter, making for a standout dessert.
Ingredients
- 3/4 cup (180g) Biscoff cookie butter
- 1.5 cups (188g) all-purpose flour
- 1/2 cup (45g) Dutch-process cocoa powder
- 1 teaspoon baking soda
- 1/2 teaspoon salt
- 1/2 cup (113g) unsalted butter (softened)
- 1/2 cup (100g) granulated sugar
- 1/2 cup (110g) packed light brown sugar
- 1 large egg (room temperature)
- 1 teaspoon vanilla extract
- Flaky sea salt for topping (optional)
Instructions
- Line a small baking sheet or plate with parchment paper.
- Scoop 12 heaping teaspoons (about 15g each) of Biscoff spread onto the parchment paper, spacing them apart.
- Use a spoon or your finger to slightly flatten them into thick discs.
- Freeze for at least 30-60 minutes, or until completely solid. Do not skip this step.
- In a medium bowl, whisk together the all-purpose flour, Dutch-process cocoa powder, baking soda, and salt. Set aside.
- In a large bowl using a stand mixer or hand mixer, beat the softened unsalted butter, granulated sugar, and light brown sugar on medium-high speed until light and fluffy (about 2-3 minutes).
- Beat in the egg and vanilla extract until just combined.
- Add the dry ingredient mixture to the wet ingredients in two batches, mixing on low speed until just a few streaks of flour remain. Do not overmix.
- For thicker cookies, cover the bowl and chill the dough for at least 30 minutes. This makes it easier to handle.
- Preheat your oven to 350°F (175°C). Line two large baking sheets with parchment paper.
- Using a medium cookie scoop (about 2 tablespoons), portion out the dough.
- Take one scoop of dough, flatten it in your palm, place a frozen Biscoff disc in the center, and wrap the dough around it, sealing it completely. Roll into a smooth ball.
- Place the dough balls 2-3 inches apart on the prepared baking sheets.
- Bake for 11-13 minutes. The edges should be set, but the center will look slightly underdone. This is the key to a soft center.
- Let the cookies cool on the baking sheet for 5-10 minutes before transferring them to a wire rack to cool completely. Sprinkle with flaky sea salt while they are still warm, if desired.