The Viral Dubai Chocolate Bar Recipe: A Step-by-Step Guide
This is the recipe for the chocolate bar breaking the internet. It delivers a shatteringly crisp chocolate shell that gives way to a surprisingly creamy, intensely nutty, and buttery-crisp interior. If you love texture, you’ll find more delicious inspiration in our full collection of desserts.
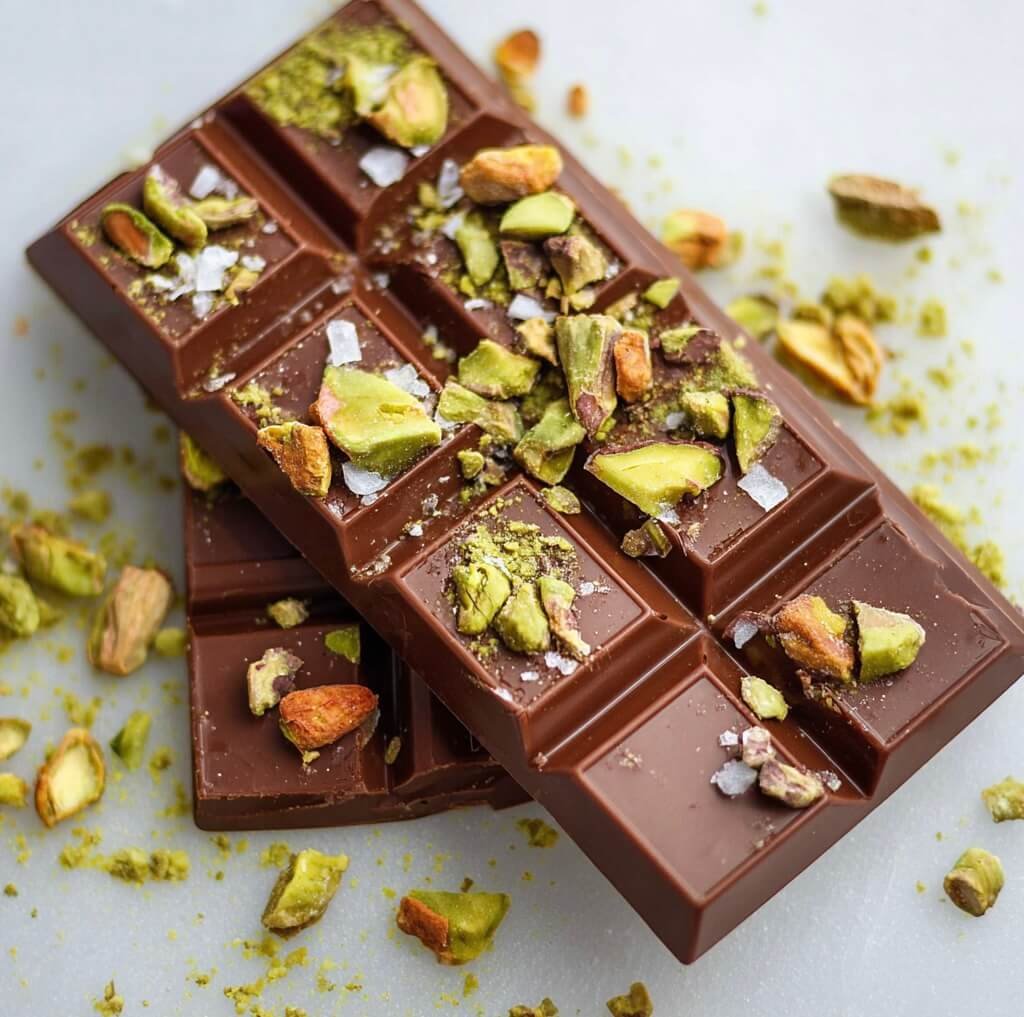
The Anatomy of the Dubai Bar: Key Components
This bar’s magic comes from a precise combination of four key elements. Understanding their roles is the first step to success.
- The Chocolate Shell: This isn’t just a container; it’s the first textural experience. Using high-quality couverture chocolate (milk or dark) that is properly tempered is non-negotiable for that signature “snap” and glossy finish.
- Toasted Kataifi (Kunafa Dough): These shredded phyllo dough strands are the source of the incredible crunch. Toasting them in butter until golden and crisp is essential to prevent a soggy filling.
- Pistachio Cream (Pistachio Pâte à Tartiner): This is the rich, creamy binder that holds the kataifi. It’s not the same as pistachio butter. Look for a sweet, smooth, vibrant green spread, often imported from Italy.
- Tahini: This is the secret weapon. A small amount of tahini adds a subtle, earthy depth and richness that balances the sweetness of the pistachio cream and chocolate.
Engineer’s Notes: Sourcing Your Ingredients
Finding the right components is half the battle. Here’s your procurement guide.
- Kataifi/Kunafa Dough: Find this in the refrigerated or frozen section of Middle Eastern or Mediterranean grocery stores. It looks like shredded vermicelli. If frozen, thaw it completely in the fridge before using.
- Pistachio Cream: Your best bet is a specialty food store, an Italian deli, or online. Brands like Pisti or Vincente are excellent. Do not substitute with plain ground pistachios or pistachio butter—the texture and sweetness are completely different.
- Chocolate: Use high-quality chocolate wafers (callets) or a bar you chop yourself. Chocolate chips contain stabilizers that prevent them from melting and tempering smoothly. Look for brands like Callebaut, Valrhona, or Guittard.
- Chocolate Mold: A standard polycarbonate or silicone chocolate bar mold is required. Silicone is more forgiving for beginners, while polycarbonate provides a superior gloss.
The Science of Tempering Chocolate (The Easy Way)
Tempering gives chocolate its professional-looking shine, satisfying snap, and smooth melt-in-your-mouth feel. It prevents the dull, chalky “bloom” you see on improperly melted chocolate. We’ll use the simple microwave seeding method.
- Melt: Place 2/3 of your chocolate wafers in a microwave-safe bowl.
- Heat in Bursts: Microwave on 50% power for 30-second intervals, stirring thoroughly after each one.
- Stop Early: Stop heating when about 75% of the chocolate is melted and a few lumps remain. The residual heat in the bowl is enough.
- Seed: Add the remaining 1/3 of the chocolate wafers (the “seed” chocolate) to the bowl.
- Stir: Stir continuously until the seed chocolate is fully melted and the mixture is smooth and fluid. This cools the chocolate down to the correct working temperature. Your chocolate is now in temper.
Step-by-Step Instructions
Prep Time: 20 mins
Chill Time: 1-2 hours
Yields: 4-6 bars (depending on mold size)
- Prepare the Kataifi: Preheat your oven to 350°F (175°C). Gently pull apart the kataifi strands and chop them into roughly 1-inch pieces. Toss with the melted butter on a baking sheet. Bake for 10-15 minutes, tossing halfway through, until golden brown and very crisp. Let it cool completely.
- Temper the Chocolate: Using the microwave method described above, temper your milk or dark chocolate until it is smooth and fluid.
- Create the Shell: Pour a layer of tempered chocolate into each cavity of your chocolate bar mold. Swirl it around to coat the bottom and all sides evenly. Invert the mold over your bowl of chocolate and tap the edge firmly to let all excess chocolate drip out. You want a thin, even shell.
- Clean and Chill: Use a bench scraper or offset spatula to scrape the top surface of the mold clean. Place the mold upside down on parchment paper for 5 minutes, then place it in the refrigerator for 10-15 minutes to set completely.
- Mix the Filling: In a medium bowl, combine the pistachio cream and tahini until smooth. Gently fold in the cooled, toasted kataifi strands. Be careful not to crush them too much; you want to maintain that texture. Exploring new recipes like this is what makes cooking fun, and you can find many more creative ideas right here on Bites by Lila.
- Fill the Molds: Spoon the pistachio-kataifi mixture into the set chocolate shells. Gently press the filling down to ensure it’s compact and reaches all the corners. Leave a small (1-2mm) gap at the top for the final chocolate layer.
- Seal the Bars: Re-warm your tempered chocolate slightly if it has thickened. Pour a final layer over the filling, spreading it to the edges to completely seal the bar. Scrape the top of the mold clean one last time for a flat, professional bottom.
- Final Chill: Refrigerate the bars for at least 1-2 hours, or until the chocolate is fully hardened and easily pulls away from the sides of the mold.
- Demold: Gently flex the mold or tap it firmly on the counter to release the finished bars. Let them come to room temperature for 15-20 minutes before serving for the best flavor and texture.
COMMON MISTAKES TO AVOID
Mistake: Using untempered chocolate.
Fix: Your bar will be soft, dull, and melt on your fingers. Don’t skip the tempering step; the microwave method is fast and nearly foolproof.
Mistake: A soggy, underwhelming filling.
Fix: You didn’t toast the kataifi long enough or let it cool. It must be deeply golden brown and completely dry before being mixed into the pistachio cream.
Mistake: The filling leaks or the bar breaks.
Fix: Your chocolate shell was too thin or had holes. Ensure you coat the mold completely and don’t leave any transparent spots before chilling the shell.
FAQ
Q: How do I store the finished Dubai Chocolate Bars?
A: Store them in an airtight container in the refrigerator for up to one week. The kataifi will slowly lose its crunch over time, so they are best enjoyed within the first 3 days.
Q: Can I use a different nut butter like almond or cashew?
A: You can, but it will fundamentally change the flavor and won’t be the classic “Dubai Bar.” If you do, use a sweetened, smooth “cream” or “spread” version, not a natural, grainy butter, to maintain the right consistency.
Q: My chocolate seized and became a thick paste. What happened?
A: A tiny drop of water or steam got into your chocolate, or you overheated it. Always use a completely dry bowl and spatula. The microwave method helps prevent overheating if you use short, 30-second bursts. If you enjoy working with chocolate, you might also like these classic churros with chocolate sauce, which feature a delicious dipping sauce.
NUTRITIONAL SNAPSHOT
| Nutrient | Amount per Serving |
|---|---|
| Calories | 380 |
| Protein | 6g |
| Fat | 25g |
| Net Carbs | 31g |
| Fiber | 3g |
| Sugar | 28g |
The Viral Dubai Chocolate Bar Recipe: A Step-by-Step Guide
Ingredients
- 10 oz (300g) high-quality milk or dark chocolate wafers (couverture)
- 3.5 oz (100g) kataifi (kunafa) dough, thawed
- 2 tbsp (30g) unsalted butter, melted
- 1/2 cup (140g) pistachio cream/spread
- 1 tbsp (15g) tahini