The Best Crispy Dill Pickle Parmesan Chicken You’ll Ever Make
This Crispy Dill Pickle Parmesan Chicken is the weeknight hero you’ve been waiting for. It delivers an unbelievably juicy interior and a shatteringly crisp, savory crust, all thanks to a secret weapon: pickle brine. It’s one of the most requested dinner recipes we feature on Bites by Lila because it transforms simple ingredients into something spectacular.
Why Pickle Brine is a Game-Changer
The magic of this recipe lies in the brine. Using dill pickle juice isn’t just for flavor; it’s a culinary hack that guarantees tender, juicy chicken every time.
- Tenderizing Power: The acidity (vinegar) and salt in the brine work together to break down the tough muscle fibers in the chicken breast. This process, called denaturing, results in a more tender texture.
- Deep Flavor Infusion: The brine carries the dill, garlic, and other pickle spices deep into the meat. It seasons the chicken from the inside out, ensuring every bite is flavorful, not just the crust.
- Moisture Lock: Brining helps the chicken retain moisture during cooking. The salt helps the muscle cells absorb water, creating a buffer against the high heat of the pan and preventing dry, stringy results.
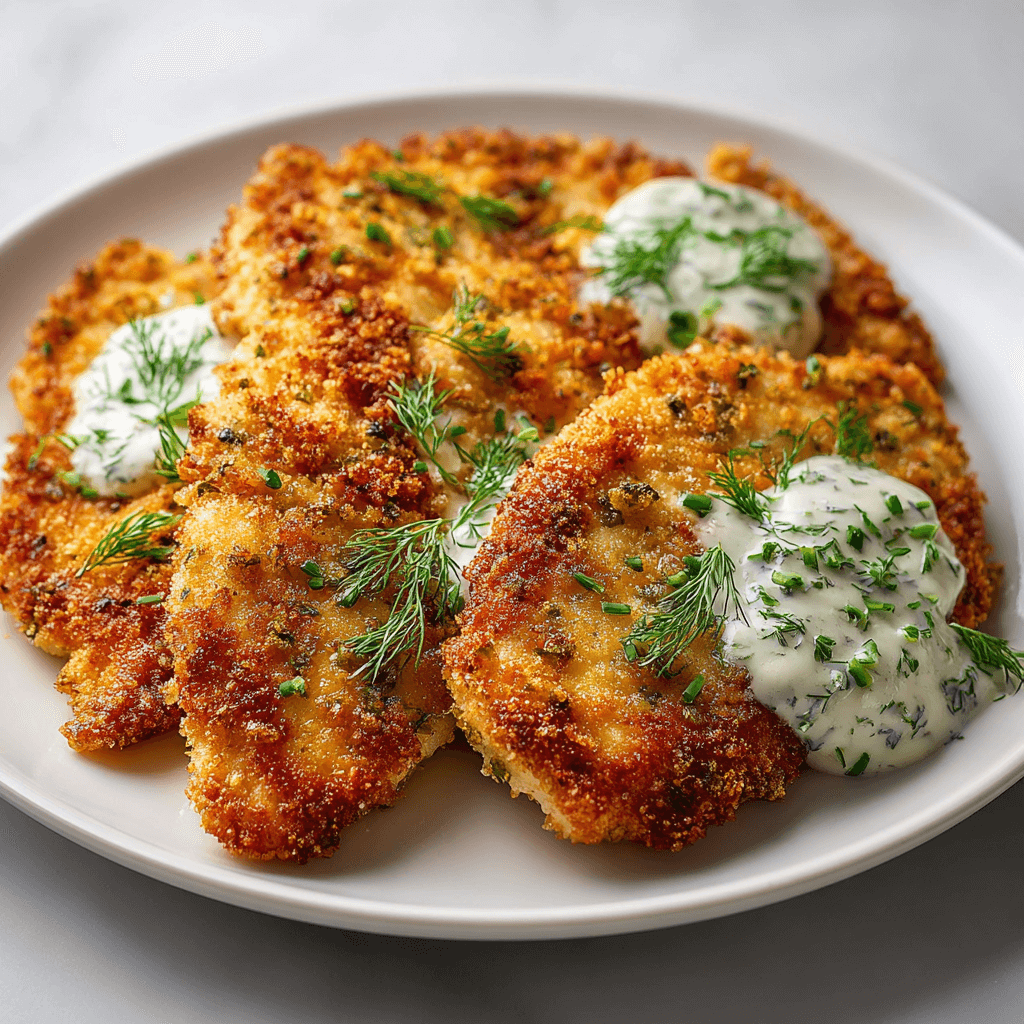
The Anatomy of the Perfect Crust
A truly crispy crust requires a specific, three-stage process. Each layer has a distinct purpose, working in harmony to create that perfect golden-brown coating that stays crunchy.
- The Flour Dredge (The Primer): The first coating of seasoned flour is essential. It absorbs any excess surface moisture from the chicken, creating a dry, starchy surface for the egg to grip onto. Do not skip this step.
- The Egg Wash (The Glue): Beaten egg acts as the binder. It adheres to the flour-coated chicken and provides the “glue” that holds the final breadcrumb mixture in place.
- The Parmesan-Breadcrumb Coating (The Armor): This is the star of the show. Panko breadcrumbs provide a light, airy, and ultra-crispy texture. The grated Parmesan cheese adds a salty, nutty, and savory (umami) flavor and helps the crust brown beautifully.
Ingredient Deep Dive: Choosing Your Pickles
The type of pickle brine you use will directly influence the final taste of your chicken. For this recipe, the choice is critical.
Best Choice: Classic Dill Pickle Brine. Look for a classic, garlic-forward dill pickle. Brands like Claussen or Grillo’s are excellent because their brine is fresh and potent, not overly sweet. The bold, tangy flavor is exactly what we need.
What to Avoid: Do not use brine from “bread and butter” or sweet pickles. The high sugar content will not complement the savory Parmesan and can cause the crust to burn before the chicken is cooked through.
Pro Tip: Your brine should be flavorful on its own. If it tastes watered down, it won’t season the chicken effectively.
The technique of using an acidic marinade is versatile. While it shines with chicken, some chefs use similar methods for fish, as seen in this creative baked feta spinach stuffed salmon recipe.
Step-by-Step Instructions
Prep Time: 10 mins (+ 30 mins brining)
Cook Time: 15 mins
Total Time: 55 mins
- Prepare the Chicken: Place chicken breasts between two sheets of plastic wrap. Using a meat mallet or heavy pan, pound them to an even ½-inch thickness. This ensures even cooking.
- Brine the Chicken: Place the pounded chicken in a shallow dish or a zip-top bag. Pour the dill pickle juice over the chicken, ensuring it’s fully submerged. Marinate in the refrigerator for at least 30 minutes, but no more than 2 hours.
- Set Up Dredging Stations: While the chicken brines, prepare three shallow dishes.
- Dish 1 (Flour): Whisk together the all-purpose flour, garlic powder, onion powder, paprika, salt, and black pepper.
- Dish 2 (Egg): In the second dish, whisk the eggs until smooth.
- Dish 3 (Breadcrumbs): In the third dish, combine the panko breadcrumbs and grated Parmesan cheese.
- Coat the Chicken: Remove the chicken from the brine and pat it completely dry with paper towels. This is crucial for a crispy crust. Working one piece at a time:
- Dredge in the flour mixture, shaking off any excess.
- Dip into the egg wash, allowing the excess to drip off.
- Press firmly into the panko-Parmesan mixture, ensuring the entire cutlet is coated. Place on a clean plate or wire rack.
- Cook the Chicken: Heat the avocado or vegetable oil in a large skillet over medium-high heat. The oil is ready when a breadcrumb sizzles immediately.
- Pan-Fry to Golden Brown: Carefully place 2 chicken cutlets in the hot pan. Do not overcrowd. Fry for 3-5 minutes per side, until golden brown, crispy, and the internal temperature reaches 165°F (74°C).
- Rest and Serve: Transfer the cooked chicken to a wire rack to rest for a few minutes. This keeps the bottom from getting soggy. Garnish with fresh parsley and serve immediately with lemon wedges.
After a savory meal like this, a simple treat from our desserts archive is the perfect finish.
Serving & Pairing Blueprint
This chicken is a versatile main course. Here are some serving suggestions to build a complete meal.
- Classic Comfort: Serve with creamy mashed potatoes and steamed green beans or asparagus.
- Lighter Fare: Pair with a crisp Caesar salad or a simple arugula salad with a lemon vinaigrette.
- Carb-Lover’s Dream: Slice the chicken and serve it over a bed of lemon-garlic pasta or inside a toasted brioche bun for an epic chicken sandwich.
- Dipping Sauces: While delicious on its own, a side of ranch dressing, honey mustard, or a simple aioli works wonders.
COMMON MISTAKES TO AVOID
- Mistake: A soggy, greasy crust.
- Fix: Ensure your oil is hot enough before adding the chicken. If it’s too cool, the breading will absorb oil instead of crisping. Also, rest the cooked chicken on a wire rack, not a plate, to maintain airflow and prevent steaming.
- Mistake: The breading falls off during cooking.
- Fix: Pat the chicken completely dry after brining. Any moisture will create steam and push the coating off. Also, press the breadcrumb mixture firmly onto the chicken and flip it only once during cooking.
- Mistake: The chicken is too salty.
- Fix: Do not add extra salt to the brine. The pickle juice is already salty enough. Stick to the 30-minute to 2-hour brining window; any longer and the chicken will become overly salty.
FAQ
Q: Can I bake this chicken or use an air fryer?A: Yes. For baking, place the coated chicken on a wire rack set on a baking sheet. Bake at 400°F (200°C) for 20-25 minutes, flipping halfway. For an air fryer, preheat to 375°F (190°C), spray the basket and chicken with oil, and cook for 10-15 minutes, flipping halfway, until golden and cooked through.
Q: Can I use chicken thighs instead of breasts?A: Absolutely. Use boneless, skinless chicken thighs. You won’t need to pound them as thin, just ensure they are of a relatively even thickness. Adjust cook time as needed, as thighs may take a minute or two longer.
Q: Can I make this gluten-free?A: Yes. Substitute the all-purpose flour with a 1-to-1 gluten-free flour blend and use gluten-free panko breadcrumbs. The results are just as crispy and delicious. For more unique recipe ideas for various dietary needs, you might find inspiration in unconventional sweet treats like these Oreo Stuffed Cinnamon Rolls.
NUTRITIONAL SNAPSHOT
| Nutrient | Amount per Serving |
|---|---|
| Calories | 485 kcal |
| Protein | 52g |
| Fat | 22g |
| Net Carbs | 16g |
| Fiber | 1g |
| Sugar | 2g |
For those looking for sweet follow-ups to this savory dish, this Chocolate Strawberry Tart offers a wonderful contrast in flavor and texture.
The Best Crispy Dill Pickle Parmesan Chicken You'll Ever Make
Ingredients
- 2 large boneless, skinless chicken breasts (about 1.5 lbs total)
- 1 cup dill pickle juice (from a jar of dill pickles)
- 1/2 cup all-purpose flour
- 1 teaspoon garlic powder
- 1/2 teaspoon onion powder
- 1/2 teaspoon paprika
- 1/2 teaspoon black pepper
- 1/4 teaspoon salt
- 2 large eggs
- 1.5 cups panko breadcrumbs
- 1/2 cup grated Parmesan cheese
- 1/3 cup high-heat cooking oil (like avocado or vegetable oil)
- Optional for serving: fresh parsley, lemon wedges