Creamy Banana Nice Cream: The Foolproof Method
Unlock the secret to impossibly creamy, dairy-free ice cream using just one core ingredient: frozen bananas. This recipe transforms a simple fruit into a decadent-tasting dessert in minutes, proving that the best treats don’t need to be complicated. If you’re a fan of simple, no-fuss desserts, you’ll also love these No-Bake Peanut Butter Treats.
STEP-BY-STEP INSTRUCTIONS
- Prep the Bananas: Peel 3-4 very ripe (spotty) bananas. The riper the banana, the sweeter the final product.
- Slice & Freeze: Slice the bananas into uniform ½-inch thick coins. Lay them in a single layer on a parchment-lined baking sheet or plate.
- Deep Freeze: Freeze for a minimum of 4 hours, but preferably overnight. The bananas must be frozen solid for the best texture. Transfer the frozen coins to a freezer-safe bag for storage if not using immediately.
- Blend: Place the frozen banana coins into the canister of a high-speed blender or the bowl of a food processor.
- Initial Pulse: Pulse the machine 5-10 times to break the banana coins into smaller, crumbly pieces. Scrape down the sides of the bowl.
- Blend to Creamy: Switch to a continuous low-speed blend. The mixture will progress through several stages: crumbly, then pasty, then suddenly smooth and creamy like soft-serve ice cream. This can take 1-3 minutes. Be patient and scrape down the sides as needed.
- Add Liquid (If Needed): If the mixture is too thick for your machine to handle, add 1 tablespoon of milk (dairy or non-dairy) or water to help it along. Use liquid sparingly to avoid a soupy result.
- Serve or Freeze: Serve immediately for a soft-serve consistency. For a firm, scoopable ice cream, transfer the nice cream to a loaf pan or freezer-safe container, smooth the top, and freeze for at least 2 hours.
The Science: Why Bananas Make Perfect “Nice Cream”
This isn’t just a kitchen hack; it’s food science. The magic of banana nice cream comes down to two key properties of the fruit itself.
- High Pectin Content: Bananas are rich in pectin, a natural gelling agent and stabilizer used in jams and jellies. When frozen bananas are blended, the pectin is released, creating an exceptionally smooth and stable emulsion that mimics the mouthfeel of traditional ice cream.
- Low Water, High Sugar: Compared to other fruits, bananas have a relatively low water content. This prevents the formation of large, crunchy ice crystals, which is the enemy of creamy frozen desserts. Their natural sugars also act as an “antifreeze,” contributing to a softer final texture.
Essential Equipment: Blender vs. Food Processor
The tool you use has a direct impact on the final texture. Both work, but they excel in different ways.
High-Speed Blender (e.g., Vitamix, Blendtec):
- Pros: Creates the smoothest, silkiest, most commercially-like texture. The power and vortex action incorporate less air, resulting in a denser nice cream.
- Cons: Requires a tamper to push the frozen pieces down into the blades. Can overheat if run for too long.
Food Processor:
- Pros: The wide bowl and S-shaped blade make it easy to process the frozen chunks without a tamper. Less likely to get “stuck.”
- Cons: Incorporates more air, leading to a lighter, slightly less smooth texture. The process can take a minute or two longer.
The Verdict: For the absolute best texture, use a high-speed blender. For ease of use and great results, a food processor is an excellent choice.
The Nice Cream Flavor Matrix: From Classic to Creative
The plain banana base is delicious, but it’s also a perfect canvas for customization. Use this matrix to engineer your perfect flavor combination.
Step 1: Boost The Base
Blend these directly with the frozen bananas. Use 1-2 tablespoons per 3 bananas.
- Chocolate: Unsweetened cocoa powder or cacao powder.
- Peanut Butter: Peanut butter powder (for flavor without excess oil) or 1-2 tbsp of creamy peanut butter.
- Vanilla: 1 tsp vanilla extract or vanilla bean paste.
- Coffee: 1-2 tsp instant espresso powder.
- Fruit: ¼ cup of other frozen fruit like strawberries, mango, or cherries.
Step 2: Add Mix-Ins
Stir these in by hand after blending for texture and crunch.
- Crunch: Cacao nibs, chopped nuts, toasted coconut flakes, crushed cookies.
- Chew: Mini chocolate chips, chopped dried fruit, shredded coconut.
- Richness: A spoonful of Nutella or cookie butter. Simple recipes are fantastic for both desserts and dinners; you can find equally easy weeknight meals like these beef taco stuffed bell peppers for when you crave something savory.
Step 3: Finish with Toppings & Swirls
Drizzle or sprinkle on top just before serving.
- Sauces: Melted dark chocolate, peanut butter, or a drizzle of homemade caramel.
- Garnish: Fresh berries, flaky sea salt (especially on chocolate or caramel versions), or a sprinkle of cinnamon.
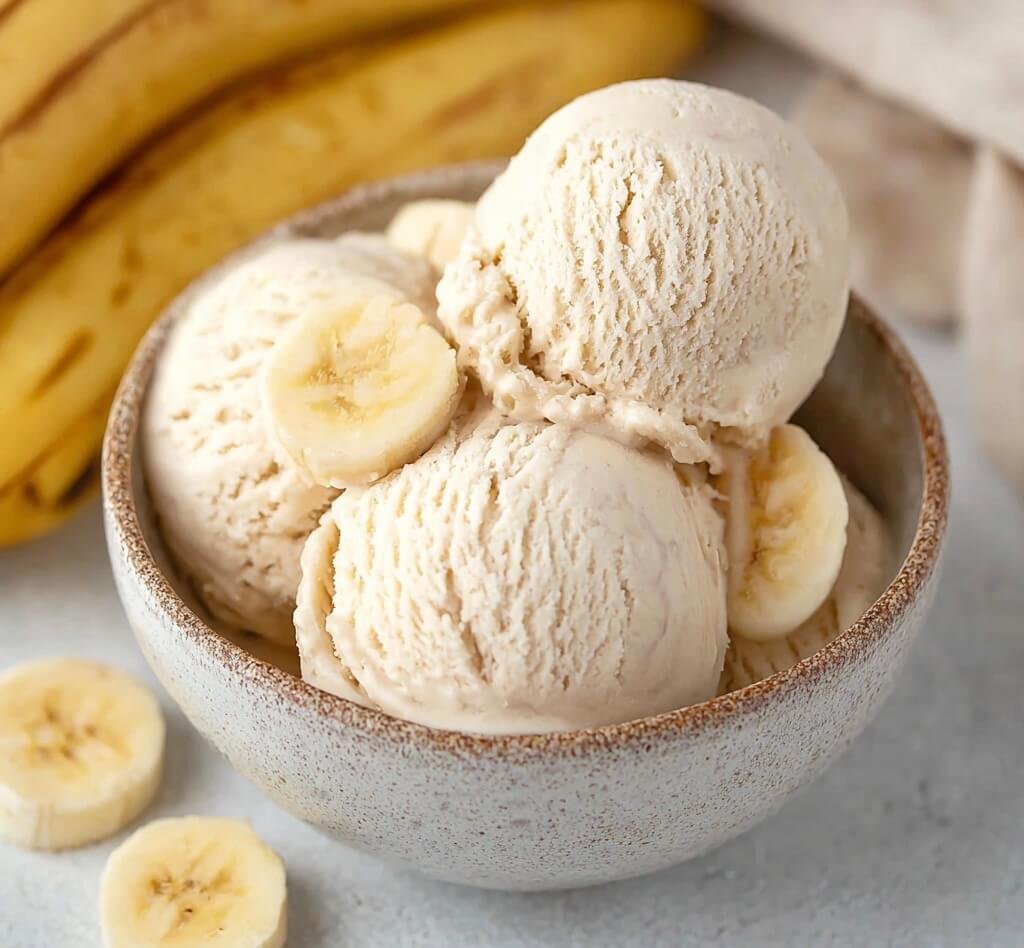
Achieving The Perfect Texture: Soft-Serve vs. Scoopable
You control the final consistency.
For Instant Soft-Serve: The key is to work quickly. Serve the nice cream the moment it becomes smooth and creamy in the blender. It will be the perfect soft-serve texture, ready to eat immediately.
For Firm, Scoopable Ice Cream: This requires a second freeze.
- Transfer: Scrape the blended nice cream into a loaf pan or other freezer-safe container. A metal loaf pan will chill it faster.
- Press & Smooth: Press a piece of parchment paper directly onto the surface of the nice cream. This prevents ice crystals from forming on top.
- Freeze: Freeze for at least 2 hours.
- Temper: Let the container sit on the counter for 5-10 minutes before scooping to soften slightly.
COMMON MISTAKES TO AVOID
Mistake: Using under-ripe or just-ripe bananas.
Fix: Use bananas with plenty of brown spots. The natural sugars are at their peak, which means a sweeter, more flavorful nice cream without added sugar.
Mistake: Adding too much liquid at the beginning.
Fix: Be patient. Let the machine do the work. Only add liquid 1 tablespoon at a time if the blender is truly struggling and the mixture isn’t coming together after a minute or two.
Mistake: Over-blending the mixture.
Fix: Stop blending the second it becomes smooth and creamy. Over-blending creates friction, which warms the nice cream and turns it into a soupy smoothie.
FAQ
Q: Can I make nice cream without a high-speed blender or food processor?
A: It is very difficult. A standard blender’s motor may not be powerful enough to break down the frozen banana chunks and could burn out. You need a robust machine for the best and safest results.
Q: How do I store leftover nice cream?
A: Store it in an airtight, freezer-safe container with parchment paper pressed directly against the surface. It will be very hard when you take it out; let it sit at room temperature for 10-15 minutes to soften before scooping. It is best enjoyed within a week.
Q: Why is my nice cream icy instead of creamy?
A: This is usually caused by too much added water/liquid, or from refreezing a partially melted batch. Using very ripe bananas with low water content is the best way to prevent iciness from the start.
NUTRITIONAL SNAPSHOT
(Estimated for 1 serving of basic nice cream, using 1.5 bananas)
| Nutrient | Amount per Serving |
|---|---|
| Calories | 160 |
| Protein | 1.5g |
| Fat | 0.5g |
| Net Carbs | 35g |
| Fiber | 4.5g |
| Sugar | 21g |
For more recipe inspiration, exploring other vibrant and healthy meals like a poke bowl with seared salmon can be a great next step.
Creamy Banana Nice Cream: The Foolproof Method
Ingredients
- 3-4 large, very ripe bananas (with brown spots)
- 1-2 tbsp milk or water (optional, as needed)