The Best Peanut Butter and Jelly Snack Bread
This Peanut Butter and Jelly Snack Bread captures the nostalgic comfort of a classic sandwich in a moist, tender loaf. The rich, nutty batter is perfectly balanced by a sweet ribbon of fruit jam, making it an irresistible treat. It’s one of my go-to breakfast recipes for a reason: it’s simple, satisfying, and fills the kitchen with an incredible aroma.
The PB&J Bread Blueprint: Key Ingredients
The success of this loaf lies in its simple, high-quality components. Understanding their roles will allow for perfect results and smart substitutions.
- Peanut Butter: Creamy, commercial-style peanut butter (like Jif or Skippy) is engineered for baking. It provides a consistent, emulsified texture that keeps the bread moist. Natural peanut butters can separate and create an oily, crumbly result.
- Jam or Jelly: Use a thick-style jam or preserve. A thinner jelly will be absorbed by the batter, causing the swirl to disappear. Strawberry or raspberry provides a classic, tart contrast to the rich peanut butter.
- Buttermilk: This is a non-negotiable for a tender crumb. The acid in buttermilk reacts with the baking soda for a better rise and breaks down gluten strands for a softer texture. No buttermilk? Make your own: 1 cup of whole milk plus 1 tablespoon of lemon juice or white vinegar. Let it sit for 5-10 minutes.
- Flour: All-purpose flour provides the right structure—sturdy enough to hold the swirl but not as dense as bread flour. Measure correctly by spooning it into your measuring cup and leveling it off.
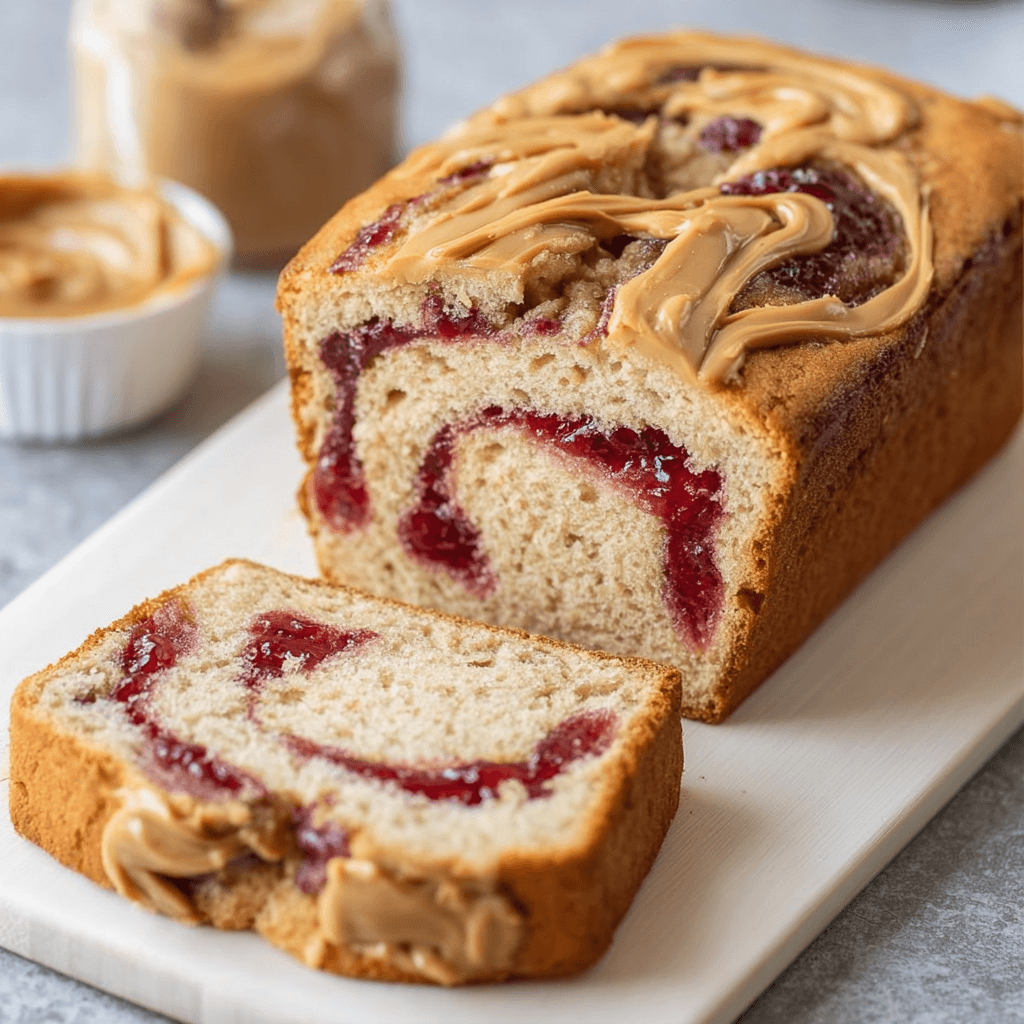
Technique Focus: The Perfect Jelly Swirl
A distinct, beautiful swirl is the goal. A messy, blended loaf tastes fine, but a defined ribbon of jam is visually stunning.
- Layering is Key: Don’t just pour all the batter in at once. The best method is to layer: half the batter, dollops of jam, the remaining batter, and more dollops on top.
- The “Knife Swirl” Method: Use a simple butter knife or a skewer. Plunge it into the batter and make 2-3 gentle “S” shaped motions down the length of the loaf pan.
- Don’t Over-Swirl: This is the most common mistake. It’s tempting to keep mixing, but more than 3-4 passes will muddy the jam into the batter, and you’ll lose the distinct layers. The goal is to gently marble, not fully combine.
- Warm the Jam Slightly: If your jam is very thick and cold from the fridge, microwave it for 10-15 seconds. This makes it easier to dollop and swirl without tearing the batter.
Flavor Customization & Upgrades
This basic recipe is a fantastic canvas for experimentation. Once you’ve mastered the classic, try these variations to create your own signature loaf. These ideas can elevate a simple snack into something worthy of our desserts collection.
- Nut Butter Variations:
- Almond Butter & Apricot Jam: A sophisticated, slightly sweeter combination.
- Cashew Butter & Blackberry Jam: Incredibly creamy and rich.
- Crunchy Peanut Butter: Adds a fantastic textural contrast.
- Mix-Ins & Toppings:
- Add Chocolate: Fold 1/2 cup of semisweet or dark chocolate chips into the batter.
- Streusel Topping: Combine 1/4 cup flour, 1/4 cup brown sugar, 2 tbsp cold butter, and a pinch of cinnamon. Sprinkle over the top before baking for a crunchy crust.
- Chopped Peanuts: Sprinkle 1/4 cup of salted, roasted peanuts over the top layer of jam for extra crunch and flavor.
- Advanced Inspiration: If you’re feeling adventurous and want to tackle a more complex pastry, the techniques in this Raspberry Choux au Craquelin recipe are a great next step in mastering fillings and doughs.
Step-by-Step Instructions
Prep Time: 15 minutes
Cook Time: 50-60 minutes
Yields: 1 loaf (8-10 slices)
- Pre-Work: Preheat your oven to 350°F (175°C). Grease and flour a 9×5 inch loaf pan, or line it with parchment paper for easy removal.
- Dry Ingredients: In a medium bowl, whisk together the all-purpose flour, baking soda, baking powder, and salt. Set aside.
- Wet Ingredients: In a large bowl, use a hand mixer or stand mixer to cream the softened unsalted butter and both sugars until light and fluffy (about 2-3 minutes).
- Combine: Beat in the eggs one at a time, followed by the peanut butter and vanilla extract. Mix until just combined.
- Alternate Flour & Buttermilk: Add the dry ingredients to the wet ingredients in three additions, alternating with the buttermilk in two additions (Dry, Wet, Dry, Wet, Dry). Start and end with the dry mixture. Mix on low speed until just combined. Do not overmix.
- Assemble the Loaf: Spread half of the batter evenly into the prepared loaf pan.
- Add the Jam: Dollop half of your chosen jam (about 1/4 cup) over the batter.
- Layer and Swirl: Top with the remaining batter and spread it gently. Dollop the remaining jam on top. Use a butter knife to make 2-3 gentle swirls through the batter.
- Bake: Bake for 50-60 minutes, or until a wooden skewer inserted into the center comes out with moist crumbs, but no wet batter.
- Cool: Let the bread cool in the pan for 15 minutes before transferring it to a wire rack to cool completely before slicing. This prevents it from crumbling.
Storage & Make-Ahead Guide
Proper storage ensures your snack bread stays fresh and delicious.
- At Room Temperature: Store in an airtight container for up to 4 days. The flavor actually deepens on day two.
- In the Refrigerator: While you can refrigerate it, this can dry out the bread. It’s not recommended unless your kitchen is very warm.
- Freezing: This bread freezes beautifully.
- Whole Loaf: Wrap the completely cooled loaf tightly in plastic wrap, then a layer of aluminum foil. Freeze for up to 3 months.
- Individual Slices: Slice the loaf and place parchment paper between each slice. Store in a freezer-safe bag. This allows you to grab a single serving whenever you want. Thaw at room temperature or toast lightly from frozen.
COMMON MISTAKES TO AVOID
- Mistake: Using natural, oily peanut butter.
- Fix: Stick to commercial, emulsified creamy peanut butter. It has stabilizers that prevent the oil from separating, ensuring a moist, even crumb.
- Mistake: The jam swirl sinks to the bottom of the pan.
- Fix: Your batter might be too thin, or the jam is too heavy. Ensure you measure your flour correctly. Also, using the layering method (batter, jam, batter, jam) helps suspend the jam within the loaf.
- Mistake: The center of the bread is gummy and underbaked.
- Fix: Your oven may run cool. Use an oven thermometer to verify the temperature. If the top is browning too quickly, tent it loosely with aluminum foil for the last 15-20 minutes of baking.
FAQ
Q: Can I reduce the sugar in this recipe?
A: You can slightly, but sugar does more than sweeten; it adds moisture and contributes to the tender texture. I wouldn’t recommend reducing it by more than 1/4 cup, or the bread may become dry.
Q: Can I make this recipe gluten-free?
A: Yes, you can substitute the all-purpose flour with a high-quality 1-to-1 gluten-free baking flour blend that contains xanthan gum. The texture will be slightly denser but still delicious.
Q: Why did my bread crack on top?
A: A crack on top of a quick bread is a good sign! It means the heat of the oven caused the leavening agents (baking soda/powder) to activate quickly, creating a strong rise. It’s characteristic of a well-baked loaf.
For those who enjoy nutty, layered desserts, you may also find inspiration in these intricate Pistachio Honey Baklava Rolls.
NUTRITIONAL SNAPSHOT
| Nutrient | Amount per Serving |
|---|---|
| Calories | 380 kcal |
| Protein | 8g |
| Fat | 19g |
| Net Carbs | 42g |
| Fiber | 2g |
| Sugar | 25g |
The Best Peanut Butter and Jelly Snack Bread
Ingredients
- 1 3/4 cups all-purpose flour
- 1 tsp baking soda
- 1/2 tsp baking powder
- 1/2 tsp salt
- 1/2 cup unsalted butter, softened
- 1/2 cup granulated sugar
- 1/2 cup packed light brown sugar
- 2 large eggs, room temperature
- 1 cup creamy peanut butter
- 1 tsp vanilla extract
- 1 cup buttermilk, room temperature
- 1/2 cup thick strawberry or raspberry jam