Rich & Creamy No-Bake Biscoff Dessert Recipe
Craving an impressive dessert without touching the oven? This no-bake Lotus Biscoff dessert layers a spiced cookie crust, a velvety cheesecake-style filling, and a luscious Biscoff spread topping. It’s a showstopper that’s surprisingly simple, making it one of our most popular dessert recipes.
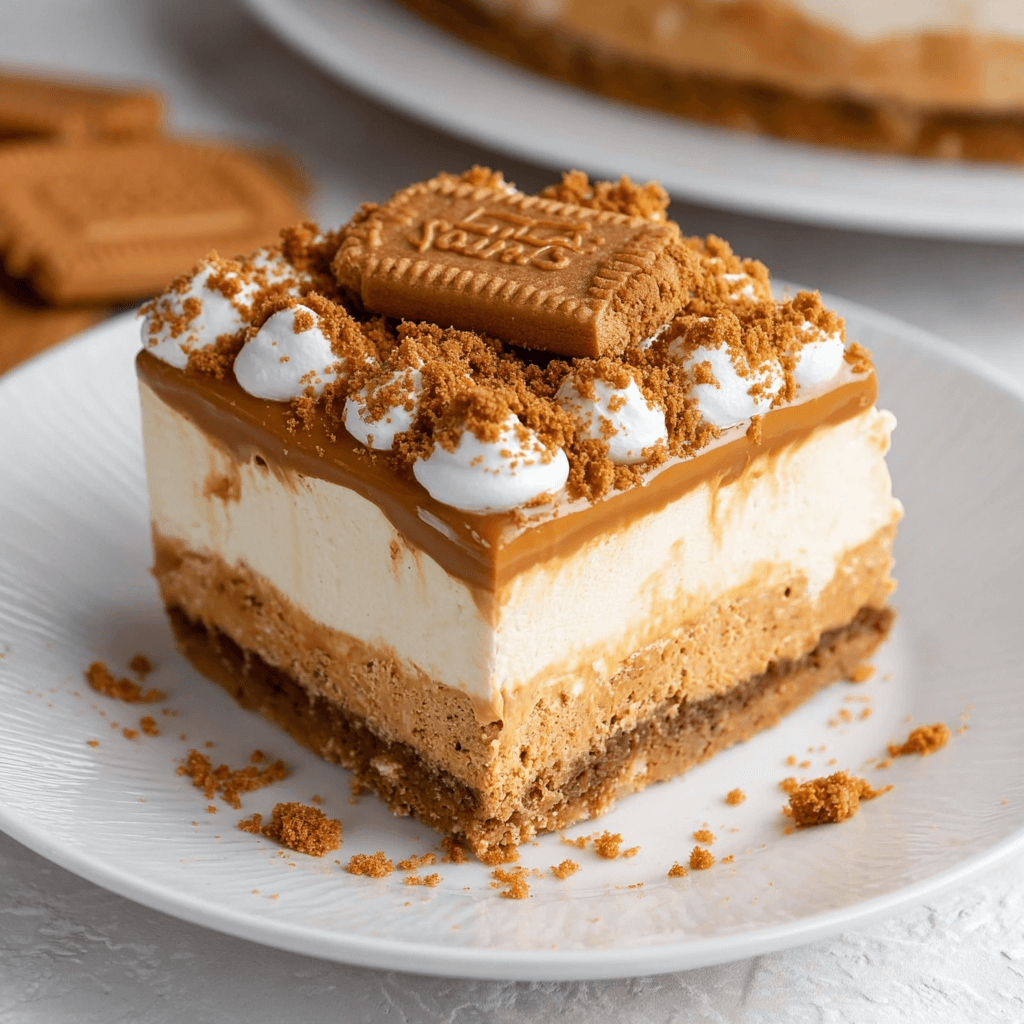
Component Breakdown: The 3 Layers of Biscoff Bliss
Understanding the structure is key to success. This dessert is built in three distinct, synergistic layers.
- The Crust: A crisp, buttery foundation made from crushed Lotus Biscoff cookies. This provides a crunchy, caramelized spice flavor that is the signature of the dessert.
- The Filling: An ultra-smooth, creamy layer that tastes like a light cheesecake. It’s a simple mix of cream cheese, powdered sugar, and whipped heavy cream, which provides structure and a tangy counterpoint to the sweet Biscoff.
- The Topping: A glossy, decadent layer of melted Biscoff spread. This final touch doubles down on the core flavor and creates a beautiful finish, garnished with more cookie crumbs for texture.
Why This No-Bake Method Works
No-bake desserts rely on chilling and fat solidification, not heat, to set up.
- Butter’s Role: In the crust, melted butter coats the cookie crumbs. As it chills in the refrigerator, the butter solidifies, acting as a “glue” that binds the crumbs into a firm, sliceable base.
- Fat Emulsion in the Filling: The high fat content in the cream cheese and heavy cream is crucial. When whipped, the fat globules in the heavy cream create a stable matrix. This, combined with the dense structure of the cream cheese, allows the filling to firm up into a mousse-like consistency when chilled.
- Chilling is Critical: The refrigerator isn’t just for storage; it’s an essential part of the “cooking” process. Adequate chilling time allows the fats to harden completely, ensuring clean slices and preventing a soupy mess.
Pro-Tips for a Perfect Set
Achieving the perfect texture is easy if you follow a few engineering principles. These tips are useful for many no-bake treats, from this dessert to other dinner party favorites.
- Room Temperature is Non-Negotiable: For the filling, your cream cheese must be at room temperature. Cold cream cheese results in a lumpy, grainy filling because it cannot blend smoothly with the other ingredients.
- Whip Cream to Stiff Peaks: Don’t under-whip your heavy cream. You are looking for “stiff peaks,” meaning when you lift the beaters out, the cream holds its shape firmly. This provides the aeration and stability the filling needs.
- Fold, Don’t Stir: When combining the whipped cream with the cream cheese mixture, use a spatula to gently fold it in. Aggressive stirring will deflate the air you just whipped into the cream, resulting in a dense, runny filling.
- Press the Crust Firmly: Use the flat bottom of a measuring cup or glass to pack the crust mixture tightly and evenly into your pan. A loosely packed crust will crumble when you try to serve it.
Step-by-Step Instructions
Prep Time: 20 minutes
Chill Time: 6 hours (or overnight)
Yields: 9-12 servings
Part 1: Prepare the Biscoff Crust
- Crush the Cookies: Place 250g (about 8.8 oz) of Lotus Biscoff cookies into a food processor and pulse until they form fine crumbs. Alternatively, place them in a sealed plastic bag and crush them with a rolling pin.
- Combine with Butter: Transfer the crumbs to a medium bowl. Pour in 100g (7 tbsp) of melted unsalted butter and mix with a fork until all the crumbs are evenly moistened, resembling wet sand.
- Press into Pan: Tip the mixture into an 8×8 inch (20×20 cm) square baking pan. Use the back of a spoon or the bottom of a glass to press the crumbs firmly and evenly across the bottom.
- Chill: Place the pan in the refrigerator for at least 30 minutes to allow the crust to set while you prepare the filling.
Part 2: Create the Creamy Filling
- Beat Cream Cheese: In a large bowl, use an electric mixer to beat 450g (16 oz) of room-temperature, full-fat block cream cheese until completely smooth and free of lumps.
- Add Sugar & Biscoff: Add 100g (1 cup) of powdered sugar and 125g (1/2 cup) of Biscoff spread. Beat on medium speed until fully combined and smooth, scraping down the sides of the bowl as needed.
- Whip the Cream: In a separate, chilled bowl, whip 360ml (1.5 cups) of cold heavy whipping cream with 1 tsp of vanilla extract until stiff peaks form.
- Fold and Combine: Gently fold the whipped cream into the cream cheese mixture in two or three additions using a spatula. Mix until just combined and no white streaks remain. Do not overmix.
- Layer: Spoon the filling over the chilled crust and spread it into an even layer with an offset spatula.
Part 3: Add the Topping and Chill
- Melt Biscoff Spread: Gently warm 200g (3/4 cup) of Biscoff spread in a microwave-safe bowl in 15-second intervals until it’s pourable but not hot.
- Top the Dessert: Pour the melted spread over the cream cheese layer and gently spread it to cover the entire surface.
- Garnish: Crush an additional 4-5 Biscoff cookies and sprinkle the crumbs over the top.
- Final Chill: Cover the pan with plastic wrap and refrigerate for at least 6 hours, or preferably overnight, to allow the dessert to set completely.
- Serve: Slice into squares and serve chilled.
Flavor Variations & Upgrades
While the classic recipe is a star, you can easily modify it.
- Chocolate Ganache Layer: Add a thin layer of chocolate ganache between the filling and the Biscoff topping for a rich, decadent twist.
- Coffee Infusion: Dissolve 1-2 teaspoons of instant espresso powder in the vanilla extract before adding it to the whipped cream. For more coffee-forward ideas, you can draw inspiration from the components in this espresso mascarpone tart recipe.
- Salted Caramel Drizzle: A light drizzle of salted caramel sauce on top before serving cuts through the sweetness and adds another layer of complexity.
If you enjoy exploring creamy, no-bake desserts, you might also find inspiration in recipes for a tangy blueberry lemon cheesecake or indulgent dark chocolate raspberry truffles for a future baking project.
COMMON MISTAKES TO AVOID
- Mistake: Lumpy filling. Fix: Ensure your cream cheese is truly at room temperature. Cold cream cheese will not blend smoothly. Beat it by itself first to eliminate all lumps before adding other ingredients.
- Mistake: A runny, unset filling. Fix: This is usually caused by under-whipped cream or not chilling long enough. Whip the heavy cream to firm, stiff peaks. Then, be patient and let the dessert chill for the full recommended time.
- Mistake: A greasy or crumbly crust. Fix: Use the precise amount of butter. Too much will create a greasy base; too little will cause it to fall apart. Pack the crumbs down very firmly to create a solid foundation.
FAQ
Q: Can I make this dessert in a different pan?
A: Yes. A 9-inch round springform pan works great. The layers will be slightly thinner. You can double the recipe for a 9×13 inch pan.
Q: How long does this dessert last in the fridge?
A: It can be stored, covered, in the refrigerator for up to 4 days. The cookie crust will soften slightly over time.
Q: Can I freeze this Biscoff dessert?
A: Yes, it freezes well. Wrap the entire pan tightly or freeze individual slices. Thaw in the refrigerator for a few hours before serving.
NUTRITIONAL SNAPSHOT
| Nutrient | Amount per Serving |
|---|---|
| Calories | 480 kcal |
| Protein | 5g |
| Fat | 35g |
| Net Carbs | 38g |
| Fiber | 1g |
| Sugar | 29g |
Rich & Creamy No-Bake Biscoff Dessert Recipe
Ingredients
- 250g (8.8 oz) Lotus Biscoff Cookies
- 100g (7 tbsp) Unsalted Butter, melted
- 450g (16 oz) Full-Fat Block Cream Cheese, room temperature
- 100g (1 cup) Powdered Sugar
- 125g (1/2 cup) Lotus Biscoff Cookie Spread
- 360ml (1.5 cups) Cold Heavy Whipping Cream
- 1 tsp Vanilla Extract
- 200g (3/4 cup) Lotus Biscoff Cookie Spread
- 4-5 Lotus Biscoff Cookies, crushed for garnish