
How to Make Italian Peach Cookies (Pesche Dolci)
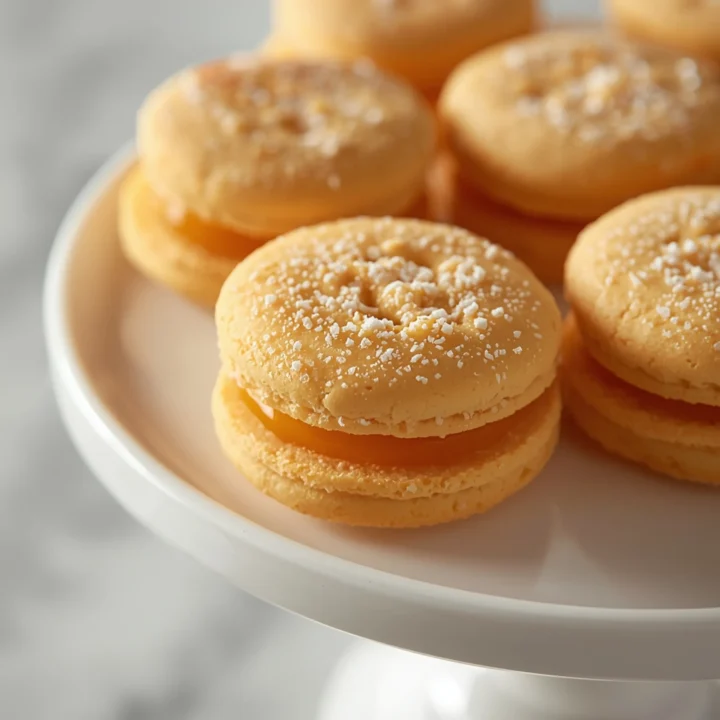
These stunning Italian Peach Cookies, or Pesche Dolci, are a classic for a reason. They look just like real peaches but are actually two delicate, dome-shaped cookies filled with a rich pastry cream. While I love simple weeknight treats, some occasions call for a showstopper, and these join the ranks of my most beloved Desserts.
This recipe breaks down the process into manageable steps, ensuring you get that perfect, tender crumb and vibrant, realistic finish every time. Let’s engineer a masterpiece.
The Anatomy of a Perfect Peach Cookie
Understanding the components is key to success. Each cookie is an assembly of three distinct parts that work in harmony.
- The Cookie Halves: These aren’t your typical drop cookies. They’re soft, slightly cakey, and sturdy enough to be hollowed out. The dough is enriched with eggs and butter, giving it a texture similar to a madeleine. The key is baking them just until they are set but not browned, keeping them pale and tender.
- The Filling: Traditionally, this is a vanilla or lemon-infused pastry cream (crema pasticcera). The scooped-out cookie crumbs are often mixed back into the cream, adding texture and preventing waste. This filling acts as the delicious “glue” that holds the two halves together.
- The “Peach Skin” Dip: This is the magic step. The assembled cookies are briefly dipped in a colored liqueur, typically Alchermes, which gives them their signature blush and a subtle spiced flavor. A final roll in granulated sugar mimics the fuzzy skin of a fresh peach.
Step-by-Step Instructions
Phase 1: The Cookie Dough
- Prep: Preheat your oven to 350°F (175°C). Line two baking sheets with parchment paper.
- Wet Ingredients: In a large bowl or the bowl of a stand mixer, whisk together the sugar, melted butter, eggs, milk, and vanilla extract until smooth and well-combined.
- Dry Ingredients: In a separate bowl, whisk together the all-purpose flour, baking powder, and salt.
- Combine: Gradually add the dry ingredients to the wet ingredients, mixing on low speed until just combined. The dough will be soft and slightly sticky. Do not overmix.
- Chill (Optional but Recommended): Cover the bowl and chill the dough for 30 minutes. This makes it easier to handle and prevents spreading.
Phase 2: Baking the Halves
- Portion: Scoop tablespoon-sized portions of dough (about 20-25 grams each) and roll them into smooth balls. Place them 2 inches apart on the prepared baking sheets. They will flatten slightly into domes.
- Bake: Bake for 12-15 minutes, or until the bottoms are lightly golden and the tops are pale and set. They should not get much color.
- Cool: Let the cookies cool on the baking sheet for 5 minutes before transferring them to a wire rack to cool completely.
Phase 3: Filling and Assembly
- Hollow Out: Once completely cool, use a small, sharp paring knife or a melon baller to carefully scoop out the flat bottom of each cookie half, creating a small cavity. Save the crumbs in a bowl.
- Prepare the Filling: In a medium bowl, combine your pastry cream with the reserved cookie crumbs. Mix well.
- Fill: Use a small spoon or a piping bag to fill the cavity of one cookie half with the cream mixture.
- Assemble: Gently press a second, unfilled cookie half onto the filled one to create a sphere. Scrape off any excess filling that oozes out. Place the assembled “peaches” on a tray and chill for at least 30 minutes to firm up.
Phase 4: Creating the Peach Effect
- Prepare Dyes: Pour the yellow-colored liquid into one shallow bowl and the red-colored liquid into another. Pour the granulated sugar onto a small plate.
- Dip: Working quickly, take a chilled cookie and dip it entirely into the yellow liquid. Immediately dip opposite sides into the red liquid to create a “blush” effect. Don’t soak the cookie—a quick dip is all you need.
- Sugar Coat: Immediately roll the damp cookie in the granulated sugar until it’s fully coated.
- Garnish: Place the finished cookie on a clean tray. Add a fresh mint leaf or a candied cherry stem to the top to act as a “leaf.”
- Set: Let the cookies sit at room temperature for about an hour for the colors to set and the sugar to crystallize.
Filling Variations: Beyond the Classic
While classic pastry cream is phenomenal, you can easily customize the filling. This is where you can get creative and adapt the recipe to your taste or even turn it into a decadent treat for a special Breakfast gathering.
- Nutella & Hazelnut: Fill with Nutella and mix in finely chopped toasted hazelnuts instead of the cookie crumbs.
- Ricotta & Orange: Combine whole milk ricotta, powdered sugar, and a teaspoon of orange zest for a lighter, tangier filling.
- Jam-Filled: A high-quality apricot, peach, or raspberry jam makes for a simple and delicious center.
- Chocolate Ganache: For a truly decadent twist, consider a rich chocolate filling. The concept of a fruit-and-chocolate pairing is timeless; for instance, the filling in this Raspberry Chocolate Lasagna Recipe shows just how well these flavors can work together.
Achieving the Realistic Peach Look
The visual appeal is half the fun. Nailing the look is easier than you think with these engineering principles.
- Use Two Colors: The key to a realistic peach is a multi-tonal blush, not a flat color. Using a base of yellow and adding targeted “blushes” of red is what creates the convincing effect.
- The Right Liquid: Traditional Alchermes liqueur provides both color and a unique spiced flavor. If you can’t find it, don’t worry. You can use peach schnapps, rum, or even milk for a non-alcoholic version. Just add food coloring.
- Work Fast: The cookies are porous. Dip them quickly (1-2 seconds per side) to add color without making them soggy. A saturated cookie will fall apart.
- Sugar is Functional: The final roll in granulated sugar isn’t just for sweetness. It creates a crystalline, slightly fuzzy texture that mimics real peach skin and helps lock in the moisture from the dip.
Make-Ahead & Storage Blueprint
These cookies are a project, but you can break up the work. Here’s the blueprint for planning ahead.
- Cookie Halves: The unfilled, hollowed-out cookie halves can be stored in an airtight container at room temperature for up to 3 days.
- Pastry Cream: The filling can be made up to 2 days in advance and stored in the refrigerator with plastic wrap pressed directly onto the surface to prevent a skin from forming.
- Assembly: Once assembled and filled (but before dipping), the cookies should be stored in the refrigerator for up to 24 hours.
- Finished Cookies: For the best texture, serve these cookies the day they are finished. After dipping, the exterior will soften over time. Store any leftovers in a single layer in an airtight container in the refrigerator for up to 2 days.
COMMON MISTAKES TO AVOID
-
Mistake: Overbaking the cookie halves. This makes them brown and too crispy to hollow out properly.
Fix: Pull them from the oven the moment the bottoms are a very light golden brown. The tops should remain pale.
-
Mistake: Soaking the cookies in the coloring liquid. This leads to a soggy, disintegrating mess.
Fix: A quick, decisive dip is all that’s needed. Think of it as painting the cookie, not marinating it.
-
Mistake: Using a runny filling. A thin filling will leak out and make the cookies soggy from the inside.
Fix: Ensure your pastry cream is thick. If using jam, choose a high-quality preserve or thicken it slightly with a teaspoon of cornstarch over low heat.
FAQ
Q: Can I make these non-alcoholic?
A: Absolutely. Simply replace the liqueur with milk or a fruit juice like peach or apricot nectar. Add a few drops of yellow and red food coloring to two separate bowls and proceed with the dipping step.
Q: My cookies are cracking when I try to hollow them out. What went wrong?
A: This usually means the cookies are too cool or slightly overbaked. Let them cool until they are just warm to the touch, which makes them more pliable. If they’re fully cool, they become more brittle.
Q: Where can I find Alchermes liqueur?
A: Alchermes is a spiced Italian liqueur that can be difficult to find outside of specialty Italian markets or well-stocked liquor stores. Online retailers are your best bet. If you can’t find it, a mix of cranberry juice, a drop of orange blossom water, and a drop of almond extract is a decent non-alcoholic substitute for flavor and color.
If you enjoyed the project of making these beautiful cookies, you might also love the delicious complexity of these Biscoff Cookie Butter Cinnamon Rolls. And for those days you need a break from baking, these Maple Glazed Chicken Thighs are a perfect savory alternative.
NUTRITIONAL SNAPSHOT
| Nutrient | Amount per Serving |
|---|---|
| Calories | 185 kcal |
| Protein | 3g |
| Fat | 8g |
| Net Carbs | 24g |
| Fiber | 1g |
| Sugar | 15g |
How to Make Italian Peach Cookies (Pesche Dolci)
These stunning Italian Peach Cookies, or Pesche Dolci, are a classic for a reason. They look just like real peaches but are actually two delicate, dome-shaped cookies filled with a rich pastry cream. While I love simple weeknight treats, some occasions call for a showstopper, and these join the ranks of my most beloved Desserts.
Ingredients
- 3 ¼ cups (400g) all-purpose flour
- 2 ½ teaspoons baking powder
- Pinch of salt
- ½ cup (100g) granulated sugar
- ½ cup (113g) unsalted butter, melted and cooled
- 2 large eggs, room temperature
- ¼ cup (60ml) whole milk
- 1 teaspoon vanilla extract
- 1 cup (240ml) whole milk
- 3 large egg yolks
- ¼ cup (50g) granulated sugar
- 2 tablespoons cornstarch
- 1 teaspoon vanilla extract
- Reserved cookie crumbs
- 1/4 cup Alchermes liqueur or rum (or milk for non-alcoholic)
- Yellow and red food coloring
- 1 cup granulated sugar, for rolling
- Fresh mint leaves, for garnish
Instructions
- Preheat your oven to 350°F (175°C). Line two baking sheets with parchment paper.
- In a large bowl or the bowl of a stand mixer, whisk together the sugar, melted butter, eggs, milk, and vanilla extract until smooth and well-combined.
- In a separate bowl, whisk together the all-purpose flour, baking powder, and salt.
- Gradually add the dry ingredients to the wet ingredients, mixing on low speed until just combined. The dough will be soft and slightly sticky. Do not overmix.
- Cover the bowl and chill the dough for 30 minutes. This makes it easier to handle and prevents spreading.
- Scoop tablespoon-sized portions of dough (about 20-25 grams each) and roll them into smooth balls. Place them 2 inches apart on the prepared baking sheets. They will flatten slightly into domes.
- Bake for 12-15 minutes, or until the bottoms are lightly golden and the tops are pale and set. They should not get much color.
- Let the cookies cool on the baking sheet for 5 minutes before transferring them to a wire rack to cool completely.
- Once completely cool, use a small, sharp paring knife or a melon baller to carefully scoop out the flat bottom of each cookie half, creating a small cavity. Save the crumbs in a bowl.
- In a medium bowl, combine your pastry cream with the reserved cookie crumbs. Mix well.
- Use a small spoon or a piping bag to fill the cavity of one cookie half with the cream mixture.
- Gently press a second, unfilled cookie half onto the filled one to create a sphere. Scrape off any excess filling that oozes out. Place the assembled "peaches" on a tray and chill for at least 30 minutes to firm up.
- Pour the yellow-colored liquid into one shallow bowl and the red-colored liquid into another. Pour the granulated sugar onto a small plate.
- Working quickly, take a chilled cookie and dip it entirely into the yellow liquid. Immediately dip opposite sides into the red liquid to create a "blush" effect. Don't soak the cookie—a quick dip is all you need.
- Immediately roll the damp cookie in the granulated sugar until it's fully coated.
- Place the finished cookie on a clean tray. Add a fresh mint leaf or a candied cherry stem to the top to act as a "leaf."
- Let the cookies sit at room temperature for about an hour for the colors to set and the sugar to crystallize.