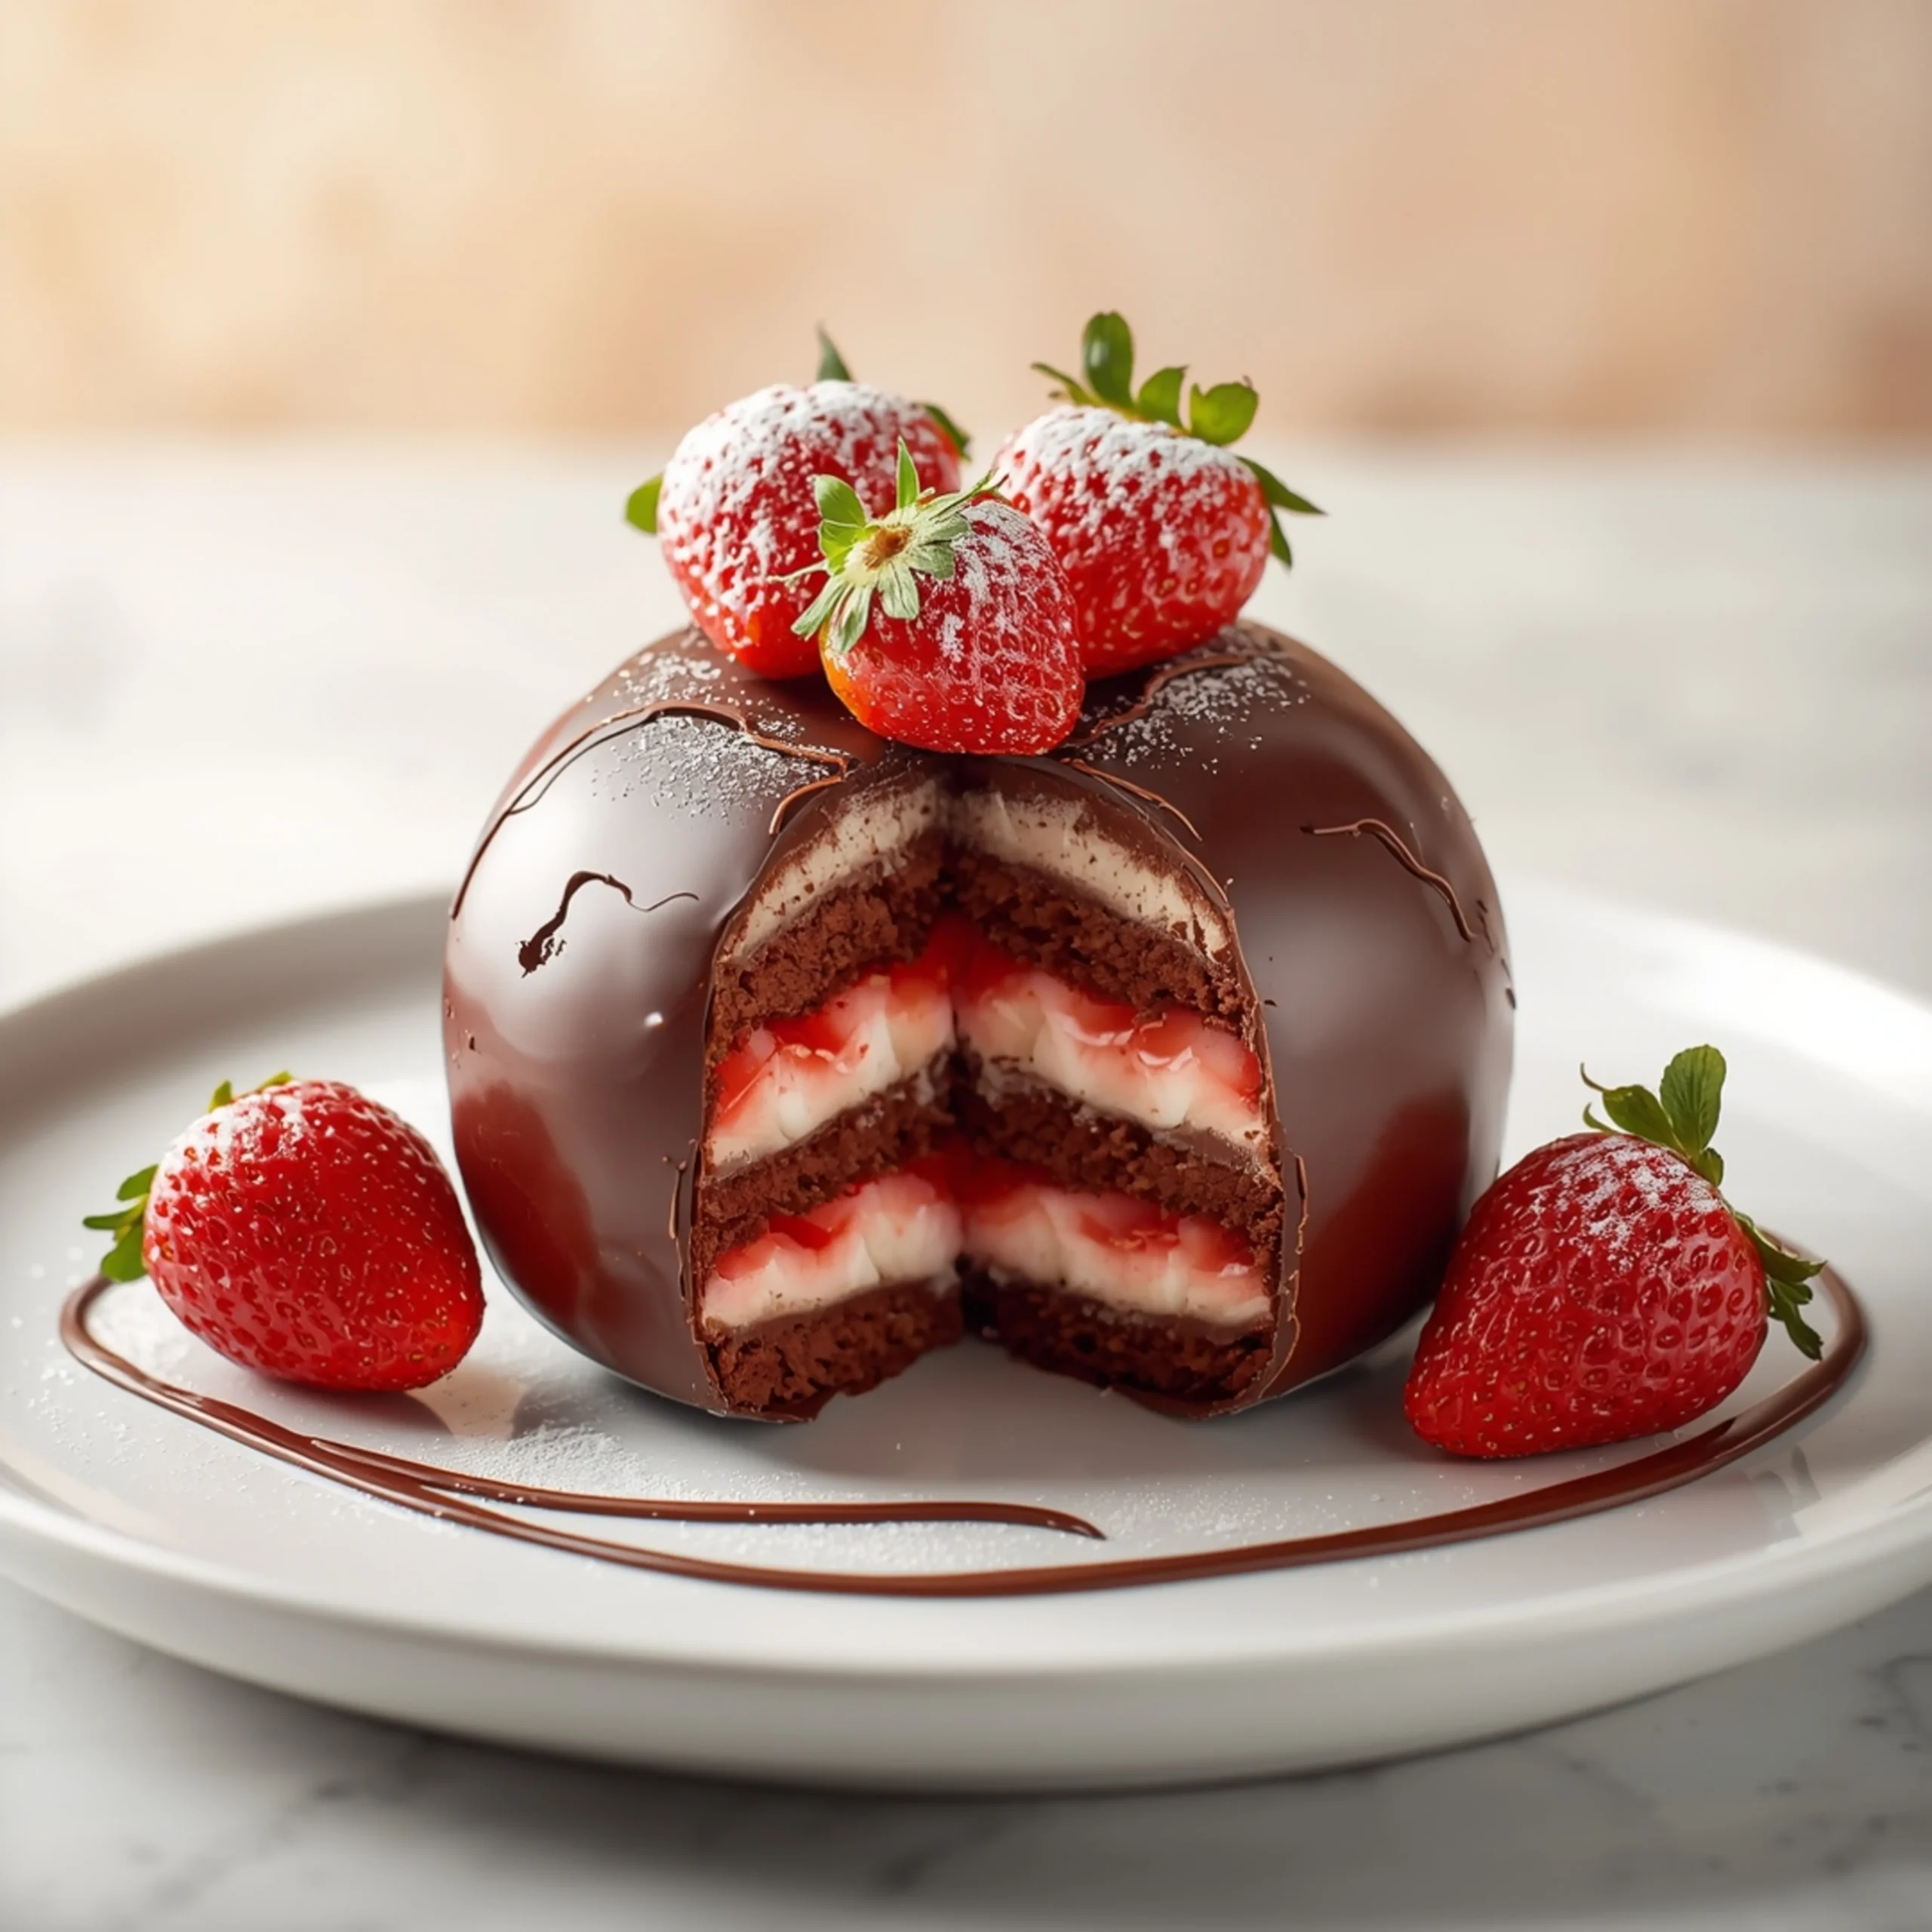
The Perfect Strawberry Cake with a Chocolate Crackle Shell
This cake delivers on two fronts: a tender, fresh strawberry crumb and the satisfying crack of a hard chocolate shell. It’s a textural masterpiece that looks impressive but is engineered for simplicity. If you love this, you’ll want to explore our other amazing desserts.
STEP-BY-STEP INSTRUCTIONS
Phase 1: The Strawberry Cake
- Prep: Preheat oven to 350°F (175°C). Grease and flour two 8-inch round cake pans.
- Dry Ingredients: In a medium bowl, whisk together 2 ½ cups all-purpose flour, 2 tsp baking powder, and ½ tsp salt.
- Wet Ingredients: In a large bowl, use an electric mixer to cream ¾ cup unsalted butter (softened) and 1 ½ cups granulated sugar until light and fluffy. Beat in 3 large eggs, one at a time, followed by 2 tsp of vanilla extract.
- Combine: Alternate adding the dry ingredient mixture and 1 cup of milk to the wet ingredients, beginning and ending with the dry. Mix on low speed until just combined—do not overmix.
- Fold: Gently fold in 1 ½ cups of finely diced fresh strawberries.
- Bake: Divide batter evenly between the prepared pans. Bake for 30-35 minutes, or until a toothpick inserted into the center comes out clean.
- Cool: Let cakes cool in the pans for 15 minutes before inverting them onto a wire rack to cool completely.
Phase 2: The Strawberry Buttercream
- Puree: Blend ½ cup of fresh strawberries until smooth.
- Beat: In a large bowl, beat 1 cup of unsalted butter (softened) until creamy.
- Mix: Gradually add 4 cups of powdered sugar, alternating with 3-4 tbsp of the strawberry puree. Add ½ tsp vanilla extract. Beat until the frosting is smooth and spreadable.
- Assemble: Place one cake layer on your serving plate. Spread a generous layer of frosting on top. Place the second cake layer on top and frost the top and sides of the entire cake with a thin, smooth layer (a crumb coat).
- CHILL: Refrigerate the cake for at least 60 minutes, or freeze for 30 minutes. The cake must be very cold for the next step.
Phase 3: The Chocolate Shell
- Melt: In a microwave-safe bowl, combine 8 oz of semi-sweet chocolate chips and 3 tbsp of coconut oil. Microwave in 20-second intervals, stirring in between, until completely smooth.
- Cool Slightly: Let the chocolate mixture cool for 5-10 minutes. It should be fluid but not hot.
- Pour: Retrieve the chilled cake. Working quickly, pour the chocolate shell mixture over the top center of the cake, allowing it to drip down the sides naturally. Use an offset spatula to gently guide it if needed.
- Set: Place the cake back in the refrigerator immediately for 15-20 minutes to allow the shell to harden completely.
The Science Behind the ‘Magic Shell’
The “crackle” is not magic; it’s chemistry. The effect hinges entirely on the properties of one key ingredient: coconut oil.
- High Saturated Fat: Coconut oil is high in saturated fats, which makes it solid at a relatively high temperature (around 76°F / 24°C). Most other vegetable oils are liquid at room temperature.
- Rapid Solidification: When you pour the warm, liquid chocolate-oil mixture onto the cold, frosted cake, the temperature of the coconut oil plummets.
- The “Snap”: This rapid cooling forces the oil to solidify almost instantly, creating a brittle, crystalline structure. This is what gives the shell its signature “snap” when you cut or bite into it. Using butter or another oil will not produce the same hard shell.
Ingredient Blueprint: The Key Components
Your final result is only as good as your inputs. Here’s a breakdown of the critical elements.
The Strawberries:
- Fresh is Best: Fresh, ripe strawberries provide the best flavor and texture. Dice them small to ensure they distribute evenly and don’t make the cake overly wet.
- Frozen Alternative: You can use frozen strawberries. Thaw them completely and pat them very dry with paper towels to remove excess moisture before dicing.
The Chocolate:
- Semi-Sweet or Bittersweet: These are ideal. They balance the sweetness of the cake and frosting.
- Avoid Milk Chocolate: Milk chocolate contains more milk solids and sugar, which can make the shell softer and less snappy.
The Oil:
- Refined Coconut Oil: This is non-negotiable for the shell. Use refined coconut oil if you don’t want any coconut flavor. Unrefined will work but will impart a distinct coconut taste.
The Flour:
- All-Purpose: Works perfectly for a sturdy yet tender crumb.
- Cake Flour: For an even lighter, more delicate texture, you can substitute cake flour 1:1.
Pro-Tips for a Flawless Finish
Small adjustments in technique make a big difference.
- The Chill is Critical: The cake must be cold. A room-temperature cake will not set the shell. The colder the surface, the faster and harder the shell will form. A quick 30-minute stint in the freezer is more effective than an hour in the fridge.
- Smooth Your Canvas: A smooth layer of frosting creates a better surface for the chocolate shell, resulting in a cleaner look. Use an offset spatula or bench scraper.
- Control The Drip: Pour the chocolate shell into the center of the cake and let gravity do most of the work. Use a spoon or spatula to gently nudge it over the edges where you want drips. Don’t try to “frost” the cake with the chocolate. For more great techniques, check out our full collection of recipes.
- Work Fast: The shell begins setting the moment it hits the cold cake. Have your tools ready and pour with confidence.
Serving & Storage Engineering
This cake requires specific handling to maintain its perfect texture.
- Cutting the Cake: To get clean slices without shattering the entire shell, use a large, sharp knife dipped in hot water and wiped dry before each cut. Press down firmly and decisively.
- Serving Temperature: Let the cake sit at room temperature for 10-15 minutes before serving. This slightly softens the shell and buttercream for the best eating experience.
- Storage: The cake must be stored in the refrigerator due to the buttercream and chocolate shell. Keep it in an airtight container or cake carrier for up to 4 days. The shell will keep its snap. This cake is a fantastic dessert to follow a lighter, savory appetizer, and if you need ideas, these Cheesy Jalapeno Corn Fritters are always a hit.
COMMON MISTAKES TO AVOID
- Mistake: The chocolate shell is too thick or greasy.
Fix: Your chocolate-to-oil ratio was off, or the chocolate was overheated. Use the precise measurements. Melt gently in short bursts, stirring frequently. - Mistake: Pouring the shell on a room-temperature cake.
Fix: This is the most common error. The shell will not harden properly and will just create a mess. The cake and its crumb coat of frosting must be thoroughly chilled until firm to the touch. - Mistake: The cake batter is lumpy or curdled.
Fix: Your ingredients were too cold. Ensure eggs, butter, and milk are at room temperature. This allows them to emulsify properly, creating a smooth batter and a tender final product.
FAQ
Q: Can I use a different kind of fruit?
A: Absolutely. Finely diced raspberries would be an excellent substitute in the cake and puree for the frosting. Blueberries would also work well.
Q: Can I make this cake ahead of time for a party?
A: Yes. You can bake the cake layers up to a month in advance and store them, well-wrapped, in the freezer. Frost and apply the shell the day of or the day before serving for the best texture. If you’re planning a full party menu, an easy appetizer like a Baked Feta Dip with Fig Jam is a great starter.
Q: My chocolate shell didn’t harden. What went wrong?
A: Two likely culprits: 1) Your cake was not cold enough. It needs to be chilled thoroughly. 2) You used the wrong type of oil. Only coconut oil (or cocoa butter) will solidify this way at cold temperatures.
NUTRITIONAL SNAPSHOT
| Nutrient | Amount per Serving (Est.) |
|---|---|
| Calories | 580 kcal |
| Protein | 6g |
| Fat | 35g |
| Net Carbs | 60g |
| Fiber | 3g |
| Sugar | 45g |
Disclaimer: This is an estimate for one of 12 slices. For those planning a full meal before this decadent dessert, consider a balanced main course like these Turkey and Spinach Stuffed Peppers for a satisfying experience.

The Perfect Strawberry Cake with a Chocolate Crackle Shell
This cake delivers on two fronts: a tender, fresh strawberry crumb and the satisfying crack of a hard chocolate shell. It’s a textural masterpiece that looks impressive but is engineered for simplicity.
Ingredients
- 2 ½ cups all-purpose flour
- 2 tsp baking powder
- ½ tsp salt
- ¾ cup unsalted butter, softened (for cake)
- 1 ½ cups granulated sugar
- 3 large eggs
- 2 tsp vanilla extract (for cake)
- 1 cup milk
- 1 ½ cups finely diced fresh strawberries (for cake)
- 1 cup unsalted butter, softened (for buttercream)
- 4 cups powdered sugar
- ½ cup fresh strawberries (for puree, for buttercream)
- ½ tsp vanilla extract (for buttercream)
- 8 oz semi-sweet chocolate chips
- 3 tbsp coconut oil
Instructions
- Preheat oven to 350°F (175°C). Grease and flour two 8-inch round cake pans.
- In a medium bowl, whisk together 2 ½ cups all-purpose flour, 2 tsp baking powder, and ½ tsp salt.
- In a large bowl, use an electric mixer to cream ¾ cup unsalted butter (softened) and 1 ½ cups granulated sugar until light and fluffy. Beat in 3 large eggs, one at a time, followed by 2 tsp of vanilla extract.
- Alternate adding the dry ingredient mixture and 1 cup of milk to the wet ingredients, beginning and ending with the dry. Mix on low speed until just combined—do not overmix.
- Gently fold in 1 ½ cups of finely diced fresh strawberries.
- Divide batter evenly between the prepared pans. Bake for 30-35 minutes, or until a toothpick inserted into the center comes out clean.
- Let cakes cool in the pans for 15 minutes before inverting them onto a wire rack to cool completely.
- Blend ½ cup of fresh strawberries until smooth.
- In a large bowl, beat 1 cup of unsalted butter (softened) until creamy.
- Gradually add 4 cups of powdered sugar, alternating with 3-4 tbsp of the strawberry puree. Add ½ tsp vanilla extract. Beat until the frosting is smooth and spreadable.
- Place one cake layer on your serving plate. Spread a generous layer of frosting on top. Place the second cake layer on top and frost the top and sides of the entire cake with a thin, smooth layer (a crumb coat).
- Refrigerate the cake for at least 60 minutes, or freeze for 30 minutes. The cake must be very cold for the next step.
- In a microwave-safe bowl, combine 8 oz of semi-sweet chocolate chips and 3 tbsp of coconut oil. Microwave in 20-second intervals, stirring in between, until completely smooth.
- Let the chocolate mixture cool for 5-10 minutes. It should be fluid but not hot.
- Retrieve the chilled cake. Working quickly, pour the chocolate shell mixture over the top center of the cake, allowing it to drip down the sides naturally. Use an offset spatula to gently guide it if needed.
- Place the cake back in the refrigerator immediately for 15-20 minutes to allow the shell to harden completely.